- AU TAS UTAS SPARC DX8-12-22
- Sub-item
- 1972
Parte de Donald Davie Papers
BHP "History of Bass Strait" series Nos. 1-12 : reproductions of maps and pictures issued each month with The Australian Financial Review, Jan-Dec. 1972.
423 resultados com objetos digitais Mostrar resultados com objetos digitais
Parte de Donald Davie Papers
BHP "History of Bass Strait" series Nos. 1-12 : reproductions of maps and pictures issued each month with The Australian Financial Review, Jan-Dec. 1972.

Hobart Town, Van Diemen's Land, from Old Wharf in 1839
Parte de Walker Family Papers
Lantern slide of Hobart Town, Van Diemen's Land, from Old Wharf in 1839. From the collection of James Backhouse Walker. Prepared by J.W. Beattie (1859-1930) whose studio locations were in Elizabeth Street, Hobart from 1891-1920, Murray Street from 1921-40 and Cat and Fiddle Arcade, Hobart, until 1994.
John Watt Beattie
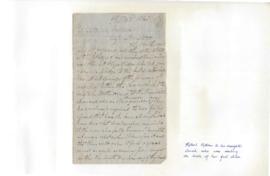
Letters : Ann Mather to her husband Robert Mather
Parte de Walker Family Papers 2007
Three letters dated April 9th 1828, June 19th 1828 & July 15th 1828 from Ann Mather to her husband Robert Mather revealing the care and concern for her children. She lived at Lauderdale supervising the farm workmen, and the children lived in Hobart Town with their father. From Walker Family Scrapbook compiled by Peter Benson Walker. Private collection. Page 20
Robert Mather
Parte de Walker Family Papers
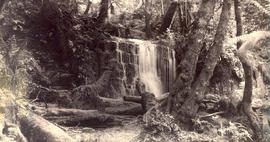
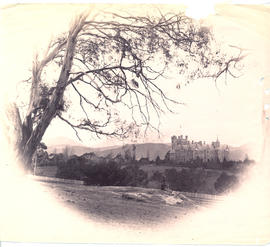
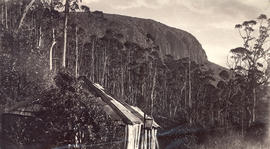
Photographs of Silver Falls, Fern Tree Bower, Mount Wellington c.1874
James Backhouse Walker
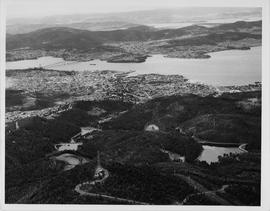
Aerial view of the Ridgeway Reservoir
Parte de Dennison Collection
Aerial view of the Ridgeway Reservoir and Waterworks Reserve looking to Hobart, the Tasman Bridge and beyond to the Eastern Shore, Seven Mile Beach and Dodges Ferry
Parte de Dennison Collection
View of the Hobart harbour looking from Princes Park showing the cargo ships at Elizabeth Street Pier, MTT bus terminal, RH hospital, transport building, City Hall and Tasmanian Museum
Watercolour of Governor's House at Sydney Port Jackson
Parte de Donald Davie Papers
Photograph of watercolour of Governor's House at Sydney Port Jackson, 1791
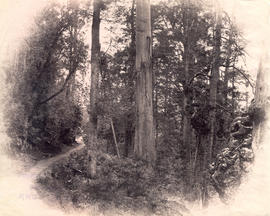
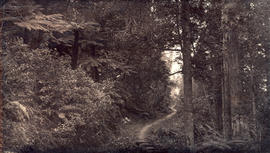
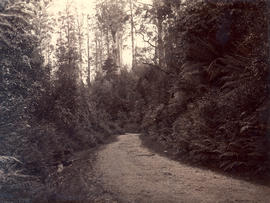
Track to Fern Tree Bower, Mt Wellington
Parte de Walker Family Papers
Photograph of the track to Fern Tree Bower, Mount Wellington before taken prior to 1879 by Anson Brothers who had studios in Liverpool, Collins, and Elizabeth Streets between 1878 and 1891.
James Backhouse Walker
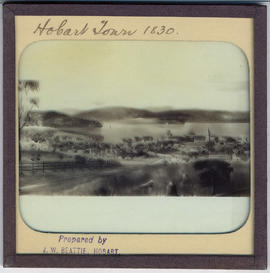
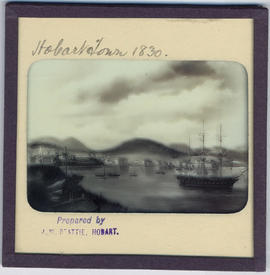
Hobart Town, Van Diemen's Land in 1830
Parte de Walker Family Papers
Lantern slide of early print of Hobart Town, Van Diemen's Land in 1830. From the collection of James Backhouse Walker. Prepared by J.W. Beattie (1859-1930) whose studio locations were in Elizabeth Street, Hobart from 1891-1920, Murray Street from 1921-40 and Cat and Fiddle Arcade, Hobart, until 1994.
John Watt Beattie
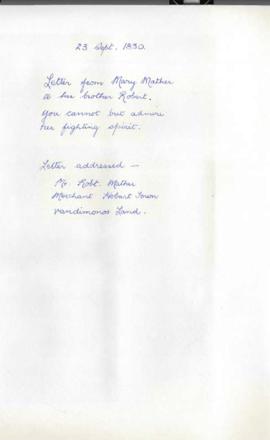
Letter : Mary Mather to her brother Robert
Parte de Walker Family Papers 2007
Letter from Mary Mather in London to her brother Robert in Van Diemen's Land dated 23 September 1830. From Walker Family Scrapbook compiled by Peter Benson Walker. Private collection. Page 20
Robert Mather
Parte de Walker Family Papers
Photograph of the track to Fern Tree Bower, Mount Wellington before taken prior to 1870
James Backhouse Walker
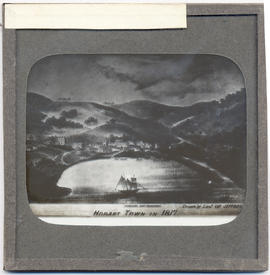
Hobart Town, Van Diemen's Land in 1817
Parte de Walker Family Papers
Lantern slide of Hobart Town, Van Diemen's Land, in February, 1817. Inscribed with the words 'Hobart Town in 1817. Drawn by Lieut. Charles Jeffreys' - also shows the Government schooner the Kangaroo , church, Government House and Fort.
Charles Jeffreys
Advertisement for Facsimile Edition of First Fleet Journal of Lt. Wm. Brady
Parte de Donald Davie Papers
Photograph of advertisement for a facsimile edition of First Fleet Journal of Lt. Wm. Brady. [Lieutenant William Bradley (1757– 1833)?]
"A Voyage to N.S.W." R.N. of H.M.S. "Sirius", 1786-1792.
Letter : Ann Mather to her sons
Parte de Walker Family Papers 2007
Letter from Ann Mather to her sons who were attending James Thompson's school, Hobart on the present site of Pressland House. Reproduced in Appendix A of 'All that we Inherit' by Peter Benson Walker. From Walker Family Scrapbook compiled by Peter Benson Walker. Private collection.. Page 17
Ann Mather
Parte de Dennison Collection
Aerial view of the Hobart harbour showing Salamanca Place, Watermans dock, Parliamentary House , Hydro Building, Elizabeth Street pier, the Marine Board building under construction, Franklin Square and St, David's Park.
Parte de Walker Family Papers
Two photographs of Sunnyside, New Town, Tasmania, home of Thomas Daniel Chapman 1815-1884, Politician. Mt Wellington in distance. The photographer was Henry Hall Baily who had studios in Elizabeth and Liverpool Streets, Hobart from 1865 until 1918.
James Backhouse Walker
Parte de Donald Davie Papers
Photograph of Bishop of Hobarton R W Willson from Allport Library and Museum of Fine Arts
Parte de William & John Clark Family Papers
Parte de Clive Samson Collection
Sixteen photographs taken at times between 1934 and the 1970s. One is of Ruth at Sandy Bay presumably before leaving for England. Later photographs show Ruth on her honeymoon, horse riding (presumably in England) and, later still, at Eaglehawk Neck and Orford. There are several passport photographs and one studio portrait taken in England in 1945.
Clive Sansom
Launceston from beyond Cataract Bridge
Parte de Walker Family Papers
Photograph of Launceston, Tasmania, from beyond the Cataract Bridge in about 1881. The photographer was Alfred Winter who had studios in Bathurst, Elizabeth and Liverpool Streets, Hobart, from 1869 until 1891.
Alfred Winter
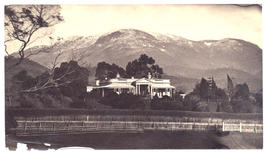
Government House from the Domain
Parte de Walker Family Papers
Vignette photograph of Government House, Hobart, Tasmania taken from the Domain in about 1880. Showing gentleman in a bowler hat sitting on mound.

Letter : Thomas Cotton to son, Francis Cotton
Parte de Cotton Family Papers
Parte de Cotton Family Papers
Copies of dispatches of the Van Diemen's Land Company
Parte de Meston Papers
Copies of dispatches etc. of the Van Diemen's Land Company
Archibald Lawrence Meston
Parte de Meston Papers
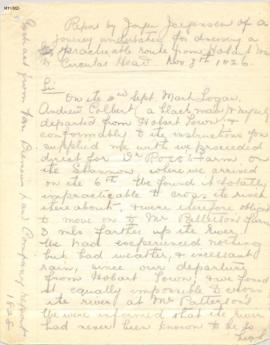
Copies of diaries of Jorgen Jorgensen, including Journey to Ouse Plateau, Repat of Jorgensen to V.D.L. Co. on route between Hobart and Circular Head, and Journal kept while exploring from Circular Head to the Pieman River, 1826-7.
Archibald Lawrence Meston
Cradle Mountain miscellaneous papers
Parte de Meston Papers
Miscellaneous papers re Cradle Mountain comprising correspondence regarding Franz Malcher, translation from Malcher's account of his trip to Tasmania, March 1914, notes on wild animals by G. Weindorfer and copy of his birth certificate, and copy of "Trip to the Summit of Cradle Mountain" by W.O. Weston, published in Examiner, Feb-March 1891 and miscellaneous notes.
Archibald Lawrence Meston
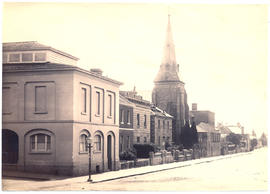
Photograph of the Oddfellows Hall and Congregational Church
Parte de Walker Family Papers
Photograph of Davey Street, Hobart, looking east, showing the Oddfellows hall and the Congregational church. Photograph taken from the Harrington Street intersection.
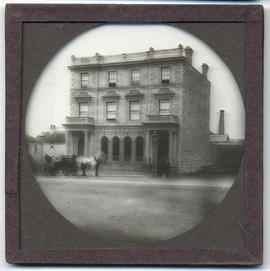
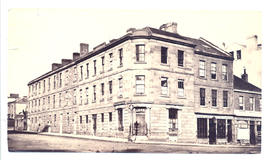
Waterloo House Private Boarding Establishment
Parte de Walker Family Papers
Photograph of Waterloo House Private Boarding Establishment on the corner of Murray and Davey Streets, Hobart c.1893 with an electric tram in the background.
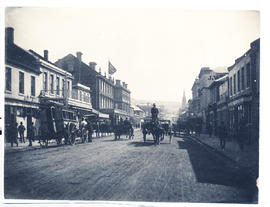
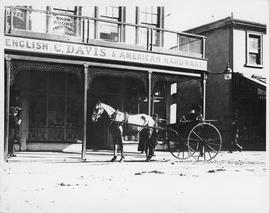
Elizabeth Street outside C. Davis Importer of English and American Hardware
Parte de Walker Family Papers
Photograph of Elizabeth Street looking north, outside C. Davis Importer of English and American Hardware. Showing horse drawn carts and coach.
Alfred Winter
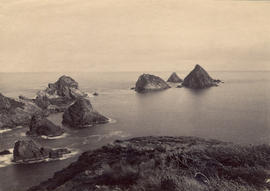
Big Witch from Maatsuyker Island
Parte de Walker Family Papers
Photograph of Big Witch from Maatsuyker Island, taken on the day of the opening of the lighthouse in 1891
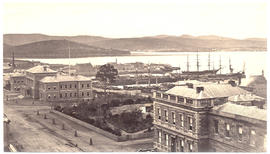
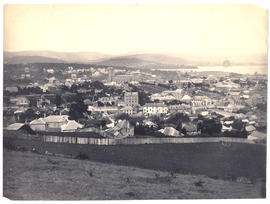
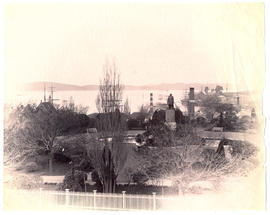
Franklin Square and Hobart waterfront
Parte de Walker Family Papers
Photograph from the collection of James Backhouse Walker of Franklin Square and the Hobart waterfront taken in about 1870 possibly from St. David's Cathedral according to a note on the reverse. The photographer is Henry Hall Baily who had studios in Elizabeth and Liverpool Streets Hobart from 1865 until 1918.
Henry Hall Baily
Parte de Walker Family Papers
Photograph of Sandy Bay Road, with St. Helena , later Wrest Point, on the left.
James Backhouse Walker
Parte de Walker Family Papers
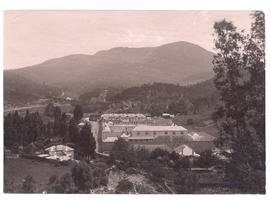
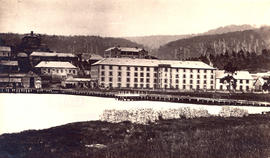
Photograph of the Cascades' Female Factory looking toward Mt Wellington with the Cascade Brewery in the distance. In 1828 a Female Factory opened on the outskirts of Hobart at Cascades. It became the colony's largest Factory, expanding by 1853 into five major courtyards accommodating 1000 women and 175 children. The photographer was J.W. Beattie (1859-1930) whose studios were in Elizabeth and Murray Streets between 1891 and 1940
John Watt Beattie

Sandy Bay campus facing Earl Street
Parte de Lindsay Crawford Collection
Parte de Cotton Family Papers
Parte de Cotton Family Papers
Parte de Clive Samson Collection
Circular letter from David Jenkin of the London Friends Local
Conscription Committee offering advice and assistance to prospective conscientious objectors (30/4/40). Sansom's letter to Edgar Dunstan about a draft statement to the War Tribunal. Letters from Edgar Dunstan (8/6/40 and 12/6/40) suggesting appropriate work both the Sansoms could offer to undertake in lieu of active service. Sansom's letter of26/6/40 proposing to establish a house and property in Kent as a centre for conscientious objectors. A further letter to Capper Johnson containing a similar proposal applying to Bunce Court, Otterden (1/7/40) and Johnson's reply (17/7/40).
Clive Sansom
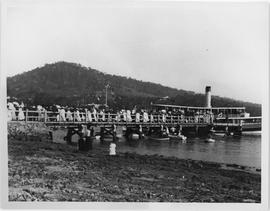
Photograph of Lindisfarne regatta
Parte de Dennison Collection
Photograph of a ferry, people and row boats at Lindisfarne regatta
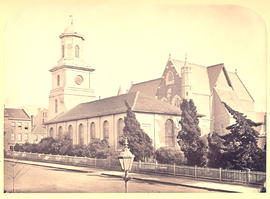
Parte de Walker Family Papers
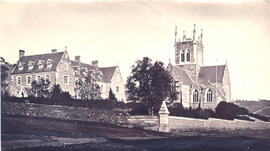
Photograph of old St. David's Cathedral on the corner of Macquarie and Murray Streets, Hobart c. 1870.
John Watt Beattie
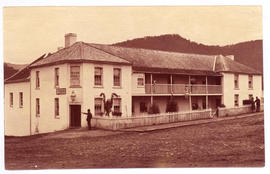
Parte de Walker Family Papers
Photograph of the Bush Hotel, New Norfolk, Tasmania, 1881. Proprietor at the time was Captain Blockey. The photographer was Alfred Winter who had studios in Bathurst, Elizabeth and Liverpool Streets from 1869 until 1891.
Alfred Winter
Parte de Walker Family Papers
Photograph of Port Arthur Penitentiary c. 1880. The photographers are Anson Brothers., Portrait and Landscape Photographers, Hobart Town whose firm was located in Liverpool, Collins and Elizabeth Streets between 1878 and 1891
Anson Brothers
Copies of letters from Clive Sansom
Parte de Clive Samson Collection
Copies of letters from Clive Sansom to:
• A.G. Prys-Jones of Aberystwyth Press (3/9/49)
• The News Chronicle about speech education (27/9/48) and supporting the building of a replica of the Globe Theatre (25/1/49)
• The Spectator about poetry (2/9/49)
• The Times Literary Supplement about the Arts Council's support for poetry (22/1/49), choral speaking (26/3/29), Gerard Manly Hopkins (20/5/49), and the broadcasting of poetry (1/12/50)
• The Observer about the publishing of poetry (7 /8/4?)
• John O' London's Weekly about the use of the word 'pretty' (21/1/49)
• The Listener about Eliot's Murder in the Cathedral (31/3/49)
• The Friend about the concept of vocation in work (28/5/48) and the meaning of Divine Guidance (22/10/48)
• The Sunday Times about book publishing (7/11/48)
• Muriel Spark about adjudicating and an article on T.S. Eliot (21/2/48)
• Mr Foules about a verse-speaking syllabus (5/3/49)
• Ruth Sansom on personal matters (at least five letters undated and apparently written before the Sansoms married)
• To unidentified correspondents about changing patterns in pronunciation, Quakerism, and Murder in the Cathedral (all undated)
Clive Sansom
Parte de Meston Papers
Draft of a letter by A.L. Meston on aborigines and the naming of V.D.L. undated
Archibald Lawrence Meston
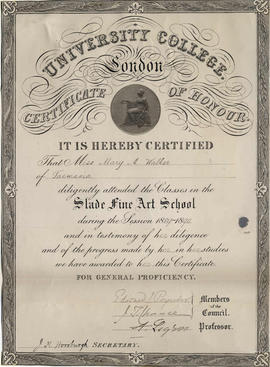
Mary Augusta Walker : certificate from the Slade Fine Art School, University College London
Parte de Walker Family Papers 2007
Mary Augusta Walker's certificate from the Slade Fine Art School, University College London, where she studied from 1889-1890. From Walker Family Scrapbook compiled by Peter Benson Walker. Private collection. Page 45
Mary Augusta Walker
Character of George Cotton by John Mitchell
Parte de Cotton Family Papers
Letter Francis to Thomas Cotton
Parte de Cotton Family Papers
Parte de Marshall and Terry Family Papers
Parte de Donald Davie Papers
Photograph of Sir John Franklin from Allport Library and Museum of Fine Arts
Parte de Walker Family Papers
Photograph of St. Mary's Cathedral in Harrington Street in about 1870. Henry Hall Baily is the photographer. He had studios in Elizabeth and Liverpool Streets Hobart from 1865 until 1918.
Henry Hall Baily
Parte de Walker Family Papers
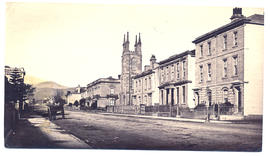
Photograph of Macquarie Street Hobart including St. Joseph's Catholic Church c. 1870. The view is looking west. The photographer was Henry Hall Baily who had studios in Elizabeth and Liverpool Streets Hobart from 1865 until 1918.
Henry Hall Baily

Parte de Walker Family Papers
Photograph of Liverpool Street Hobart at the intersection of Argyle Street looking towards West Hobart, taken around the turn of the century showing Cherry's Carlton Club Hotel in the foreground. Also J. Whiteside & Son Furnishing Warehouse and Canes Iron mongers. The date is assumed from the presence of electric power poles which were introduced in 1898.
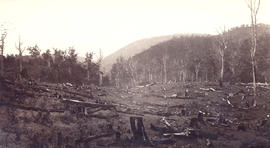
Dead trees on the side of Huon Road
Parte de Walker Family Papers
Photograph of dead trees on the side of Huon Road, Hobart, Tasmania, c 1870.
James Backhouse Walker

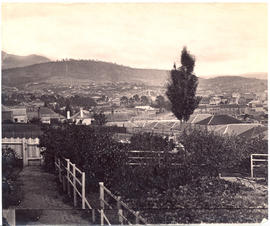
Hobart waterfront from the Queen's Domain
Parte de Walker Family Papers
Photograph of the Hobart waterfront from the old quarry on the Queen's Domain taken in the 1870s before the railway.

Parte de Walker Family Papers
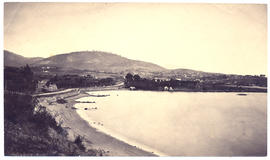
Photograph of Kangaroo Point (Bellerive) Beach on Hobart's Eastern Shore looking toward settlement c. 1882. The photographer was Henry Hall Baily who had studios in Elizabeth and Liverpool Streets, Hobart from 1865 until 1918.
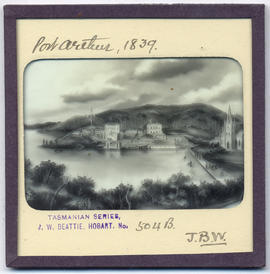
Parte de Walker Family Papers
Lantern slide of Port Arthur 1839. Prepared by J.W. Beattie (1859-1930) whose studio locations were Elizabeth Street, Hobart from 1891-1920, Murray Street from 1921-40 and Cat and Fiddle until 1994.
John Watt Beattie
Parte de Cotton Family Papers
Letter Francis to Anna Maria Cotton, 25th Dec 1867
Parte de Cotton Family Papers
Parte de Cotton Family Papers
Letter from Francis Cotton written to Rachel Cotton dated 29 June 1868, while visiting South Australia, Victoria, and New South Wales
Parte de Cotton Family Papers
Parte de Cotton Family Papers
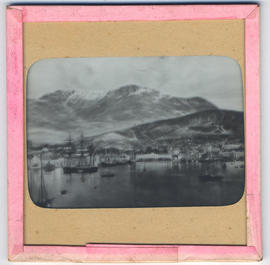
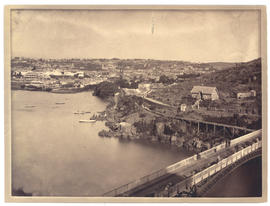
Hobart Town, Van Diemen's Land from the Harbour
Parte de Walker Family Papers
Lantern slide of an early print of Hobart Town, Van Diemen's Land from the harbour. From the collection of James Backhouse Walker. Thought to have been prepared by J.W. Beattie (1859-1930) whose studio locations were in Elizabeth Street, Hobart from 1891-1920, Murray Street from 1921-40 and Cat and Fiddle Arcade, Hobart, until 1994.
John Watt Beattie
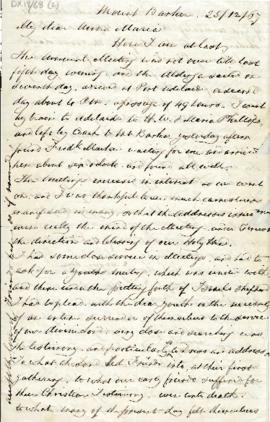
Letter and memorial on the death of Ann Mather
Parte de Walker Family Papers 2007
Letter and memorial on the death of Ann Mather by her daughter Sarah Benson Mather, Van Diemen's Land, 1831. From Walker Family Scrapbook compiled by Peter Benson Walker. Private collection. Page 21
Ann Mather
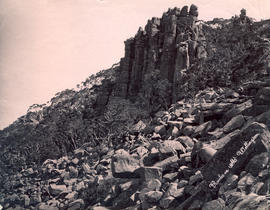
Parte de Walker Family Papers
Photograph rocks on Mount Wellington. The photographer was Albert Sargeant who had studios in Macquarie Street, Hobart and George Street, Launceston between 1886 and 1913.
Albert Sargeant
Rossbank Observatory, Hobarton, 1840
Parte de Donald Davie Papers
Christmas card issued by the Hobart Bureau of Meterology in 1966 of the Rossbank Observatory, Hobarton,1840.
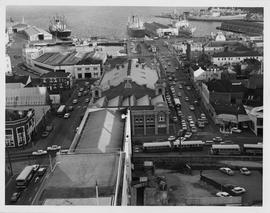
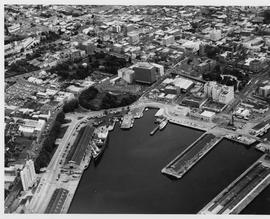
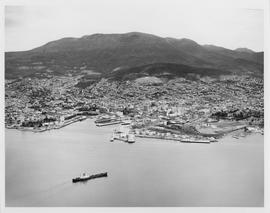
Aerial view of City Hall and port
Parte de Dennison Collection
Aerial view of City Hall, Museum and Art Gallery and the port of Hobart, Constitution and Victoria Docks and wharfs
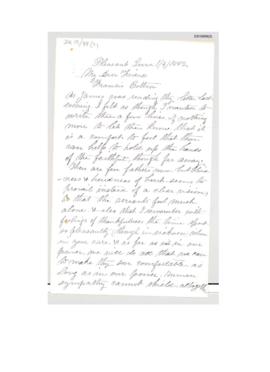
Letter : Robert Mather to his daughter Sarah Benson Walker
Parte de Walker Family Papers 2007
Letter from Robert Mather to his daughter Sarah Benson Walker who was waiting for the birth of her first child. From Walker Family Scrapbook compiled by Peter Benson Walker. Private collection. Page 14
Robert Mather
Historic Port Arthur Tasmania : postcard sketches
Parte de Donald Davie Papers
Seven postcard sketches - Historic Port Arthur Tasmania. (NuColorvue Productions Pty.Ltd. Mulgrave Vic).
Aerial view of of the port of Hobart
Parte de Dennison Collection
Aerial view of of the port of Hobart showing Macquarie Point, the wharf area and Mount Wellington in the background
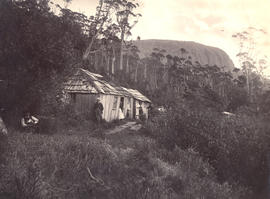
Side view of Woods Hut, Mt Wellington
Parte de Walker Family Papers
Photograph of side view of Woods Hut, Mt Wellington. Organ pipes in distance
James Backhouse Walker
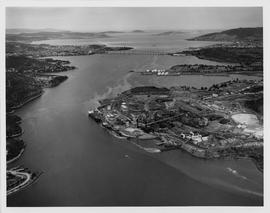
Parte de Dennison Collection
Aerial view of the Zinc Works at Derwent Park. Looking down the Derwent River toward the Tasman Bridge. Showing Self's Point and Cornelian Bay Cemetery
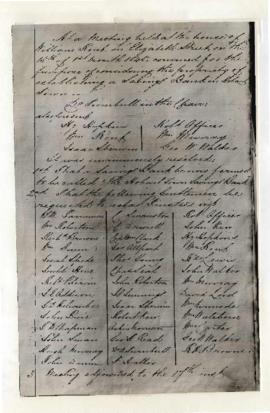
Establishment of the Hobart Town Savings Bank
Parte de Walker Family Papers 2007
Meeting held on 15th January 1845 to establish a savings bank in Hobart Town, Van Diemen's Land. It was unanimously resolved that it be called " The Hobart Town Savings Bank" Includes a list of trustees. From Walker Family Scrapbook compiled by Peter Benson Walker. Private collection. Page 26a
George Washington Walker
Parte de Donald Davie Papers
Miscellaneous photographs - 19 negatives ,13 in MSS, 2 standing portraits 'Postcard' set., 11 views of Entally House internal and external x 2.
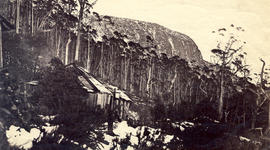
Men standing outside Woods Huts, Mt Wellington
Parte de Walker Family Papers
Photograph of men standing outside Woods Huts, Mt Wellington, Organ pipes in distance
James Backhouse Walker
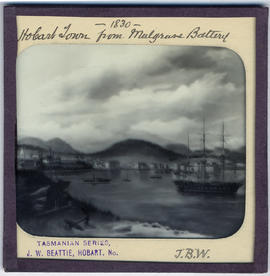
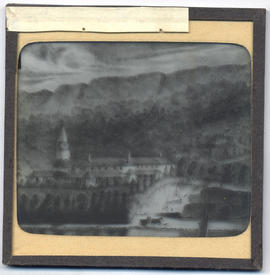
Hobart Town from Mulgrave Battery, Van Diemen's Land
Parte de Walker Family Papers
Lantern slide of Hobart Town from Mulgrave Battery, Van Diemen's Land, in 1830. From the collection of James Backhouse Walker. Prepared by J.W. Beattie (1859-1930) whose studio locations were in Elizabeth Street, Hobart from 1891-1920, Murray Street from 1921-40 and Cat and Fiddle Arcade, Hobart, until 1994.
John Watt Beattie
Young couple with baby : photograph
Parte de Donald Davie Papers
Photograph of young couple with baby (contemporary)
Woods Huts, Mt Wellington in the snow
Parte de Walker Family Papers
Photograph of Woods Huts, Mt Wellington in the snow. Organ pipes in distance
James Backhouse Walker
Hobart Town Harbour, Van Diemen's Land
Parte de Walker Family Papers
Lantern slide of Hobart Town Harbour, Van Diemen's Land, in 1830. Prepared by J.W. Beattie (1859-1930) whose studio locations were in Elizabeth Street, Hobart from 1891-1920, Murray Street from 1921-40 and Cat and Fiddle Arcade, Hobart, until 1994.
John Watt Beattie
Phrenology report of Robert Walker
Parte de Walker Family Papers 2007
Character sketch of Robert Walker by A.S. Hamilton, phrenologist, 1855. From Walker Family Scrapbook compiled by Peter Benson Walker. Private collection. Page 36a
Robert Walker
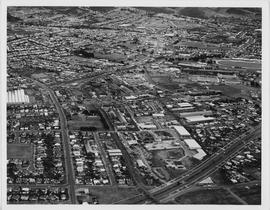
Aerial view of Brooker Highway
Parte de Dennison Collection
Aerial view of Brooker Highway, Hobart looking toward the show grounds and Derwent Park
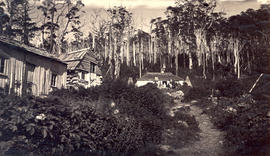
Group at Woods Huts, Mt Wellington
Parte de Walker Family Papers
Photograph of a group of people outside of Woods Hut, Mt Wellington.
James Backhouse Walker
Parte de Walker Family Papers
Lantern slide of Hobart Savings Bank, Murray Street Hobart c1860. Prepared by J.W. Beattie (1859-1930) whose studio locations were Elizabeth Street, Hobart from 1891-1920, Murray Street from 1921-40 and Cat and Fiddle until 1994.
John Watt Beattie
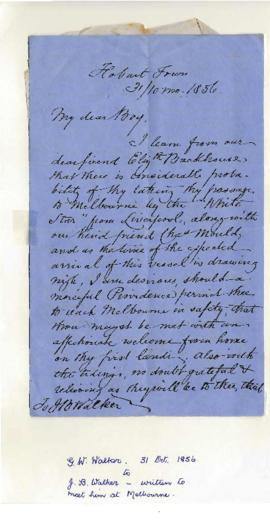
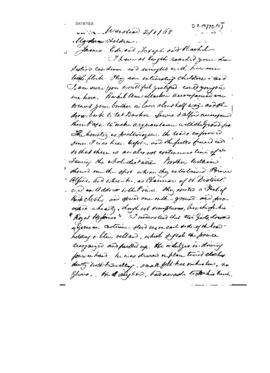
Letter from George Washington Walker to James Backhouse Walker
Parte de Walker Family Papers 2007
Letter from George Washington Walker in Hobart to his son James Backhouse Walker, expressing his desire to meet him in Melbourne on his return from England after attending school there. From Walker Family Scrapbook compiled by Peter Benson Walker. Private collection. Page 36a
George Washington Walker
Parte de Donald Davie Papers
Photograph of young girl (contemporary) in two poses
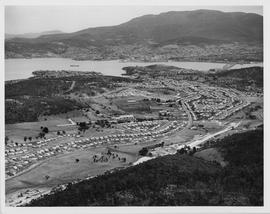
Aerial view of Mornington and Warrane
Parte de Dennison Collection
Aerial photograph of Mornington and Warrane c. 1970 looking toward the Tasman Bridge and Hobart
Parte de Walker Family Papers
Photograph from the collection of James Backhouse Walker of a view of Hobart from West Hobart looking east toward the river, showing Holy Trinity Church. The photographer is Henry Hall Baily who had studios in Elizabeth and Liverpool Streets Hobart from 1865 until 1918..
James Backhouse Walker
Man with a gun on the road to Mt Wellington
Parte de Walker Family Papers
Photograph of road to Mt Wellington showing man with a gun hunting. Taken in about 1870 by Alfred Winter, who had studios in Bathurst, Elizabeth and Liverpool Streets from 1869 until 1891.
James Backhouse Walker
Beautiful Hobart and Surroundings
Parte de Donald Davie Papers
Souvenir booklet entitled 'Beautiful Hobart and surroundings. 81 views by J.C. Breaden'. It contains a series of black and white photographs of Hobart and places nearby

Parte de Walker Family Papers
Photograph of Sir John Franklin's statue in the fountain, Franklin Square, Hobart.
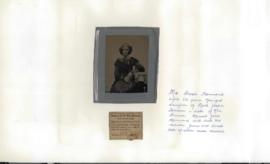
Photograph of Mrs. Sarah Hammond
Parte de Walker Family Papers 2007
Photograph of Mrs. Sarah Hammond, youngest daughter of the Reverend Joseph Benson and sister of Ann Benson, aged 62.
From Walker Family Scrapbook compiled by Peter Benson Walker. Private collection. Page 10
Sarah Hammond
Photograph of carriage outside C Davis store
Parte de Dennison Collection
Photograph of man and woman in a carriage outside Charles Davis store. Importer of English and American goods.
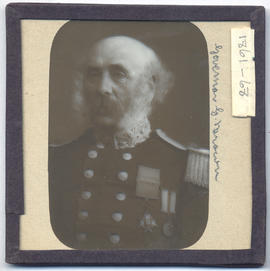
Governor Sir Thomas Gore Browne
Parte de Walker Family Papers
Lantern slide of Governor Sir Thomas Gore Browne. Governor of Tasmania from 1861-1868. Prepared by J.W. Beattie (1859-1930) whose studio locations were Elizabeth Street, Hobart from 1891-1920, Murray Street from 1921-40 and Cat and Fiddle until 1994.
John Watt Beattie
Government House and St David's Cathedral, Van Diemen's Land
Parte de Walker Family Papers
Lantern slide of Government House and St David's Cathedral, Van Diemen's Land. Prepared by J.W. Beattie (1859-1930) whose studio locations were Elizabeth Street, Hobart from 1891-1920, Murray Street from 1921-40 and Cat and Fiddle until 1994. Lantern slide of detail from 'The Seat of His Excellency Lieut. Govr. Arthur / drawn from Nature and on Stone' by Charles Atkinson d.1837
John Watt Beattie
Buildings on the corner of Macquarie and Murray Streets
Parte de Walker Family Papers
Photograph of buildings on corner of Macquarie and Murray Streets, Hobart c. 1877. Photographed by Henry Hall Baily who had studios in Elizabeth and Liverpool Streets, Hobart from 1865 until 1918.
Henry Hall Baily
Parte de Walker Family Papers
Photograph of Franklin Square Hobart was taken by the Anson Brothers photographers, whose firm was located in Liverpool, Collins and Elizabeth Streets between 1878 and 1891.
Anson Brothers
Parte de Donald Davie Papers
Eight portrait photographs - Unknown - Hull, Denison? all males . 4 from Allport Library & 2 from Don Stephens Lindisfarnes (Repro)
Hobart from a garden behind Salamanca Place
Parte de Walker Family Papers
Photograph from the collection of James Backhouse Walker of a view of Hobart from a garden behind Salamanca Place.
James Backhouse Walker
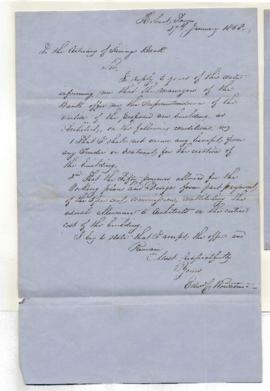
Letter from architect Edward Rowntree to George Washington Walker
Parte de Walker Family Papers 2007
Letter from architect Edward Rowntree to George Washington Walker regarding the new Savings Bank building. From Walker Family Scrapbook compiled by Peter Benson Walker. Private collection. Page 27
George Washington Walker