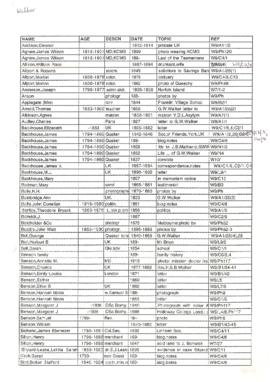
Lantern slide of funeral notice of Lieutenant Governor David Collins, 1810. From The Derwent Star, and Van Diemen’s Land Intelligencer no. 7, Tuesday April 3rd 1810. Prepared by J.W. Beattie (1859-1930) whose studio locations were Elizabeth Street, Hobart from 1891-1920, Murray Street from 1921-40 and Cat and Fiddle until 1994.
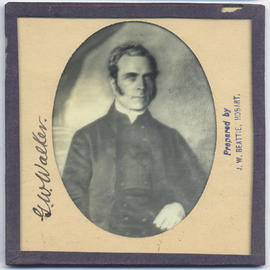
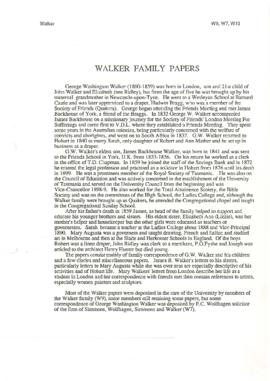
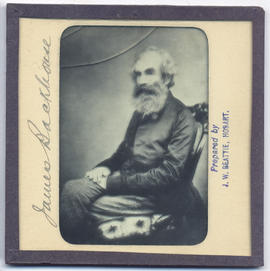
Lantern slide of George Washington Walker (1800-1859). Prepared by J.W. Beattie (1859-1930) whose studio locations were Elizabeth Street, Hobart from 1891-1920, Murray Street from 1921-40 and Cat and Fiddle until 1994.
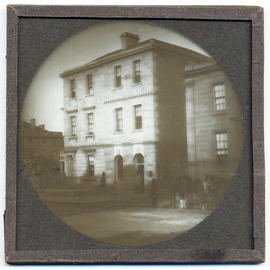
Portrait photograph of Government House, Hobart, Tasmania. The photographer was Henry Hall Baily who had studios in Elizabeth and Liverpool Streets, Hobart from 1865 until 1918
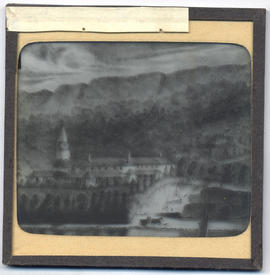
Lantern slide of Government House and St David's Cathedral, Van Diemen's Land. Prepared by J.W. Beattie (1859-1930) whose studio locations were Elizabeth Street, Hobart from 1891-1920, Murray Street from 1921-40 and Cat and Fiddle until 1994. Lantern slide of detail from 'The Seat of His Excellency Lieut. Govr. Arthur / drawn from Nature and on Stone' by Charles Atkinson d.1837
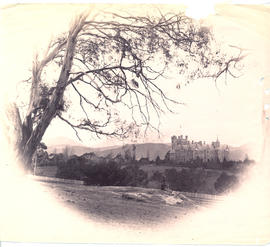
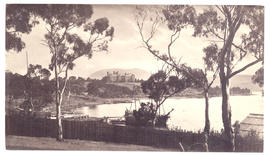
Photograph of Government House Hobart taken from the bay below the Queen's Domain, c.1890s. The photographer was Henry Hall Baily who had studios in Elizabeth and Liverpool Streets, Hobart from 1865 until 1918.
Photograph of Government House, Hobart taken from the Queen's Domain, c. 1890s. A note on the reverse says 'after railway'. The photographer was Henry Hall Baily who had studios in Elizabeth and Liverpool Streets, Hobart from 1865 until 1918.
Photograph of Government House, Hobart, Tasmania in about 1870. Showing the shipyard in the foreground and Mount Direction behind.. The photographer was Henry Hall Baily who had studios in Elizabeth and Liverpool Streets, Hobart from 1865 until 1918.
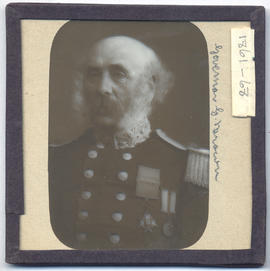
Lantern slide of Governor Sir Thomas Gore Browne. Governor of Tasmania from 1861-1868. Prepared by J.W. Beattie (1859-1930) whose studio locations were Elizabeth Street, Hobart from 1891-1920, Murray Street from 1921-40 and Cat and Fiddle until 1994.
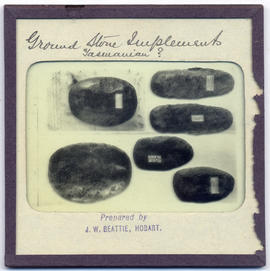
Lantern slide of ground stone aboriginal implements. Prepared by J.W. Beattie (1859-1930) whose studio locations were Elizabeth Street, Hobart from 1891-1920, Murray Street from 1921-40 and Cat and Fiddle until 1994.
Various photographs of Harrington Street - St. Marys Cathedral, Wilmot Terrace; Pressland House (formerly J P Cowles School); Goulburn St. ; St John the Baptist Church. Photographs by Winter Baily and Anson Bros.
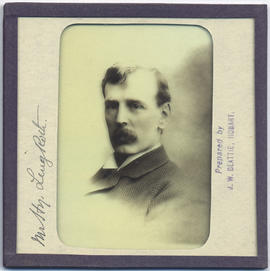
Lantern slide photograph of Henry Ling Roth. Prepared by J.W. Beattie (1859-1930) whose studio locations were Elizabeth Street, Hobart from 1891-1920, Murray Street from 1921-40 and Cat and Fiddle until 1994.
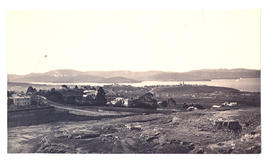
Photograph from the collection of James Backhouse Walker of a view of Hobart from Huon Road looking east in about 1879, according to notes on the reverse.
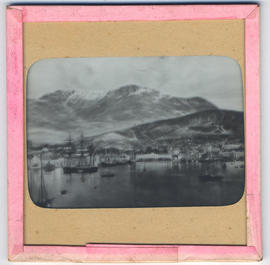
Photograph of Hobart harbor and mountain (snow topped) from river, showing sailing ships, steam ferries. Glossy print, on "cabinet" mount, T. Crawford, Hobart.
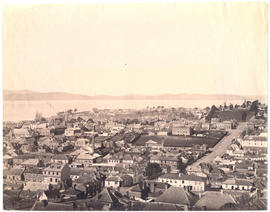
Photograph from the collection of James Backhouse Walker of a view of Hobart from the top of Murray St in about 1876 according to notes on the reverse. The photographer is Henry Hall Baily who had studios in Elizabeth and Liverpool Streets Hobart from 1865 until 1918.
Photograph from the collection of James Backhouse Walker of a view of Hobart from West Hobart looking east toward the river, showing Holy Trinity Church. The photographer is Henry Hall Baily who had studios in Elizabeth and Liverpool Streets Hobart from 1865 until 1918..
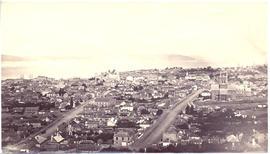
Photograph from the collection of James Backhouse Walker of a view of Hobart looking South East with a garden in the foreground and Elizabeth Street in the middle distance. The photographer is Alfred Winter who had studios in Bathurst, Elizabeth and Liverpool Streets from 1874-1880.
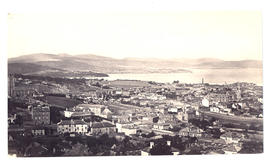
Photograph of Hobart from the Queen's Domain with the railway station in the foreground, c. 1881. The photographers were Anson Brothers who had studios in Liverpool, Collins and Elizabeth Streets between 1878 and 1891.
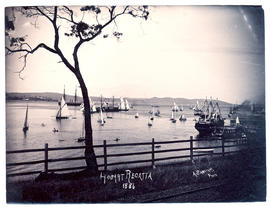
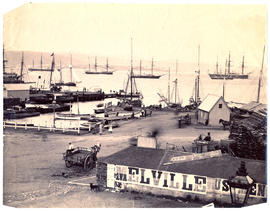
Photograph of the Hobart Regatta taken in 1886. The photographer was Albert Sargeant who had studios in Macquarie Street, Hobart from 1886-1890 and George Street, Launceston from 1900-1913
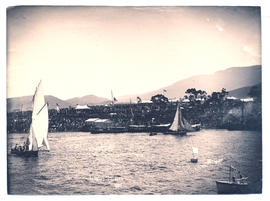
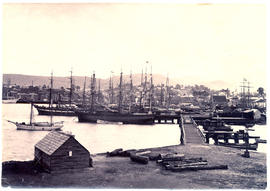
Photograph of the Hobart Regatta grandstand taken from the water in 1886. The photographer was Albert Sargeant who had studios in Macquarie Street, Hobart, Tasmania from 1886-1890 and George Street, Launceston, Tasmania from 1900-1913.
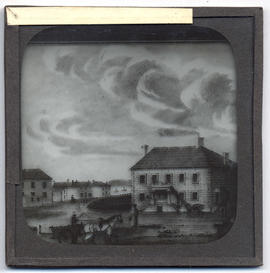
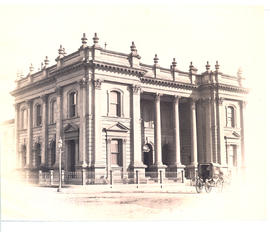
Lantern slide of Hobart Savings Bank, Murray Street Hobart c1860. Prepared by J.W. Beattie (1859-1930) whose studio locations were Elizabeth Street, Hobart from 1891-1920, Murray Street from 1921-40 and Cat and Fiddle until 1994.
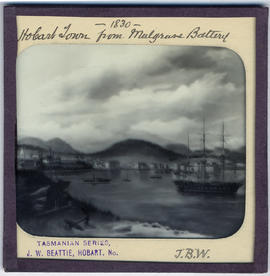
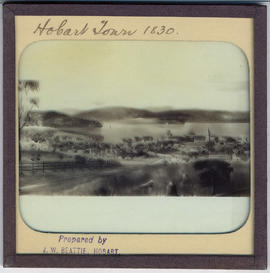
Lantern slide of Hobart Town from Mulgrave Battery, Van Diemen's Land, in 1830. From the collection of James Backhouse Walker. Prepared by J.W. Beattie (1859-1930) whose studio locations were in Elizabeth Street, Hobart from 1891-1920, Murray Street from 1921-40 and Cat and Fiddle Arcade, Hobart, until 1994.
Photograph of Hobart Town, Tasmania, from the Queen's Domain, looking down Macquarie Street in the 1850s. This photograph appears on page 27 of Allan Sierp's 'Colonial Life in Tasmania: Fifty Years of Photography 1855-1905' (Rigby, 1976)
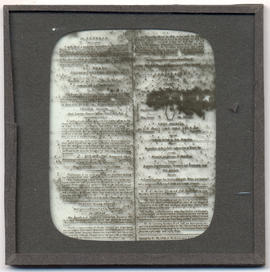
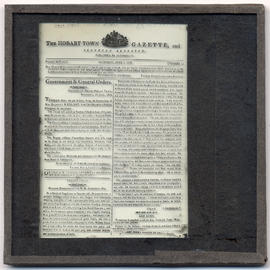
Lantern slide of front page of the Hobart Town Gazette, June 1816. Prepared by J.W. Beattie (1859-1930) whose studio locations were Elizabeth Street, Hobart from 1891-1920, Murray Street from 1921-40 and Cat and Fiddle until 1994.
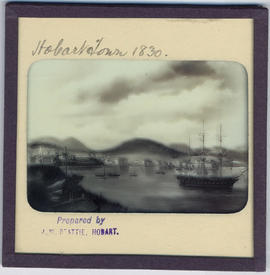
Lantern slide of Hobart Town Harbour, Van Diemen's Land, in 1830. Prepared by J.W. Beattie (1859-1930) whose studio locations were in Elizabeth Street, Hobart from 1891-1920, Murray Street from 1921-40 and Cat and Fiddle Arcade, Hobart, until 1994.
Lantern slide of an early print of Hobart Town, Van Diemen's Land from the harbour. From the collection of James Backhouse Walker. Thought to have been prepared by J.W. Beattie (1859-1930) whose studio locations were in Elizabeth Street, Hobart from 1891-1920, Murray Street from 1921-40 and Cat and Fiddle Arcade, Hobart, until 1994.
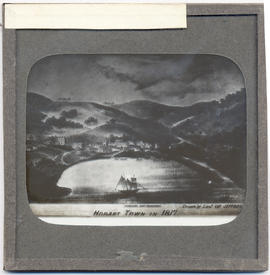
Lantern slide of Hobart Town, Van Diemen's Land, in February, 1817. Inscribed with the words 'Hobart Town in 1817. Drawn by Lieut. Charles Jeffreys' - also shows the Government schooner the Kangaroo , church, Government House and Fort.
Lantern slide of early print of Hobart Town, Van Diemen's Land in 1830. From the collection of James Backhouse Walker. Prepared by J.W. Beattie (1859-1930) whose studio locations were in Elizabeth Street, Hobart from 1891-1920, Murray Street from 1921-40 and Cat and Fiddle Arcade, Hobart, until 1994.
Lantern slide of Hobart Town, Van Diemen's Land, from Old Wharf in 1839. From the collection of James Backhouse Walker. Prepared by J.W. Beattie (1859-1930) whose studio locations were in Elizabeth Street, Hobart from 1891-1920, Murray Street from 1921-40 and Cat and Fiddle Arcade, Hobart, until 1994.
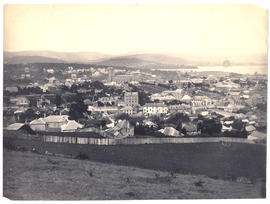
Photograph from the collection of James Backhouse Walker of Hobart viewing over St. Davids Park, probably from Hampden Road, (in about 1878 according to a note on the reverse). The photographer is Henry Hall Baily who had studios in Elizabeth and Liverpool Streets Hobart from 1865 until 1918.
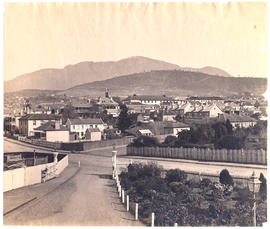
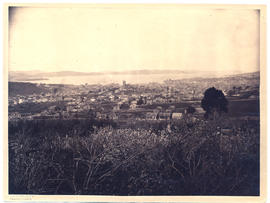
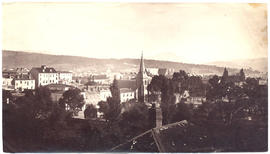
Photograph from the collection of James Backhouse Walker of an elevated view of Hobart looking east taken near Browne Street, (about 1876, according to a note on the reverse). Warwick Street in the foreground. Photographed by Henry Hall Baily who had studios in Elizabeth and Liverpool Streets, Hobart from 1865 until 1918.
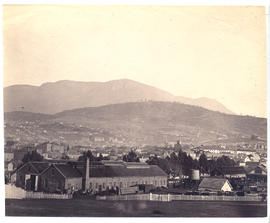
Photograph from the collection of James Backhouse Walker of a view of Hobart, looking towards St. George's Hill, Battery Point. Showing St Georges Church and James Luckman's windmill probably taken in the 1870s.
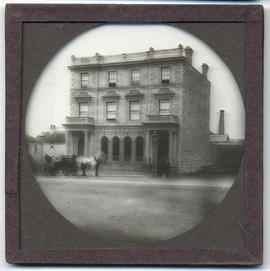
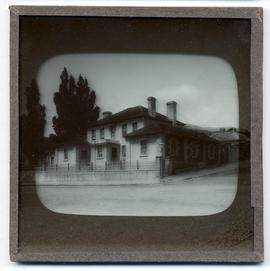
Lantern slide of house in Hobart. Prepared by J.W. Beattie (1859-1930) whose studio locations were Elizabeth Street, Hobart from 1891-1920, Murray Street from 1921-40 and Cat and Fiddle until 1994.
Photograph of unidentified house with pillared verandah and shrubbery, paling fence, other houses beyond (? Hobart). A man, woman and child faintly visible on verandah.
Lantern slide of house in Hunter Street, Hobart. Prepared by J.W. Beattie (1859-1930) whose studio locations were Elizabeth Street, Hobart from 1891-1920, Murray Street from 1921-40 and Cat and Fiddle until 1994.
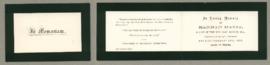
Folded memorial card with black margins. In loving memory of Hannah Maria, widow of the rev. Samuel Benson M.A. Chaplin of St. Saviour’s Southwark who died February 18th, 1882 aged 73 years. Interred at Norwood Cemetery, grave number 18495
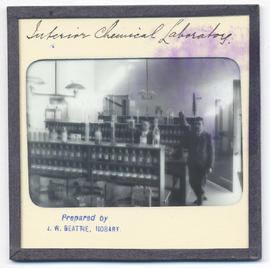
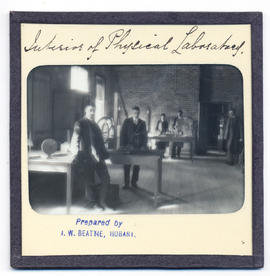
Lantern slides of the University of Tasmania, Queen's Domain, Hobart. Views of exterior and laboratories and library. Prepared by J.W. Beattie (1859-1930) whose studio locations were Elizabeth Street, Hobart from 1891-1920, Murray Street from 1921-40 and Cat and Fiddle until 1994 (Collection Pr.S.Uni/1-8)
Lantern slides of the University of Tasmania, Queen's Domain, Hobart. Views of exterior and laboratories and library. Prepared by J.W. Beattie (1859-1930) whose studio locations were Elizabeth Street, Hobart from 1891-1920, Murray Street from 1921-40 and Cat and Fiddle until 1994 (Collection Pr.S.Uni/1-8)
Lantern slide of J. Walch and Sons, Macquarie Street, Hobart c1880. Prepared by J.W. Beattie (1859-1930) whose studio locations were Elizabeth Street, Hobart from 1891-1920, Murray Street from 1921-40 and Cat and Fiddle until 1994.
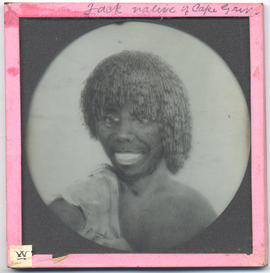
Lantern slide of Jack, native of Cape Grim. Prepared by J.W. Beattie (1859-1930) whose studio locations were Elizabeth Street, Hobart from 1891-1920, Murray Street from 1921-40 and Cat and Fiddle until 1994.
Lantern slide of James Backhouse. Prepared by J.W. Beattie (1859-1930) whose studio locations were Elizabeth Street, Hobart from 1891-1920, Murray Street from 1921-40 and Cat and Fiddle until 1994.
Photograph of Joan and Ursula Walker, daughters of John Ridley Walker (1847-1915) and Adah Caroline Giblin. Ursula seated at garden table, Joan standing behind, with cat.
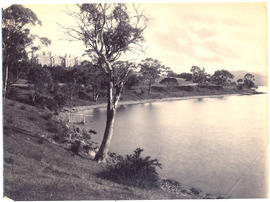
Photograph of Kangaroo Bay (Bellerive) on Hobart's Eastern Shore from hill showing wharf and houses c. 1882. The photographer was Henry Hall Baily who had studios in Elizabeth and Liverpool Streets, Hobart from 1865 until 1918.
Photograph of Kangaroo Point (Bellerive) Beach on Hobart's Eastern Shore looking toward settlement c. 1882. The photographer was Henry Hall Baily who had studios in Elizabeth and Liverpool Streets, Hobart from 1865 until 1918.
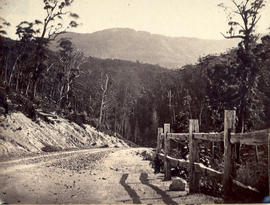
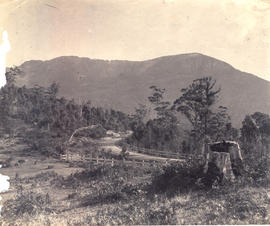
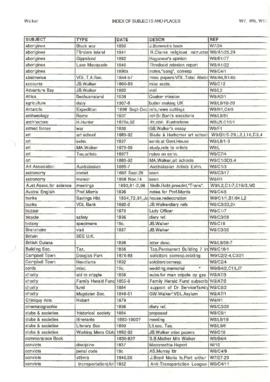
Photographs of Lake St. Clair at the southern end of the Cradle Mountain-Lake St Clair National Park. Is part of the Tasmanian Wilderness World Heritage Area. The Cradle Mountain-Lake St Clair area was declared a scenic reserve in 1922, a wildlife reserve in 1927, a national park in 1947 and a world heritage area from 1982.
Photograph of Launceston, Tasmania, from beyond the Cataract Bridge in about 1881. The photographer was Alfred Winter who had studios in Bathurst, Elizabeth and Liverpool Streets, Hobart, from 1869 until 1891.
Photograph of Launceston from Windmill Hill looking north taken in c1881. The photographer was Alfred Winter who had studios in Bathurst, Elizabeth and Liverpool Streets from 1869 until 1891.
Photograph of the Town Hall in Launceston, Tasmania. The photographers were Anson Brothers who had studios in Liverpool, Collins and Elizabeth Streets, Hobart, between 1878 and 1891.
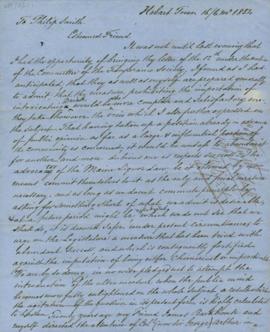
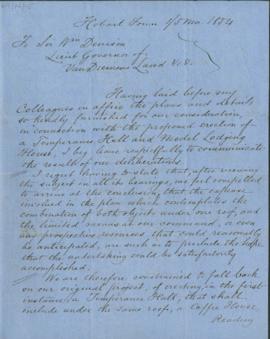
Copy of a letter signed G.W. Walker and statement of account respecting the Temperance Halls and transfer to the V.D.L. Total Abstinence Society for the building fund
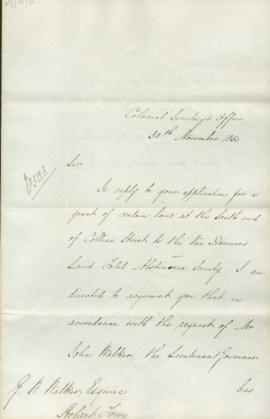
Letter dated 30th November 1850 from the Colonial Secretary's office signed by James Ebenezer Bicheno regarding a grant of land at the south end of Collins Street Hobart to the Total Abstinence Society.
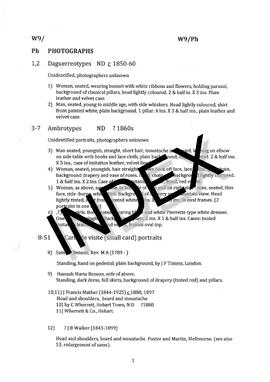
Ambrotypes in cases of little girls. Both seated, wearing black and white Pierrette type white dresses. One child has ringlets. Cases: tooled imitation leather, lined red velvet, frames oval top.
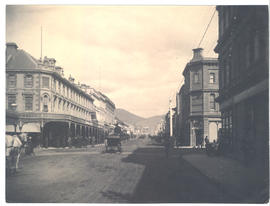
Photograph of Liverpool Street Hobart at the intersection of Elizabeth Street. Show gas lighting taken about 1870. The photographer is Alfred Winter who had studios in Bathurst, Elizabeth and Liverpool Streets from 1869 until 1891.
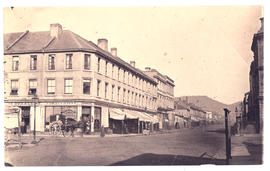
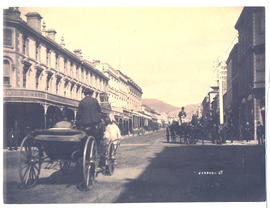
Photograph of Liverpool Street Hobart taken from just before the Elizabeth Street intersection around the turn of the century with horse drawn carriages in the foreground. The date is assumed from the presence of electric power poles which were introduced in 1898.
Photograph of Liverpool Street Hobart taken around the turn of the century showing horse drawn carriages in the foreground. The date is assumed from the presence of electric power poles which were introduced in 1898.
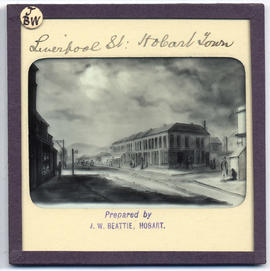
Lantern slide of Liverpool Street, Hobart. Prepared by J.W. Beattie (1859-1930) whose studio locations were Elizabeth Street, Hobart from 1891-1920, Murray Street from 1921-40 and Cat and Fiddle until 1994.
Photographs of Maatsuyker Island located 5.5 kilometres off the south coast of Tasmania. The island comprises part of the Southwest National Park and is a Tasmanian Wilderness World Heritage Site. The Maatsuyker Island Lighthouse, the southernmost Australian lighthouse, is located on the southern tip of the island
Various photographs of Macquarie Street, looking north taken c1877-1893-4. Photographed by Beattie (electric tram car), Winter, Anson Bros, and H H Baily