Showing 1142 results

Archival description
Private Deposit Collection : University of Tasmania Library Special and Rare Collections Image With digital objects
Print preview View:

Port Arthur church and Penitentiary

Photograph of Port Arthur church and Penitentiary with view of Mt. Arthur in the distance. The photographers were Anson Brothers., Portrait and Landscape Photographers, Hobart Town whose firm was located in Liverpool, Collins and Elizabeth Streets between 1878 and 1891.

Anson Brothers

Port Arthur Penitentiary

Photograph of Port Arthur Penitentiary c. 1880. The photographers are Anson Brothers., Portrait and Landscape Photographers, Hobart Town whose firm was located in Liverpool, Collins and Elizabeth Streets between 1878 and 1891

Anson Brothers

Friends' Meeting House, Murray Street

Photograph titled First Friends' Meeting House: The first Quaker Meeting House in Hobart. A cottage at 39 Murray Street which was bought by James Backhouse in 1837 with a loan from Meeting for Sufferings, London. The cost was £400 including alterations. Shows Mr Cheverton and Mr Shields and uniformed police constable in front, Holy Trinity Church on hill in background. From 12 February 1832 the visiting Quakers James Backhouse and George Washington Walker held periods of worship in the Quaker manner and others sought leave to join them. These included ex-English Friends who had been transported, some of whom were still prisoners, other convicts and ‘locals’, together with four current members. The gatherings were held in private homes and various rented rooms. The Hobart Meeting began in 1833 when the first Meeting for Discipline was held on 20 September 1833 at the home of Thomas Crouch, Bathurst Street. Members present were Thomas Squire, Ann Pollard (minor), James Backhouse and George Washington Walker. Photograph (mounted) J. Bishop, Osborne (& copy neg)

George Musgrave Parker

The Tasmanian Club, Macquarie Street, Hobart

Photograph of the Tasmanian Club formally the Derwent Bank, and Walch's building with a landau outside. The Tasmanian Club is a Georgian style building designed by architect James Alexander Thomson and built in 1846 for banker and merchant Captain Charles Swanston as the Derwent Bank. After the depression of the 1840's the Bank went into liquidation and the building was bought by the Tasmania Club in April 1873 and is still their residence today. The Tasmanian Club was established in 1861 in Hobart by seventy gentlemen. It was founded on the 'London pattern', that is, election or exclusion of candidates by ballot. The photographers are Anson Brothers whose firm was located in Liverpool, Collins and Elizabeth Streets between 1878 and 1891.

Anson Brothers

Port Arthur from behind the church

Photograph of Port Arthur from behind the church with ship in the harbour, taken by Henry Hall Baily who had studios in Elizabeth and Liverpool Streets, Hobart from 1865 until 1918.

Henry Hall Baily

View from the Botanical Gardens

Photograph of view from the Botanical Gardens, Hobart, Tasmania in about 1880. Three Norfolk Island pines dominate the foreground and the view looks out to the River Derwent and Eastern Shore. The photographers were Anson Brothers, whose firm was located in Liverpool, Collins and Elizabeth Streets between 1878 and 1891.

Anson Brothers

Hobart from Huon Road looking east

Photograph from the collection of James Backhouse Walker of a view of Hobart from Huon Road looking east in about 1879, according to notes on the reverse.

James Backhouse Walker

Track to Fern Tree Bower, Mt Wellington

Photograph of the track to Fern Tree Bower, Mount Wellington before taken prior to 1879 by Anson Brothers who had studios in Liverpool, Collins, and Elizabeth Streets between 1878 and 1891.

James Backhouse Walker

Elizabeth Street looking toward Memorial Congregational Church

Photograph of Elizabeth Street Hobart looking north in about 1879. Legrands old shop is on the right and the old post offfice and Ship hotel are also visible according to notes on the reverse of the photo. Also shown is the Tasmanian pale ales store and the All Nations hotelThe photographer is Alfred Winter who had studios in Bathurst, Elizabeth and Liverpool Streets from 1869 until 1891.

Alfred Winter

Diploma of degree of Associate of Arts

  • AU TAS UTAS SPARC R11
  • Collection
  • 1878

Diploma of degree of Associate of Arts, awarded to Mary Friend Whitney Canaway of Hobart, by the Tasmanian Council of Education dated 17th October 1878. Includes wafer seal. Examined and passed in the following subjects. English with credit, French with credit, German, Italian with credit and Mathematics with credit. Mary Friend Whitney Canaway has been awarded the Councils first prize for English and the Councils first prize for Italian. Diploma has decorative border of oak leaves and acorns designed by Henry Hunter and engraved by Alfred Bock.

Mary Friend Whitney Canaway

Hobart looking south east

Photograph from the collection of James Backhouse Walker of a view of Hobart looking South East with a garden in the foreground and Elizabeth Street in the middle distance. The photographer is Alfred Winter who had studios in Bathurst, Elizabeth and Liverpool Streets from 1874-1880.

James Backhouse Walker

Mt. Wellington from the foot of St. George's Hill

Photograph from the collection of James Backhouse Walker of a view of Mt. Wellington from the foot of St. George's Hill in about 1870. The view is from the corner of Albeura St and Sandy Bay Rd. The photographer's name, Woolley, is recorded in a note on the reverse and presumably refers to Charles Alfred.

James Backhouse Walker

Hobart view

Photograph from the collection of James Backhouse Walker of Hobart viewing over St. Davids Park, probably from Hampden Road, (in about 1878 according to a note on the reverse). The photographer is Henry Hall Baily who had studios in Elizabeth and Liverpool Streets Hobart from 1865 until 1918.

.

James Backhouse Walker

Webb's Hotel

Photograph of Webb's Hotel, later Hadley's, Murray Street, Hobart, in about 1877. The photographer was Henry Hall Baily who had studios in Elizabeth and Liverpool Streets, Hobart, from 1865 until 1918.

Henry Hall Baily

Hobart view to the east

Photograph from the collection of James Backhouse Walker of an elevated view of Hobart looking east taken near Browne Street, (about 1876, according to a note on the reverse). Warwick Street in the foreground. Photographed by Henry Hall Baily who had studios in Elizabeth and Liverpool Streets, Hobart from 1865 until 1918.

James Backhouse Walker

Hobart from the top of Murray Street

Photograph from the collection of James Backhouse Walker of a view of Hobart from the top of Murray St in about 1876 according to notes on the reverse. The photographer is Henry Hall Baily who had studios in Elizabeth and Liverpool Streets Hobart from 1865 until 1918.

James Backhouse Walker

Sullivans Cove from Battery Point

Photograph taken from Battery Point of Sullivans Cove. Taken from a garden with fountain in the foreground. Dated about 1876 and taken by photographer Henry Hall Baily who had studios in Elizabeth and Liverpool Streets, Hobart from 1865 until 1918.

Public buildings in Macquarie Street

Photograph of public buildings in Macquarie Street, Hobart opposite St. Davids Cathedral site, corner Collins Street c. 1876. Mail coach is in front of the Post Office.

Huts on Huon Road

Photograph of Huon Road near Fern Tree Inn, Hobart, Tasmania, in about 1872 showing clearing and huts

James Backhouse Walker

Wood's huts

Photograph of Wood's huts at the Springs, Mount Wellington, in 1870 with old couple and younger gentleman and boy sitting outside. On the reverse of the photo post card 'Do you remember them. Huts and old Mr. and Mrs. Wood'.

Man with a gun on the road to Mt Wellington

Photograph of road to Mt Wellington showing man with a gun hunting. Taken in about 1870 by Alfred Winter, who had studios in Bathurst, Elizabeth and Liverpool Streets from 1869 until 1891.

James Backhouse Walker

New Town from the Orphan School grounds

Photograph from the Orphan School grounds, New Town, Tasmania c.1870s. The photographer was Henry Hall Baily who had studios in Elizabeth and Liverpool Streets, Hobart from 1865 until 1918.

Henry Hall Baily

Mill on New Town Creek

Photograph of Old Mill at New Town Creek showing creek, buildings and mill wheel. Mt Wellington in distance

James Backhouse Walker

View from Mr. Robert's garden, West Hobart

Photograph from the collection of James Backhouse Walker of a view of Hobart looking towards the Eastern Shore. The panorama has been taken from Mr. Roberts' garden with various shrubs and a Norfolk Island pine in the foreground. Henry Hall Baily is the photographer. He had studios in Elizabeth and Liverpool Streets Hobart from 1865 until 1918.

James Backhouse Walker

Hobart, looking towards St. George's Hill

Photograph from the collection of James Backhouse Walker of a view of Hobart, looking towards St. George's Hill, Battery Point. Showing St Georges Church and James Luckman's windmill probably taken in the 1870s.

James Backhouse Walker

Old St. David's Cathedral

Photograph of Macquarie Street, Hobart looking east towards Elizabeth Street from the Civil Court in about 1880. The photographer was Alfred Winter who had studios in Bathurst, Elizabeth and Liverpool Streets from 1869 until 1880.

Alfred Winter

Bank of Australasia and Macquarie House

Photograph of Macquarie Street, Hobart looking south in about 1870. The Bank of Australasia and Macquarie House are two of the buildings featured. The photographer is Henry Hall Baily who had studios in Elizabeth and Liverpool Streets between 1865 and 1918.

Henry Hall Baily

Commercial Bank

Photograph of Macquarie Street, Hobart looking south from the corner of Elizabeth Street c. 1870. Some of Franklin Square on left Commercial Bank on right. The photographers were Anson Brothers whose firm was located in Liverpool, Collins and Elizabeth Streets between 1878 and 1891.

Anson Brothers

Commercial Bank

Photograph of the Commercial Bank, Macquarie Street, Hobart looking south from the corner of Elizabeth Street in c1877 after old St. Davids Cathedral was pulled down. The photograph is attributed to Henry Hall Baily who had studios in Elizabeth and Liverpool Streets Hobart from 1865 until 1918.

Henry Hall Baily

Track to Fern Tree Bower

Photograph of the track to Fern Tree Bower, Mount Wellington before taken prior to 1870

James Backhouse Walker

Government House from the shipyards

Photograph of Government House, Hobart, Tasmania in about 1870. Showing the shipyard in the foreground and Mount Direction behind.. The photographer was Henry Hall Baily who had studios in Elizabeth and Liverpool Streets, Hobart from 1865 until 1918.

Henry Hall Baily

Franklin Square and Hobart waterfront

Photograph from the collection of James Backhouse Walker of Franklin Square and the Hobart waterfront taken in about 1870 possibly from St. David's Cathedral according to a note on the reverse. The photographer is Henry Hall Baily who had studios in Elizabeth and Liverpool Streets Hobart from 1865 until 1918.

Henry Hall Baily

Sandy Bay Road

Photograph of Sandy Bay Road, with St. Helena , later Wrest Point, on the left.

James Backhouse Walker

View from Mr. Robert's garden, West Hobart

Photograph from the collection of James Backhouse Walker of a view of Hobart looking towards the Eastern Shore. The panorama has been taken from Mr. Roberts' garden with various shrubs and a Norfolk Island pine in the foreground. Henry Hall Baily is the photographer. He had studios in Elizabeth and Liverpool Streets Hobart from 1865 until 1918.

James Backhouse Walker

Old St. David's Cathedral

Photograph of old St. David's Cathedral on the corner of Macquarie and Murray Streets, Hobart c. 1870.

John Watt Beattie

The Bank of Van Diemen's Land and Hobart Town Hotel

Photograph of Macquarie Street Hobart, looking west in about 1870. The Bank of Van Diemen's Land and Hobart Town Hotel are in the foreground. The photographer is Henry Hall Baily who had studios in Elizabeth and Liverpool Streets between 1865 and 1918.

Henry Hall Baily

Waterworks Valley

Photograph of Stony Steps or Waterworks Valley, Hobart, Tasmania with Livingstone's house Marydale in the foreground and the Waterworks dam in the background, c.1870.

James Backhouse Walker

Ships and Salamanca warehouses

Photograph from the collection of James Backhouse Walker of the Hobart waterfront taken in about 1870 with a view of ships moored next to the Salamanca warehouses. The photographer is Henry Hall Baily who had studios in Elizabeth and Liverpool Streets, Hobart, from 1865 until 1918.

Henry Hall Baily

Salamanca and Hobart waterfront

Photograph of Hobart waterfront - Salamanca looking towards Customs House. Could be around 1870. Photograph appears to have been taken in front of the warehouses near the wharf with ships alongside and a shingle roofed wooden building in the foreground.

Old Mill at New Town Creek

Photograph of Old Mill at New Town Creek showing creek, buildings and mill wheel. Mt Wellington in distance

James Backhouse Walker

St. Joseph's Catholic Church

Photograph of Macquarie Street Hobart including St. Joseph's Catholic Church c. 1870. The view is looking west. The photographer was Henry Hall Baily who had studios in Elizabeth and Liverpool Streets Hobart from 1865 until 1918.

Henry Hall Baily

Liverpool Street Hobart

Photograph of Liverpool Street Hobart at the intersection of Elizabeth Street. Show gas lighting taken about 1870. The photographer is Alfred Winter who had studios in Bathurst, Elizabeth and Liverpool Streets from 1869 until 1891.

Alfred Winter

Sullivans Cove

Photograph from the collection of James Backhouse Walker of Sullivan's Cove in about 1870 according to a note on the reverse. Taken from around Victoria Dock, Old St David's cathedral in background. The photographer is Henry Hall Baily who had studios in Elizabeth and Liverpool Streets Hobart from 1865 until 1918.

Henry Hall Baily

Photograph of Westcott's Bookshop and circulating library

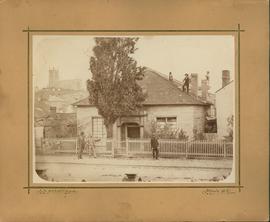
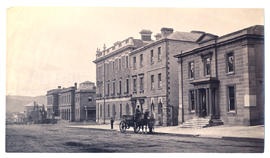
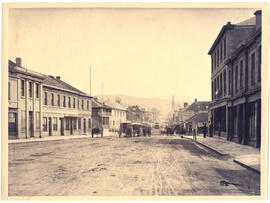
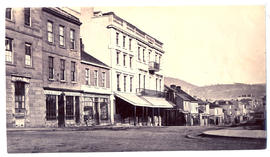
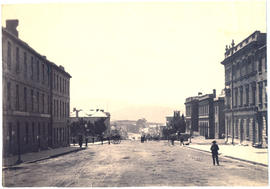
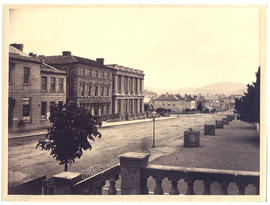
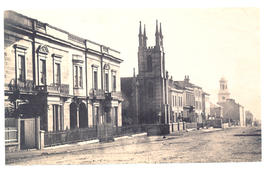
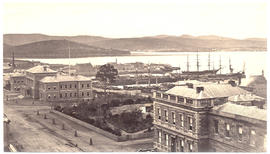
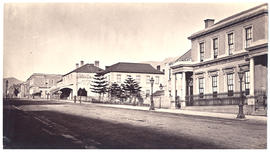
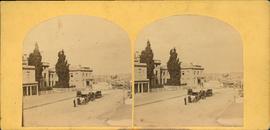
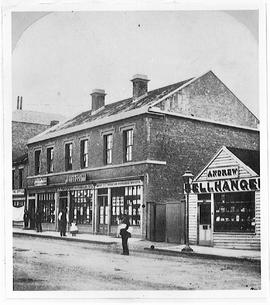
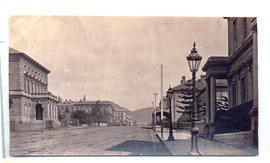
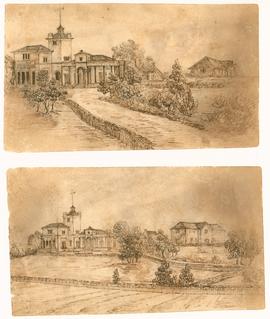
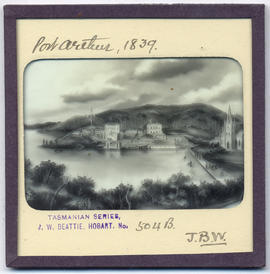
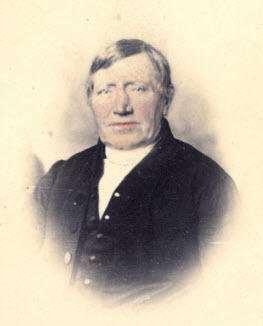
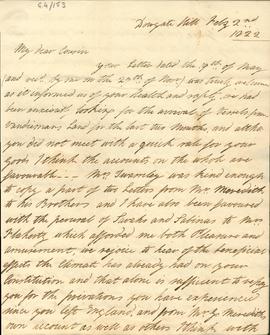
Photograph of Westcott's Bookshop and circulating library, Collins Street, Hobart. Standing outside are Mr Westcott and a little girl, Till, wearing a pinafore. The photograph shows the shop of John Andrew, Bellhanger. The photograph was made by the University photographer from an original 'stereoscopic' photograph (i.e two adjacent photographs mounted on card to be viewed through a special viewer), made by S. Clifford, Hobart Town. The original was endorsed 'The little girl with pinafore Auntie Till, Dad in his
shirt sleeves standing next to her. Fitzgerald's building now; M. Westcott 4.7.32'.
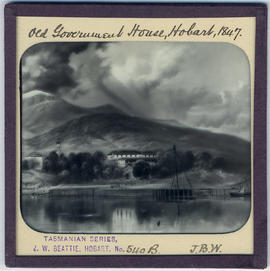
In this photograph street numbers are not visible. Westcott's circulating library sign is shown on the middle shop in a two-storey brick building, with three shops. The shop on the right has the sign 'Depot Christian Knowledge Society'. The shop on the left has a sign, part of which can be read under a magnifying glass as 'wool warehouse', and underneath on the shop lintel is a faint sign which may include the word 'bookseller" On the right of the photograph a small weatherboard shop bears the sign 'Andrew, Bellhanger'. - W. Westcott of 63 Collins Street, advertised new and second-hand books and a circulating library in Wood's Tasmanian Almanac, 1856 (p.126). The same advertisement appears in Walch's Tasmanian Almanac, 1864, but in the 1865 Almanac the address is given as 63 & 65 Collins Street. However, Hull's Hobart Town Directory, 1859 lists W. Westcott as 65 Collins Street', (65 being apparently the middle shop), so possibly both premises were already occupied by Westcott. By 1871 it had become Westcott's Circulating Library, 63, 65 &67 Collins Street. In 1879 the advertisement read (Westcott, Beedham & Co. circulating library and importers of books, stationery and music', The last advertisement in Walch's almanac appeared in 1881. The Christian Knowledge Society (Tasmanian Auxiliary, President the Lord Bishop of Tasmania}, for which Westcott acted as depository was first listed in Walch's Almanac under (Societies and Institutions) in 1869 (p. 132). John Andrew, Bellhanger, Collins Street, advertised in Wood's Almanac in 1856 (p. 148L and is listed in HuWs Hobart Town Directory of 1859 at 61 Colllns Street. He does not appear in Walch's Almanac of 1863 or any later date, nor was he listed in Macphail's National Directory of Tasmania, 1867-68. S. Clifford, photographer, Liverpool Street, Hobart Town (photographer of album and stereographic portraits, private buildings, shipping, monuments....L advertised in Walch's Almanac of 1864 (p. 43) and again annually up to 1869. It would seem, therefore, that the photograph was probably taken between 1863 and 1869. It is a clear photograph of exceptional quality.

Kenneth McKenzie Dallas

Macquarie Street, Hobart from Mercury Office

Photograph of north Macquarie Street from the Mercury office (with verandah) corner Macquarie and Argyle Street. Showing the Hobart Town Hall, Franklin Square and the Treasury buildings. Photographed byy Anson Brothers whose firm was located in Liverpool, Collins and Elizabeth Streets. Taken before September 25 1866, as this is the date of the grand opening of the Town Hall, shown on the left-hand side of the photograph

Anson Brothers

Degree of Associate of Arts

Diploma of degree of Associate of Arts awarded to Henry Lewis Garrett of Hobart Town, who passed in English, Latin(with credit and prize) Greek, French (with credit) and pure mathematics and was placed in the second class Signed by H. Officer, president of the Tasmanian Council of Education. Diploma has decorative border of oak leaves and acorns designed by Henry Hunter and engraved by Alfred Bock.

Henry Lewis Garrett

Henry Lewis Garrett : Degree of Associate of Arts

  • AU TAS UTAS SPARC C8
  • Collection
  • 1863

Diploma of degree of Associate of Arts awarded to Henry Lewis Garrett of Hobart Town, who passed in English, Latin(with credit and prize) Greek, French (with credit) and pure mathematics and was placed in the second class Signed by H. Officer, president of the Tasmanian Council of Education. Seal of Tasmanian Council of Education 1859, red wax, lozenge shaped, backed paper: open book "Floreat Tasmania' on diamond pattern, in tin (separate from document). Diploma has decorative border of oak Leaves and acorns designed by Henry Hunter and engraved by Alfred Bock.

Henry Lewis Garrett

Hobart Town from the New Wharf - print

  • AU TAS UTAS SPARC DX21
  • Collection
  • 1857

Coloured print Lloyd, Henry Grant, 1830-1904 :Hobart town from the new wharf.
W.L. Walton lith; H. Grant Lloyd del. [London, M & N Hanhart, ca. 1857].
Reprinted from the original by Foscan No. 438

Henry Grant Lloyd

Sketches of Rosedale

  • AU TAS UTAS SPARC L1-H-100 &101
  • Item
  • c1850-1854
  • Part of Leake Papers

Two pen sketches of Rosedale showing tower and weather vane, porticos and terraces, conservatory, stables etc, gardens. Drawn by John Travis Leake, c1850 - 1854

John Travis Leake

Dean Letters

  • AU TAS UTAS SPARC D8
  • Collection
  • 1850-1852

Two handwritten letters addressed to William Dean. One letter has engraving of Hobsons Bay and Williams Town, Port Phillip. HAM brothers, Engravers. Published by John Hunter, Elizabeth Street, Melbourne

William Dean

Hobart Town from the Queen's Domain

Photograph of Hobart Town, Tasmania, from the Queen's Domain, looking down Macquarie Street in the 1850s. This photograph appears on page 27 of Allan Sierp's 'Colonial Life in Tasmania: Fifty Years of Photography 1855-1905' (Rigby, 1976)

Old Government House, Hobart Town, Van Diemen's Land 1847

Lantern slide of early print of Old Government House, Hobart Town, Van Diemen's Land in 1847. From the collection of James Backhouse Walker. Prepared by J.W. Beattie (1859-1930) whose studio locations were in Elizabeth Street, Hobart from 1891-1920, Murray Street from 1921-40 and Cat and Fiddle Arcade, Hobart, until 1994.

John Watt Beattie

Salamanca from Wharf, Hobart Town, Van Diemen's Land

Lantern slide from the collection of James Backhouse Walker of Salamanca from the Wharf, Hobart Town, Van Diemen's Land 1847. Prepared by J.W. Beattie (1859-1930) whose studio locations were in Elizabeth Street, Hobart from 1891-1920, Murray Street from 1921-40 and Cat and Fiddle Arcade, Hobart, until 1994. Quaker Collection.

John Watt Beattie

Old Government House

Lantern slide from the collection of James Backhouse Walker of old Government House, Hobart Town, Van Diemen's Land 1847. Prepared by J.W. Beattie (1859-1930) whose studio locations were in Elizabeth Street, Hobart from 1891-1920, Murray Street from 1921-40 and Cat and Fiddle Arcade, Hobart, until 1994.

John Watt Beattie

Hobart Town, Van Diemen's Land, from Old Wharf in 1839

Lantern slide of Hobart Town, Van Diemen's Land, from Old Wharf in 1839. From the collection of James Backhouse Walker. Prepared by J.W. Beattie (1859-1930) whose studio locations were in Elizabeth Street, Hobart from 1891-1920, Murray Street from 1921-40 and Cat and Fiddle Arcade, Hobart, until 1994.

John Watt Beattie

Port Arthur

Lantern slide of Port Arthur 1839. Prepared by J.W. Beattie (1859-1930) whose studio locations were Elizabeth Street, Hobart from 1891-1920, Murray Street from 1921-40 and Cat and Fiddle until 1994.

John Watt Beattie

Robert & Ann Mather Papers

  • AU TAS UTAS SPARC M10
  • Collection
  • 1821-1835

Papers relating to the voyage out and settlement of Robert Mather and his wife, Ann (Benson). Many of the papers (Ml0/16-20) consist of extracts from letters from Ann Mather to her brother, Rev. Samuel Benson, and sisters Isabella Whytall and Sarah Benson (m. Hammond 1832), in UK and were probably given to their niece, Sarah Benson Mather who married George Washington Walker in 1840, after Ann Mather's death in 1831.

Robert Mather

Wood's hut, the Springs, Mount Wellington, Hobart, Tasmania

Lantern slide of Wood's hut, the Springs, Mount Wellington, Hobart. Prepared by J.W. Beattie (1859-1930) whose studio locations were Elizabeth Street, Hobart from 1891-1920, Murray Street from 1921-40 and Cat and Fiddle until 1994.

John Watt Beattie

Hobart Town Harbour, Van Diemen's Land

Lantern slide of Hobart Town Harbour, Van Diemen's Land, in 1830. Prepared by J.W. Beattie (1859-1930) whose studio locations were in Elizabeth Street, Hobart from 1891-1920, Murray Street from 1921-40 and Cat and Fiddle Arcade, Hobart, until 1994.

John Watt Beattie

Hobart Town, Van Diemen's Land in 1830

Lantern slide of early print of Hobart Town, Van Diemen's Land in 1830. From the collection of James Backhouse Walker. Prepared by J.W. Beattie (1859-1930) whose studio locations were in Elizabeth Street, Hobart from 1891-1920, Murray Street from 1921-40 and Cat and Fiddle Arcade, Hobart, until 1994.

John Watt Beattie

Hobart Town from Mulgrave Battery, Van Diemen's Land

Lantern slide of Hobart Town from Mulgrave Battery, Van Diemen's Land, in 1830. From the collection of James Backhouse Walker. Prepared by J.W. Beattie (1859-1930) whose studio locations were in Elizabeth Street, Hobart from 1891-1920, Murray Street from 1921-40 and Cat and Fiddle Arcade, Hobart, until 1994.

John Watt Beattie

Knopwood Sermons

  • AU TAS UTAS SPARC K1
  • Collection
  • 1801-1829

Manuscripts of sermons preached by Rev. Knopwood in Tasmania dated 1801 - 1829

Robert Knopwood

2 Feb 1822 - Ann Johnston to cousin John Meredith

Letter from Ann Johnston to cousin John Meredith dated 5th March 1821, letter from Teneriffe received - sorry he was so sea sick, visit to Birmingham, John's young brother Ben learning to sing, his mother Sarah, David and Joseph, dined at Henry Meredith's, respects to Mr and Mrs Meredith and love to their children

5 Mar 1821 - Ann Johnston to cousin John Meredith

Letter from Ann Johnston to cousin John Meredith dated 5th March 1821, letter from Teneriffe received - sorry he was so sea sick, visit to Birmingham, John's young brother Ben learning to sing, his mother Sarah, David and Joseph, dined at Henry Meredith's, respects to Mr and Mrs Meredith and love to their children

No date - c.1821- Ann Johnston to cousin John Meredith

Letter from Ann Johnston to cousin John Meredith dated 5th March 1821, letter from Teneriffe received - sorry he was so sea sick, visit to Birmingham, John's young brother Ben learning to sing, his mother Sarah, David and Joseph, dined at Henry Meredith's, respects to Mr and Mrs Meredith and love to their children

James and Sarah Meredith to son John

Letter from James Meredith and wife Sarah Meredith to their son John Meredith dated 1821. Sorry to hear he was ill on voyage, regards to Mr George Meredith and family - glad to hear they were well, sending letter with packet of newspapers by "Hope" and also letter in March by Mr Dunn, news of King, harvest, high rates and tithes, insurrection of Greeks against Turks.

5 Mar 1821 - Ann Johnston to cousin John Meredith

Letter from Ann Johnston to cousin John Meredith dated 5th March 1821, letter from Teneriffe received - sorry he was so sea sick, visit to Birmingham, John's young brother Ben learning to sing, his mother Sarah, David and Joseph, dined at Henry Meredith's, respects to Mr and Mrs Meredith and love to their children

Results 501 to 600 of 1142