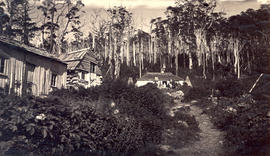
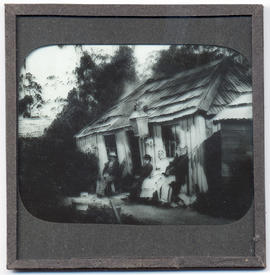
Group at Woods Huts, Mt Wellington
- AU TAS UTAS SPARC W9-Ph-136-15
- Sub-item
- c1870
Parte de Walker Family Papers
Photograph of a group of people outside of Woods Hut, Mt Wellington.
James Backhouse Walker
Group at Woods Huts, Mt Wellington
Parte de Walker Family Papers
Photograph of a group of people outside of Woods Hut, Mt Wellington.
James Backhouse Walker
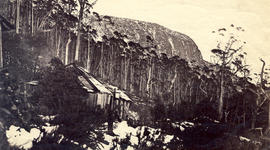
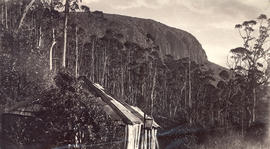
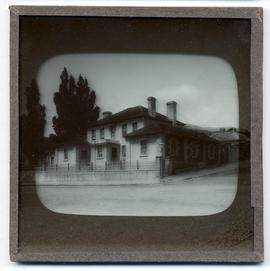
Woods Huts, Mt Wellington in the snow
Parte de Walker Family Papers
Photograph of Woods Huts, Mt Wellington in the snow. Organ pipes in distance
James Backhouse Walker
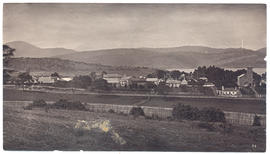
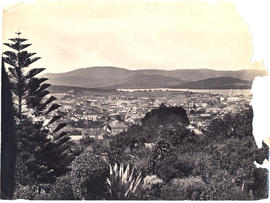
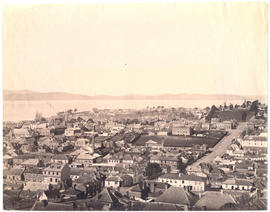
New Town from the Orphan School grounds
Parte de Walker Family Papers
Photograph from the Orphan School grounds, New Town, Tasmania c.1870s. The photographer was Henry Hall Baily who had studios in Elizabeth and Liverpool Streets, Hobart from 1865 until 1918.
Henry Hall Baily
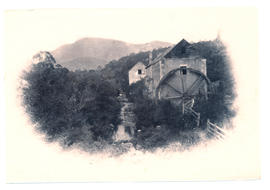
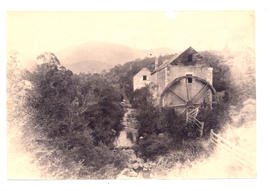
Parte de Walker Family Papers
Photograph of Old Mill at New Town Creek showing creek, buildings and mill wheel. Mt Wellington in distance
James Backhouse Walker
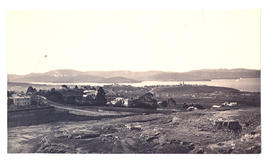
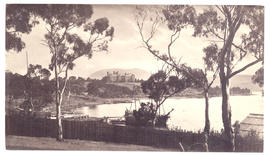
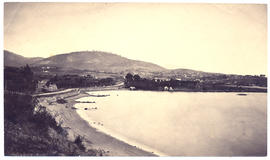
Marieville Esplanade, Sandy Bay
Parte de Walker Family Papers
Photograph Marieville Esplanade, Sandy Bay looking toward lower Sandy Bay and Mt. Nelson
James Backhouse Walker
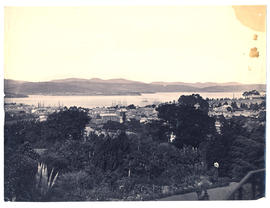
View from Mr. Robert's garden, West Hobart
Parte de Walker Family Papers
Photograph from the collection of James Backhouse Walker of a view of Hobart looking towards the Eastern Shore. The panorama has been taken from Mr. Roberts' garden with various shrubs and a Norfolk Island pine in the foreground. Henry Hall Baily is the photographer. He had studios in Elizabeth and Liverpool Streets Hobart from 1865 until 1918.
James Backhouse Walker
Hobart, looking towards St. George's Hill
Parte de Walker Family Papers
Photograph from the collection of James Backhouse Walker of a view of Hobart, looking towards St. George's Hill, Battery Point. Showing St Georges Church and James Luckman's windmill probably taken in the 1870s.
James Backhouse Walker
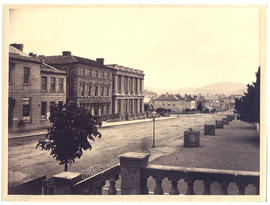
Parte de Walker Family Papers
Photograph of Macquarie Street, Hobart looking east towards Elizabeth Street from the Civil Court in about 1880. The photographer was Alfred Winter who had studios in Bathurst, Elizabeth and Liverpool Streets from 1869 until 1880.
Alfred Winter
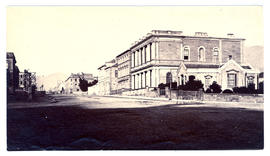
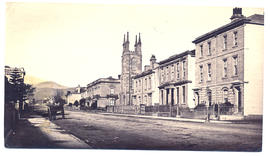
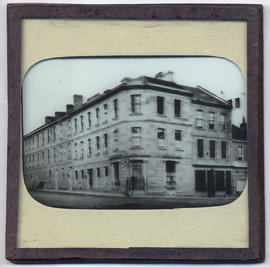
Bank of Australasia and Macquarie House
Parte de Walker Family Papers
Photograph of Macquarie Street, Hobart looking south in about 1870. The Bank of Australasia and Macquarie House are two of the buildings featured. The photographer is Henry Hall Baily who had studios in Elizabeth and Liverpool Streets between 1865 and 1918.
Henry Hall Baily
Parte de Walker Family Papers
Photograph of Macquarie Street, Hobart looking south from the corner of Elizabeth Street c. 1870. Some of Franklin Square on left Commercial Bank on right. The photographers were Anson Brothers whose firm was located in Liverpool, Collins and Elizabeth Streets between 1878 and 1891.
Anson Brothers
Parte de Walker Family Papers
Photograph of the Commercial Bank, Macquarie Street, Hobart looking south from the corner of Elizabeth Street in c1877 after old St. Davids Cathedral was pulled down. The photograph is attributed to Henry Hall Baily who had studios in Elizabeth and Liverpool Streets Hobart from 1865 until 1918.
Henry Hall Baily
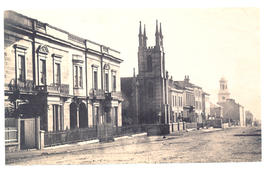
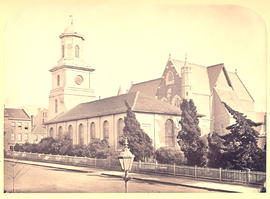
St. Joseph's Catholic Church and old St. David's Cathedral
Parte de Walker Family Papers
Photograph of St. Joseph's Catholic Church, Macquarie Street, with old St. David's Cathedral in the background, Macquarie Street, Hobart c. 1870.
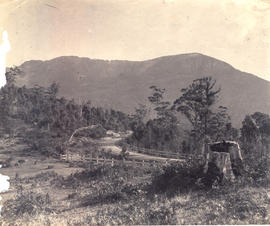
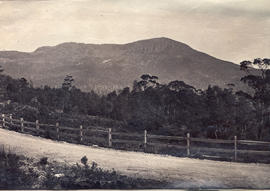
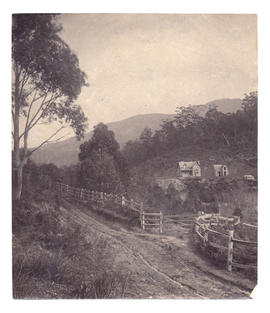
Huon Road with post and rail fence looking to Mt Wellington
Parte de Walker Family Papers
Photograph of Huon Road with post and rail fence looking to Mt Wellington
James Backhouse Walker
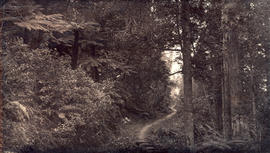
Parte de Walker Family Papers
Photograph of the track to Fern Tree Bower, Mount Wellington before taken prior to 1870
James Backhouse Walker
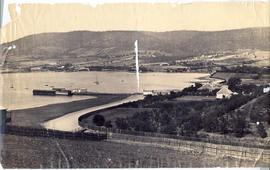
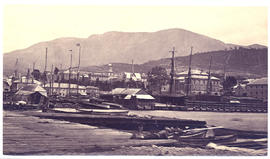
Government House from the shipyards
Parte de Walker Family Papers
Photograph of Government House, Hobart, Tasmania in about 1870. Showing the shipyard in the foreground and Mount Direction behind.. The photographer was Henry Hall Baily who had studios in Elizabeth and Liverpool Streets, Hobart from 1865 until 1918.
Henry Hall Baily
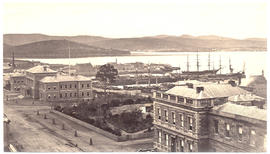
Franklin Square and Hobart waterfront
Parte de Walker Family Papers
Photograph from the collection of James Backhouse Walker of Franklin Square and the Hobart waterfront taken in about 1870 possibly from St. David's Cathedral according to a note on the reverse. The photographer is Henry Hall Baily who had studios in Elizabeth and Liverpool Streets Hobart from 1865 until 1918.
Henry Hall Baily
Parte de Walker Family Papers
Photograph of Sandy Bay Road, with St. Helena , later Wrest Point, on the left.
James Backhouse Walker
View from Mr. Robert's garden, West Hobart
Parte de Walker Family Papers
Photograph from the collection of James Backhouse Walker of a view of Hobart looking towards the Eastern Shore. The panorama has been taken from Mr. Roberts' garden with various shrubs and a Norfolk Island pine in the foreground. Henry Hall Baily is the photographer. He had studios in Elizabeth and Liverpool Streets Hobart from 1865 until 1918.
James Backhouse Walker
Parte de Walker Family Papers
Photograph of old St. David's Cathedral on the corner of Macquarie and Murray Streets, Hobart c. 1870.
John Watt Beattie
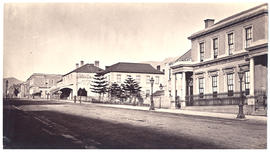
The Bank of Van Diemen's Land and Hobart Town Hotel
Parte de Walker Family Papers
Photograph of Macquarie Street Hobart, looking west in about 1870. The Bank of Van Diemen's Land and Hobart Town Hotel are in the foreground. The photographer is Henry Hall Baily who had studios in Elizabeth and Liverpool Streets between 1865 and 1918.
Henry Hall Baily
Parte de Walker Family Papers
Photograph of Macquarie Street, Hobart looking east from St. Joseph's Catholic Church, c. 1870.
Henry Hall Baily
Parte de Walker Family Papers
Photograph of snow capped Mt Wellington from Huon Road.
James Backhouse Walker
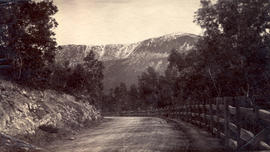
View to Mt Wellington from Huon Road
Parte de Walker Family Papers
Photograph of view to Mt Wellington from Huon Road.
James Backhouse Walker
Men standing outside Woods Huts, Mt Wellington
Parte de Walker Family Papers
Photograph of men standing outside Woods Huts, Mt Wellington, Organ pipes in distance
James Backhouse Walker
Side view of Woods Hut, Mt Wellington
Parte de Walker Family Papers
Photograph of side view of Woods Hut, Mt Wellington. Organ pipes in distance
James Backhouse Walker
Parte de Walker Family Papers
Photograph of Stony Steps or Waterworks Valley, Hobart, Tasmania with Livingstone's house Marydale in the foreground and the Waterworks dam in the background, c.1870.
James Backhouse Walker
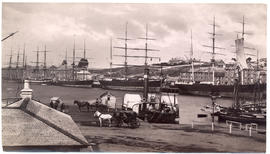
Ships and Salamanca warehouses
Parte de Walker Family Papers
Photograph from the collection of James Backhouse Walker of the Hobart waterfront taken in about 1870 with a view of ships moored next to the Salamanca warehouses. The photographer is Henry Hall Baily who had studios in Elizabeth and Liverpool Streets, Hobart, from 1865 until 1918.
Henry Hall Baily

Salamanca and Hobart waterfront
Parte de Walker Family Papers
Photograph of Hobart waterfront - Salamanca looking towards Customs House. Could be around 1870. Photograph appears to have been taken in front of the warehouses near the wharf with ships alongside and a shingle roofed wooden building in the foreground.
Parte de Walker Family Papers
Photograph of Old Mill at New Town Creek showing creek, buildings and mill wheel. Mt Wellington in distance
James Backhouse Walker
Parte de Walker Family Papers
Photograph of Macquarie Street Hobart including St. Joseph's Catholic Church c. 1870. The view is looking west. The photographer was Henry Hall Baily who had studios in Elizabeth and Liverpool Streets Hobart from 1865 until 1918.
Henry Hall Baily
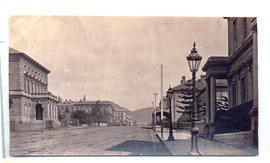
Parte de Walker Family Papers
Photograph of Liverpool Street Hobart at the intersection of Elizabeth Street. Show gas lighting taken about 1870. The photographer is Alfred Winter who had studios in Bathurst, Elizabeth and Liverpool Streets from 1869 until 1891.
Alfred Winter
Dead trees on the side of Huon Road
Parte de Walker Family Papers
Photograph of dead trees on the side of Huon Road, Hobart, Tasmania, c 1870.
James Backhouse Walker

Huon Road with Mt Wellington in snow
Parte de Walker Family Papers
Photograph of Huon Road with Mt Wellington in snow
James Backhouse Walker
Caretakers house on dam of the reservoir
Parte de Walker Family Papers
Photograph of caretakers house on dam of the reservoir, Waterworks Road, Hobart, Tasmania c.1870.
James Backhouse Walker
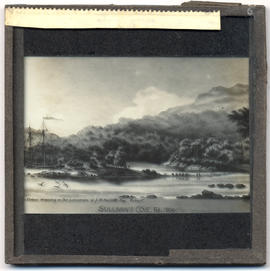
Parte de Walker Family Papers
Photograph from the collection of James Backhouse Walker of Sullivan's Cove in about 1870 according to a note on the reverse. Taken from around Victoria Dock, Old St David's cathedral in background. The photographer is Henry Hall Baily who had studios in Elizabeth and Liverpool Streets Hobart from 1865 until 1918.
Henry Hall Baily

Hobart waterfront from the Queen's Domain
Parte de Walker Family Papers
Photograph of the Hobart waterfront from the old quarry on the Queen's Domain taken in the 1870s before the railway.
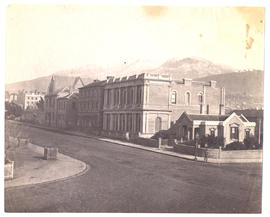
Macquarie Street, Hobart from Mercury Office
Parte de Walker Family Papers
Photograph of north Macquarie Street from the Mercury office (with verandah) corner Macquarie and Argyle Street. Showing the Hobart Town Hall, Franklin Square and the Treasury buildings. Photographed byy Anson Brothers whose firm was located in Liverpool, Collins and Elizabeth Streets. Taken before September 25 1866, as this is the date of the grand opening of the Town Hall, shown on the left-hand side of the photograph
Anson Brothers

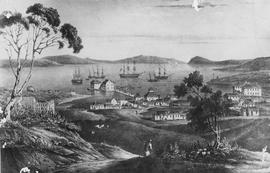
Hobart Town from the Queen's Domain
Parte de Walker Family Papers
Photograph of Hobart Town, Tasmania, from the Queen's Domain, looking down Macquarie Street in the 1850s. This photograph appears on page 27 of Allan Sierp's 'Colonial Life in Tasmania: Fifty Years of Photography 1855-1905' (Rigby, 1976)
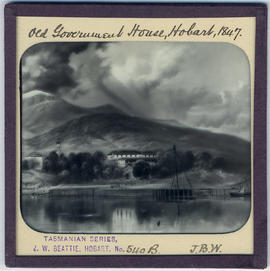
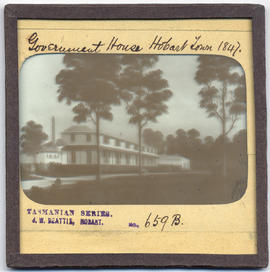
Old Government House, Hobart Town, Van Diemen's Land 1847
Parte de Walker Family Papers
Lantern slide of early print of Old Government House, Hobart Town, Van Diemen's Land in 1847. From the collection of James Backhouse Walker. Prepared by J.W. Beattie (1859-1930) whose studio locations were in Elizabeth Street, Hobart from 1891-1920, Murray Street from 1921-40 and Cat and Fiddle Arcade, Hobart, until 1994.
John Watt Beattie
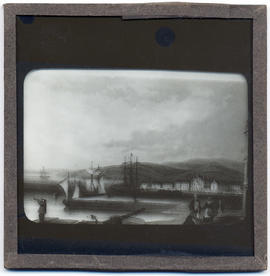
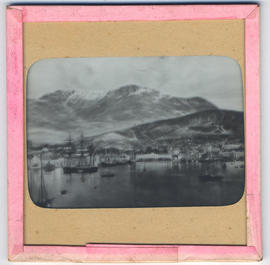
Salamanca from Wharf, Hobart Town, Van Diemen's Land
Parte de Walker Family Papers
Lantern slide from the collection of James Backhouse Walker of Salamanca from the Wharf, Hobart Town, Van Diemen's Land 1847. Prepared by J.W. Beattie (1859-1930) whose studio locations were in Elizabeth Street, Hobart from 1891-1920, Murray Street from 1921-40 and Cat and Fiddle Arcade, Hobart, until 1994. Quaker Collection.
John Watt Beattie
Parte de Walker Family Papers
Lantern slide from the collection of James Backhouse Walker of old Government House, Hobart Town, Van Diemen's Land 1847. Prepared by J.W. Beattie (1859-1930) whose studio locations were in Elizabeth Street, Hobart from 1891-1920, Murray Street from 1921-40 and Cat and Fiddle Arcade, Hobart, until 1994.
John Watt Beattie

Hobart Town, Van Diemen's Land, from Old Wharf in 1839
Parte de Walker Family Papers
Lantern slide of Hobart Town, Van Diemen's Land, from Old Wharf in 1839. From the collection of James Backhouse Walker. Prepared by J.W. Beattie (1859-1930) whose studio locations were in Elizabeth Street, Hobart from 1891-1920, Murray Street from 1921-40 and Cat and Fiddle Arcade, Hobart, until 1994.
John Watt Beattie
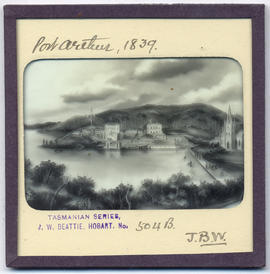
Parte de Walker Family Papers
Lantern slide of Port Arthur 1839. Prepared by J.W. Beattie (1859-1930) whose studio locations were Elizabeth Street, Hobart from 1891-1920, Murray Street from 1921-40 and Cat and Fiddle until 1994.
John Watt Beattie
Waterloo Hotel, corner Murray and Davey Streets, Hobart, Van Diemen's Land, 1832
Parte de Walker Family Papers
Lantern slide of Waterloo Hotel on the corner of Murray and Davey Streets, Hobart - from a painting dated 1832. Renamed Waterloo Tavern in 1842. Prepared by J.W. Beattie (1859-1930) whose studio locations were Elizabeth Street, Hobart from 1891-1920, Murray Street from 1921-40 and Cat and Fiddle until 1994.
John Watt Beattie
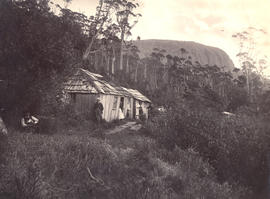
Wood's hut, the Springs, Mount Wellington, Hobart, Tasmania
Parte de Walker Family Papers
Lantern slide of Wood's hut, the Springs, Mount Wellington, Hobart. Prepared by J.W. Beattie (1859-1930) whose studio locations were Elizabeth Street, Hobart from 1891-1920, Murray Street from 1921-40 and Cat and Fiddle until 1994.
John Watt Beattie
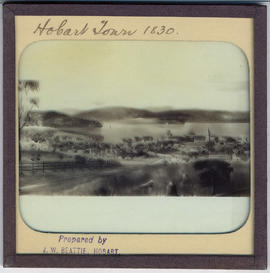
Hobart Town Harbour, Van Diemen's Land
Parte de Walker Family Papers
Lantern slide of Hobart Town Harbour, Van Diemen's Land, in 1830. Prepared by J.W. Beattie (1859-1930) whose studio locations were in Elizabeth Street, Hobart from 1891-1920, Murray Street from 1921-40 and Cat and Fiddle Arcade, Hobart, until 1994.
John Watt Beattie
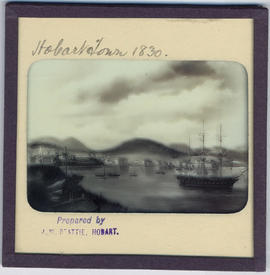
Hobart Town, Van Diemen's Land in 1830
Parte de Walker Family Papers
Lantern slide of early print of Hobart Town, Van Diemen's Land in 1830. From the collection of James Backhouse Walker. Prepared by J.W. Beattie (1859-1930) whose studio locations were in Elizabeth Street, Hobart from 1891-1920, Murray Street from 1921-40 and Cat and Fiddle Arcade, Hobart, until 1994.
John Watt Beattie
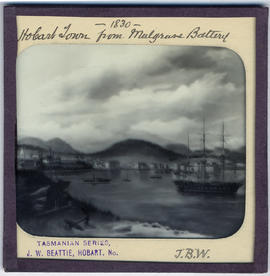
Hobart Town from Mulgrave Battery, Van Diemen's Land
Parte de Walker Family Papers
Lantern slide of Hobart Town from Mulgrave Battery, Van Diemen's Land, in 1830. From the collection of James Backhouse Walker. Prepared by J.W. Beattie (1859-1930) whose studio locations were in Elizabeth Street, Hobart from 1891-1920, Murray Street from 1921-40 and Cat and Fiddle Arcade, Hobart, until 1994.
John Watt Beattie
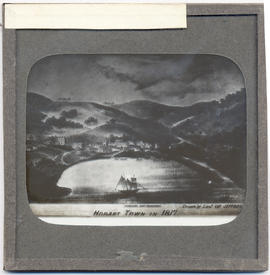
Hobart Town, Van Diemen's Land in 1817
Parte de Walker Family Papers
Lantern slide of Hobart Town, Van Diemen's Land, in February, 1817. Inscribed with the words 'Hobart Town in 1817. Drawn by Lieut. Charles Jeffreys' - also shows the Government schooner the Kangaroo , church, Government House and Fort.
Charles Jeffreys
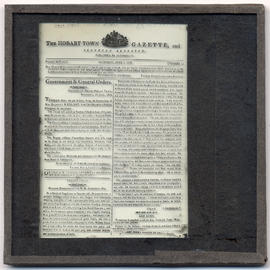
Parte de Walker Family Papers
Lantern slide of front page of the Hobart Town Gazette, June 1816. Prepared by J.W. Beattie (1859-1930) whose studio locations were Elizabeth Street, Hobart from 1891-1920, Murray Street from 1921-40 and Cat and Fiddle until 1994.
John Watt Beattie
Funeral notice of Lieutenant Governor David Collins
Parte de Walker Family Papers
Lantern slide of funeral notice of Lieutenant Governor David Collins, 1810. From The Derwent Star, and Van Diemen’s Land Intelligencer no. 7, Tuesday April 3rd 1810. Prepared by J.W. Beattie (1859-1930) whose studio locations were Elizabeth Street, Hobart from 1891-1920, Murray Street from 1921-40 and Cat and Fiddle until 1994.
John Watt Beattie
Death of Lieutenant Governor David Collins
Parte de Walker Family Papers
Lantern slide of the death of Lieutenant Governor David Collins, 1810. From The Derwent Star, and Van Diemen’s Land Intelligencer no. 7, Tuesday April 3rd 1810. Prepared by J.W. Beattie (1859-1930) whose studio locations were Elizabeth Street, Hobart from 1891-1920, Murray Street from 1921-40 and Cat and Fiddle until 1994.
John Watt Beattie
Sullivans Cove, Hobart Town, Van Diemen's Land in 1804
Parte de Walker Family Papers
Lantern slide of Sullivans Cove, Hobart Town, Van Diemen's Land, in February, 1804. Inscribed with the words 'Water colour drawing in the possession of J. B. Walker Esq., Hobart, 1891'.
John Watt Beattie
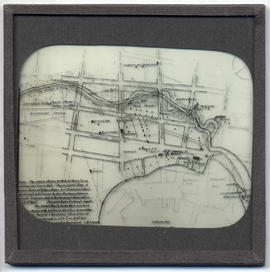
Parte de Walker Family Papers
Lantern Slide of plan of early Hobart Town, from a survey done in 1804-1805, showing later alterations. The plan also appears in James Backhouse Walker's paper 'The Founding of Hobart, by Lieut.-Governor Collins' read to the Royal Society of Tasmania 14/10/1889. In this he describes the plan, "I am indebted to my friend Mr. Mault for a beautifully executed plan, which shows very clearly the original features of the ground, and the position of the first camp, and also indicates the alterations which have since taken place. It is taken from a survey made by Surveyor-General Harris in 1804-5. The original plan was discovered many years ago in the Lands Office at Sydney, and was presented by the New South Wales Government to our Lands Department. The Deputy- Commissioner of Crown Lands, Mr. Albert Reid, kindly presented me with a tracing of it."
Lantern slide thought to have been prepared by J.W. Beattie (1859-1930) whose studio locations were in Elizabeth Street, Hobart from 1891-1920, Murray Street from 1921-40 and Cat and Fiddle Arcade, Hobart, until 1994.
John Watt Beattie
Parte de Walker Family Papers
Photograph from the collection of James Backhouse Walker of a view of Hobart looking south along Barrack Street toward St Georges Hill, Battery Point
James Backhouse Walker
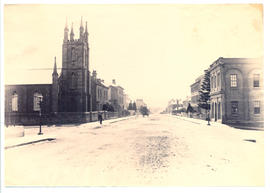
All Saints Church Macquarie Street
Parte de Walker Family Papers
Photograph of All Saints Church, Macquarie Street, Hobart c. 1880 by Anson Brothers, Portrait and Landscape Photographers, Hobart Town, whose firm was located in Liverpool, Collins and Elizabeth Streets between 1878 and 1891.
Anson Brothers
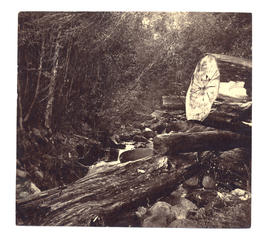
Parte de Walker Family Papers
Photographs of Waterworks off Huon Road. Flowing stream and felled tree.
James Backhouse Walker
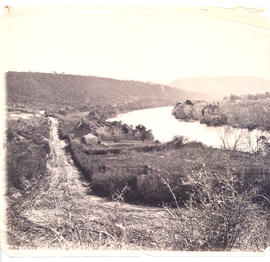
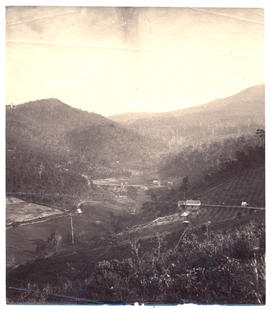
Derwent River above New Norfolk
Parte de Walker Family Papers
Photograph of the Derwent River just above New Norfolk, Tasmania. Showing track, buildings, orchard and river.
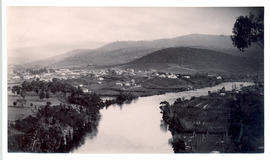
Parte de Walker Family Papers
Photograph of New Norfolk, Tasmania from the opposite side of the river. Showing the town and bridge.
Henry Hall Baily
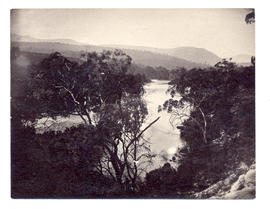
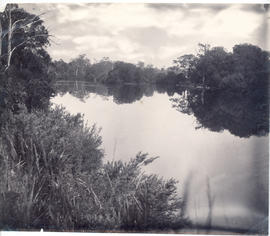
Derwent River above New Norfolk
Parte de Walker Family Papers
Photograph of the Derwent River above New Norfolk, Tasmania. Looking down the river.
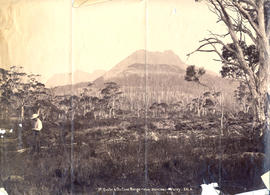
Parte de Walker Family Papers
Photograph of Mt. Gould and the DuCane Range from Narcissus Valley, Lake St. Clair taken from camp on the left hand side of Narcissus Valley going up (according to notes on the reverse of the photograph).
Parte de Walker Family Papers
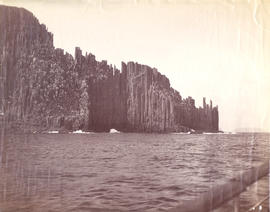
Photograph of Cape Pillar on the Tasman Peninsula.
Parte de Walker Family Papers
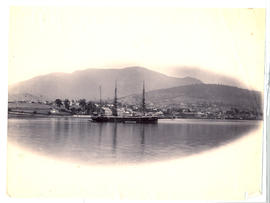
Photograph of Sullivans Cove and Mount Wellington from the water with a three masted ship in foreground.

Parte de Walker Family Papers
Lantern slide of Campbell and Minchin building, corner Elizabeth and Bathurst street, Hobart. Prepared by J.W. Beattie (1859-1930) whose studio locations were Elizabeth Street, Hobart from 1891-1920, Murray Street from 1921-40 and Cat and Fiddle until 1994.
John Watt Beattie
Parte de Walker Family Papers
Lantern slide of Elizabeth Street, Hobart looking north. Prepared by J.W. Beattie (1859-1930) whose studio locations were Elizabeth Street, Hobart from 1891-1920, Murray Street from 1921-40 and Cat and Fiddle until 1994.
John Watt Beattie
Government House and St David's Cathedral, Van Diemen's Land
Parte de Walker Family Papers
Lantern slide of Government House and St David's Cathedral, Van Diemen's Land. Prepared by J.W. Beattie (1859-1930) whose studio locations were Elizabeth Street, Hobart from 1891-1920, Murray Street from 1921-40 and Cat and Fiddle until 1994. Lantern slide of detail from 'The Seat of His Excellency Lieut. Govr. Arthur / drawn from Nature and on Stone' by Charles Atkinson d.1837
John Watt Beattie
Parte de Walker Family Papers
Lantern slide of Hobart Savings Bank, Murray Street Hobart c1860. Prepared by J.W. Beattie (1859-1930) whose studio locations were Elizabeth Street, Hobart from 1891-1920, Murray Street from 1921-40 and Cat and Fiddle until 1994.
John Watt Beattie
Hobart Town, Van Diemen's Land from the Harbour
Parte de Walker Family Papers
Lantern slide of an early print of Hobart Town, Van Diemen's Land from the harbour. From the collection of James Backhouse Walker. Thought to have been prepared by J.W. Beattie (1859-1930) whose studio locations were in Elizabeth Street, Hobart from 1891-1920, Murray Street from 1921-40 and Cat and Fiddle Arcade, Hobart, until 1994.
John Watt Beattie
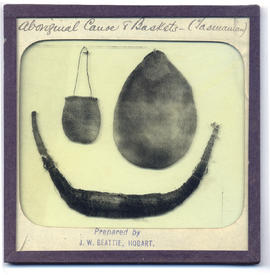
Tasmanian Aboriginal canoe and baskets
Parte de Walker Family Papers
Lantern slide of Tasmanian aboriginal canoe and baskets. Prepared by J.W. Beattie (1859-1930) whose studio locations were Elizabeth Street, Hobart from 1891-1920, Murray Street from 1921-40 and Cat and Fiddle until 1994.
John Watt Beattie
Buildings on the corner of Murray and Macquarie Street, Hobart ,Tasmania
Parte de Walker Family Papers
Lantern slide from the collection of James Backhouse Walker of buildings on the corner of Murray and Macquarie Street, Hobart, Tasmania. Thought to have been prepared by J.W. Beattie (1859-1930) whose studio locations were in Elizabeth Street, Hobart from 1891-1920, Murray Street from 1921-40 and Cat and Fiddle Arcade, Hobart, until 1994. Quaker Collection.
John Watt Beattie
Parte de Walker Family Papers
Lantern slide of house in Hobart. Prepared by J.W. Beattie (1859-1930) whose studio locations were Elizabeth Street, Hobart from 1891-1920, Murray Street from 1921-40 and Cat and Fiddle until 1994.
John Watt Beattie
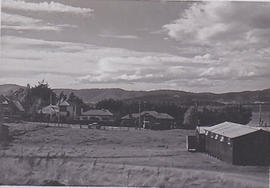
Sandy Bay campus facing Alexander Street
Parte de Lindsay Crawford Collection

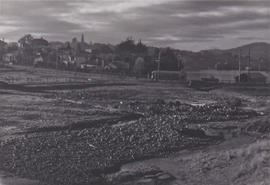
Old Rifle Range sheds, Sandy Bay campus
Parte de Lindsay Crawford Collection
Sandy Bay Road and tram from the Rifle Range sheds
Parte de Lindsay Crawford Collection
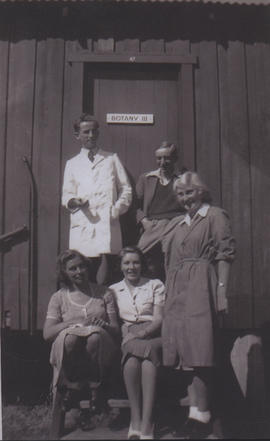
Parte de Lindsay Crawford Collection
Photograph taken outside the Botany Shed. Lindsay Crawford back right, Pat Richardson right, Heather Gulline (?) left front)
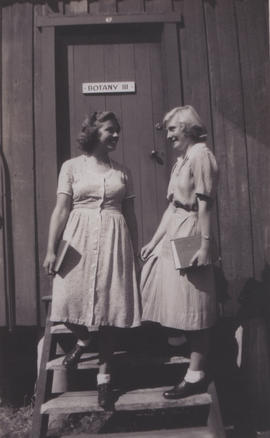
Parte de Lindsay Crawford Collection
Photograph of two students believed to be Heather Gulline and Pat Richardson outside the Botany Shed

Sandy Bay campus facing Mt Wellington
Parte de Lindsay Crawford Collection
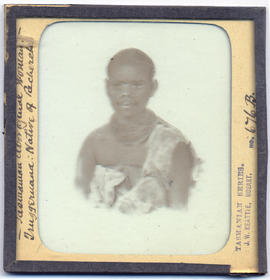
Tasmanian Aboriginal woman Truggeruana, native of Recherche, Van Diemen's Land
Parte de Walker Family Papers
Lantern slide of Tasmanian aboriginal woman Truggeruana, native of Recherche. Prepared by J.W. Beattie (1859-1930) whose studio locations were Elizabeth Street, Hobart from 1891-1920, Murray Street from 1921-40 and Cat and Fiddle until 1994
John Watt Beattie

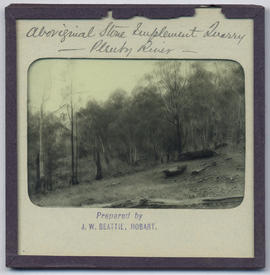
Tasmanian Aboriginal Stone Implement Quarry, Plenty River, Van Diemen's Land
Parte de Walker Family Papers
Lantern slides of Tasmanian aboriginal stone implement quarry, Plenty river. Prepared by J.W. Beattie (1859-1930) whose studio locations were Elizabeth Street, Hobart from 1891-1920, Murray Street from 1921-40 and Cat and Fiddle until 1994.
John Watt Beattie
Plenty River, Van Diemen's Land, Tasmanian Aboriginal Stone Implement Quarry
Parte de Walker Family Papers
Lantern slides of Tasmanian aboriginal stone implement quarry, Plenty river. Prepared by J.W. Beattie (1859-1930) whose studio locations were Elizabeth Street, Hobart from 1891-1920, Murray Street from 1921-40 and Cat and Fiddle until 1994.
John Watt Beattie
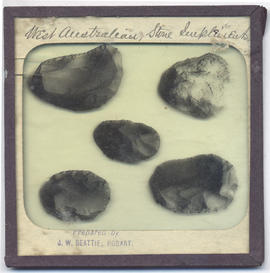
West Australian Aboriginal stone implements
Parte de Walker Family Papers
Lantern slide of West Australian aboriginal stone implements. Prepared by J.W. Beattie (1859-1930) whose studio locations were Elizabeth Street, Hobart from 1891-1920, Murray Street from 1921-40 and Cat and Fiddle until 1994.
John Watt Beattie
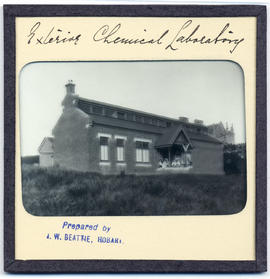
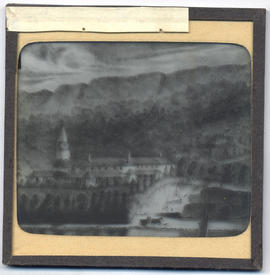
Parte de Walker Family Papers
Lantern slides of the University of Tasmania, Queen's Domain, Hobart. Views of exterior and laboratories and library. Prepared by J.W. Beattie (1859-1930) whose studio locations were Elizabeth Street, Hobart from 1891-1920, Murray Street from 1921-40 and Cat and Fiddle until 1994 (Collection Pr.S.Uni/1-8)
John Watt Beattie
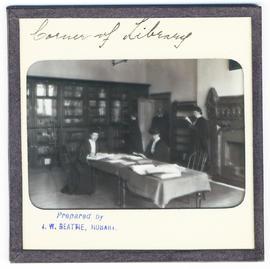
Corner of library, University of Tasmania, Queen's Domain, Hobart, late nineteenth century
Parte de Walker Family Papers
Lantern slides of the University of Tasmania, Queen's Domain, Hobart. Views of exterior and laboratories and library. Prepared by J.W. Beattie (1859-1930) whose studio locations were Elizabeth Street, Hobart from 1891-1920, Murray Street from 1921-40 and Cat and Fiddle until 1994 (Collection Pr.S.Uni/1-8)
John Watt Beattie

Parte de Dennison Collection
Aerial view of Eaglehawk Neck showing the Eaglehawk Neck hall which opened in 1928
Parte de Dennison Collection
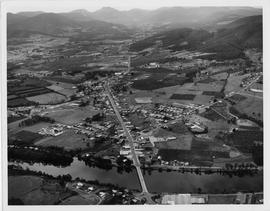
Aerial view of Huonville, Tasmania, looking toward Sleeping Beauty mountain range showing streets, bridge and Huon River
Parte de Dennison Collection
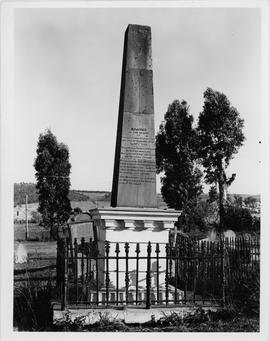
Photograph of the Rev. Robert Knopwood's grave at Rokeby, Clarence Plains, Tasmania. Knopwood died 18 September 1838. He was the first Chaplin of Van Diemen's Land
Photograph of a sketch of Old Hobart town
Parte de Dennison Collection
A view of Hobart Town by Irish born convict-artist Alan Carswell (1823), showing the colony establishing itself around the mouth of Sullivans Cove in the early 1820s.
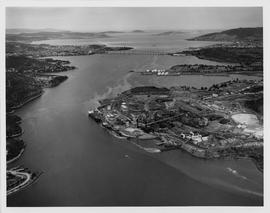
Parte de Dennison Collection
Aerial view of the Zinc Works at Derwent Park. Looking down the Derwent River toward the Tasman Bridge. Showing Self's Point and Cornelian Bay Cemetery
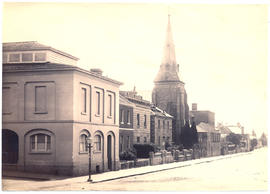
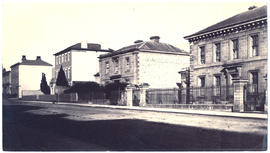
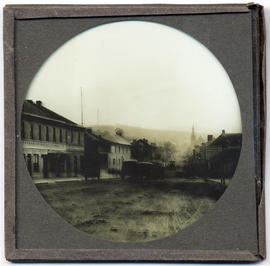
Photograph of the Oddfellows Hall and Congregational Church
Parte de Walker Family Papers
Photograph of Davey Street, Hobart, looking east, showing the Oddfellows hall and the Congregational church. Photograph taken from the Harrington Street intersection.

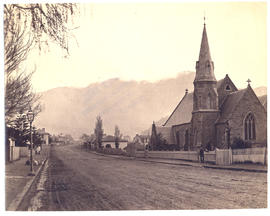
St. John's Church Goulburn Street
Parte de Walker Family Papers
Photograph of St. John's Church Goulburn Street, Hobart taken c1880 the photographers were Anson brothers whose firm was located in Liverpool, Collins and Elizabeth Streets between 1878 and 1891
Anson Brothers
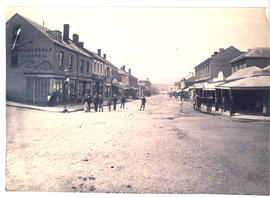
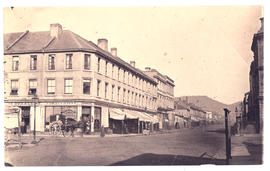
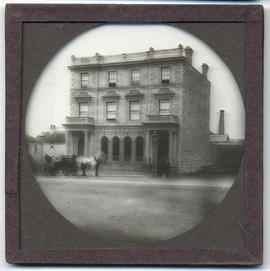
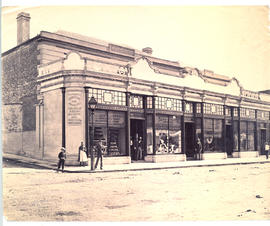
Wholesale & Retail Drapery Warehouse
Parte de Walker Family Papers
Photograph of Liverpool Street Hobart with Wholesale & Retail Drapery Warehouse in foreground.
Perkins and Nephew Wholesale & Retail Drapers and Grocers
Parte de Walker Family Papers
Photograph of the Emporium of Perkins and Nephew Wholesale & Retail Drapers and Grocers established in 1826, situated on the corner of Watchorn and Liverpool Street Hobart, taken in 1881. The photographers were Anson Brothers Portrait and Landscape Photographers Hobart Town whose firm was located in Liverpool, Collins and Elizabeth Streets between 1878 and 1891.
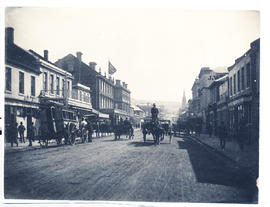
Elizabeth Street outside C. Davis Importer of English and American Hardware
Parte de Walker Family Papers
Photograph of Elizabeth Street looking north, outside C. Davis Importer of English and American Hardware. Showing horse drawn carts and coach.
Alfred Winter
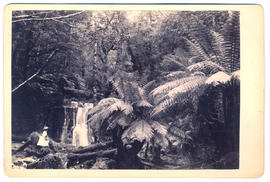
Young lady at Silver Falls, Fern Tree Bower
Parte de Walker Family Papers
Photographs of Silver Falls, Fern Tree Bower, Mount Wellington showing young lady with a basket
James Backhouse Walker
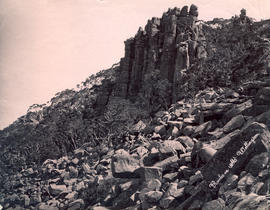
Parte de Walker Family Papers
Photograph rocks on Mount Wellington. The photographer was Albert Sargeant who had studios in Macquarie Street, Hobart and George Street, Launceston between 1886 and 1913.
Albert Sargeant
Derwent River above New Norfolk
Parte de Walker Family Papers
Photograph of the Derwent River above New Norfolk, Tasmania, 1882. The photographer was Henry Hall Baily who had studios in Elizabeth and Liverpool Streets, Hobart from 1865 until 1918.
Henry Hall Baily