- AU TAS UTAS ITCCD 2017/18-0420
- Item
- 1920's
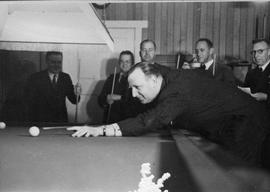
Man taking billiards shot with others looking on.

Man taking billiards shot with others looking on.
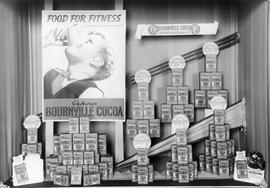
Display of Cadbury's Bournville Cocoa packets with signs indicating the product was reduced by one penny to one shilling and seven pence per quarter pound packet. Poster advertises cocoa as Food for Fitness with 120 cups from every pound.
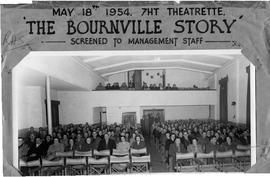
Cadbury Management staff attending the screening of The Bournville Story, at the 7HT Theatrette, May 18, 1954.
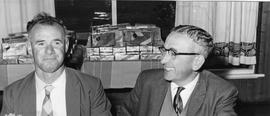
Two men seated in front of tables containing boxed chocolates.
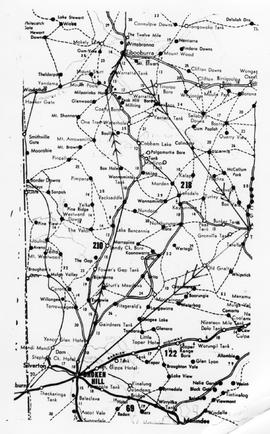
Map of Broken Hill and surrounds
Map of Broken Hill and surrounding area.
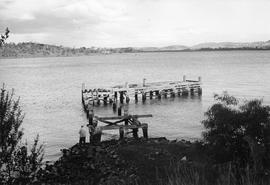
Two men standing next to a jetty in disrepair. River and suburbs in distance.
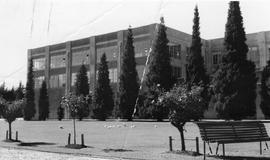
Part of the Cadbury factory with lawns, trees and standard rose bushes in front.
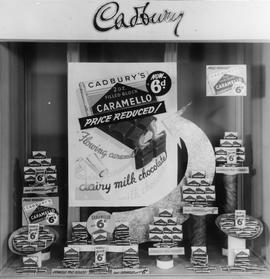
Cadbury Caramello Chocolate Display
Display of Cadbury Caramello chocolates showing a price reduction to sixpence for a 2 ounce block.
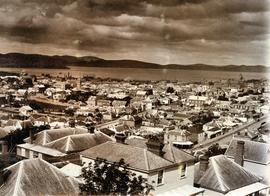
Rooftops of Hobart looking east
Part of Photographs of Edward Verrell
Black-and-white photograph shows view of Hobart rooftops looking east over central city streets including Harrington Street and Murray Street
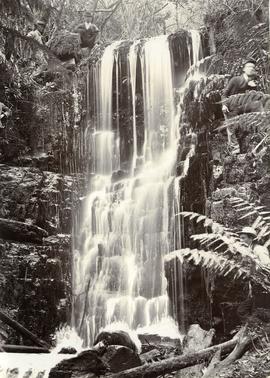
Men posing for camera at Silver Falls
Part of Photographs of Edward Verrell
Black-and-white vertical/portrait photograph of four men posing for the camera while standing or squatting above or beside a waterfall on Mount Wellington, believed to be Silver Falls
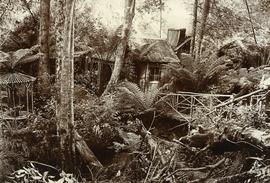
Part of Photographs of Edward Verrell
Black-and-white photograph of rustic hut built amid fern trees on walking track at Mount Wellington, two figures walking across timber bridge amid fern fronds
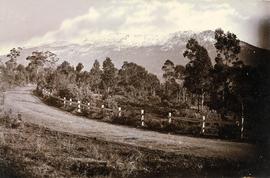
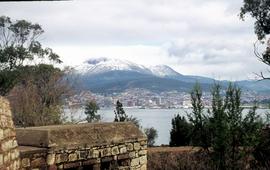
View of snow on Mount Wellington from Huon Road
Part of Photographs of Edward Verrell
Black-and-white photograph shows snow on Mount Wellington viewed from the verge of the Huon Road, South Hobart, with post-and-rail fence alongside roadway.
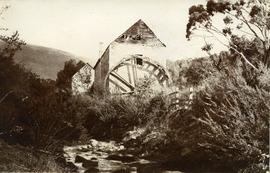
Water mill on New Town Rivulet
Part of Photographs of Edward Verrell
Black-and-white photograph shows water wheel on outside of mill on New Town Rivulet at Lenah Valley
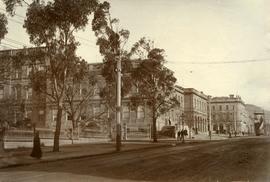
Public buildings near Franklin Square, Hobart
Part of Photographs of Edward Verrell
Black-and-white photograph shows public buildings near Franklin Square, Hobart

Sandy Bay Road looking towards Hobart
Part of Photographs of Edward Verrell
Black-and-white photograph shows Sandy Bay Road, with tram tracks on riverside of road, electric wires for Hobart Electric Tramway, carriage wheelmarks in the unpaved road surface, electricity transmission wires strung from poles mounted with porcelain insulators
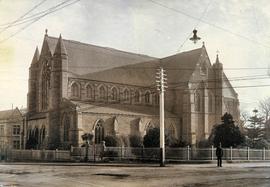
Part of Photographs of Edward Verrell
Black-and-white photograph of St David’s Cathedral, Hobart, including original fence of St David’s Church, which occupied the site until the 1860s
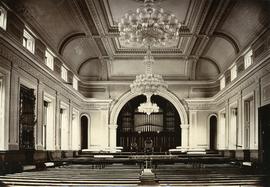
Part of Photographs of Edward Verrell
Black-and-white photograph shows interior of Hobart Town Hall, with low-hanging chandelier and pipe organ
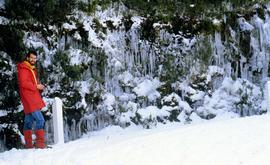
Part of Hal Wyatt Collection
Colour photograph taken near the Springs of man dressed in red beside road to Mount Wellington, with icicles dangling from the vegetation after a snowstorm
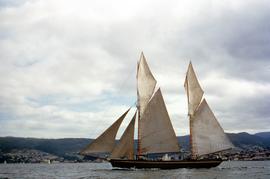
Part of Hal Wyatt Collection
Colour photograph of SV May Queen, sailing on Derwent River in trading vessel race in 1954
A & P Roller at West Hobart Park
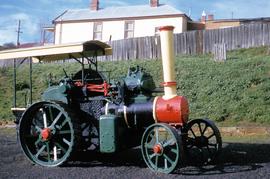
Part of Hal Wyatt Collection
Colour photograph of Aveling & Porter Limited steam roller, green and red trim, with yellow painted canopy, at West Hobart park, 1962.
Hal Wyatt
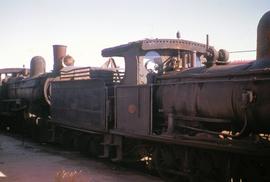
C Class steam locomotives in railyard
Part of Hal Wyatt Collection
Colour photograph of two steam locomotives, C Class locomotives, built for Tasmanian Government Railways
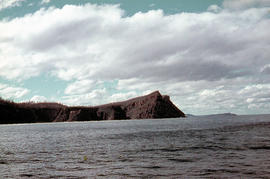
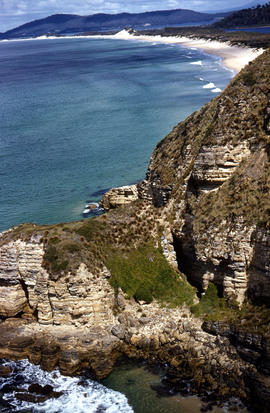
View of Cape Connella from sea level
Part of Arthur Knight Slides
Colour photograph shows Cape Connella taken at sea level
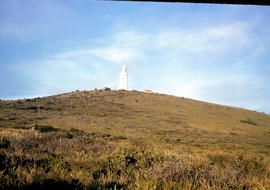
View of lighthouse at Cape Bruny
Part of Arthur Knight Slides
Colour photograph of Bruny Island lighthouse looking south
View of Cape Connella from sea level
Part of Arthur Knight Slides
Colour photograph of Cape Connella, viewed from sea level several hundred metres offshore
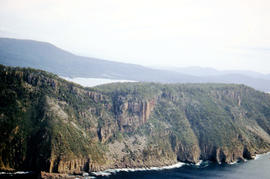
Aerial view of Fluted Cape, South Bruny Island
Part of Arthur Knight Slides
Colour aerial photograph of Fluted Cape, South Bruny Island, 1956
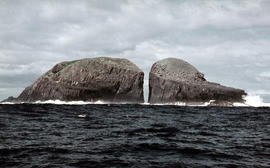
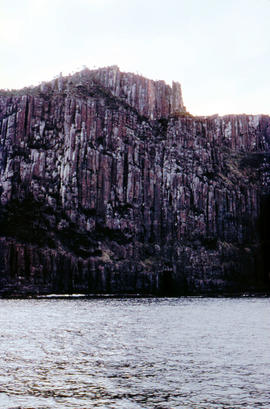
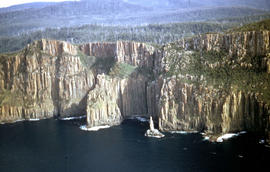
Gap between two Friars, off Bruny Island, 1962
Part of Arthur Knight Slides
Colour photograph taken at sea level of the gap between vertical cliffs of two islands in the Friars island group, off the southern coast of Bruny Island
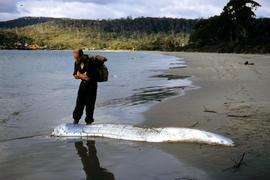
Man inspects ribbon fish on beach
Part of Arthur Knight Slides
Colour photograph of man looking at ribbonfish washed up on beach at Adventure Bay, Bruny Island
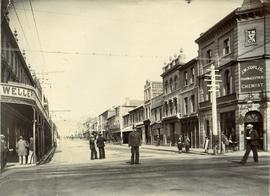
Part of Photographs of Edward Verrell
Black-and-white photograph depicts police officer standing in middle of Liverpool Street, Hobart, with YMCA and J.W. Toplis Pharmaceutical Chemist listed as tenants of the corner building.
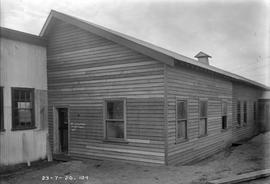
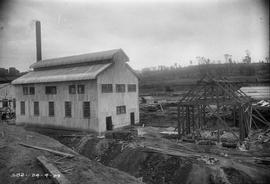
New weatherboard building at E.Z. Co. Zinc Works
Black-and-white photograph shows weatherboards fitted to new building at E.Z. Co. Zinc Works at Risdon
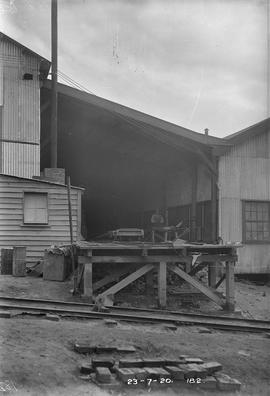
Loading bay at E.Z. Co. Zinc Works
Black-and-white photograph depicts man standing in the shelter of a loading bay beside trolleys on tracks at E.Z. Co. Zinc Works at Risdon
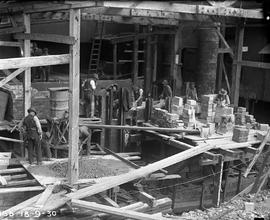
Expansion of E.Z. Co. Zinc Works cell room 1930
Black-and-white photograph of construction of cell room extension at E.Z. Co. Zinc Works at Risdon. Men climbing on beams of roof, a large sign reading “SAFETY” is mounted at ground level.
Concrete framework of new building at E.Z. Co. Zinc Works
Black-and-white photograph depicts workman kneeling at base of partially constructed concrete-framed building and man straddling the roof beams on site of E.Z. Co. Zinc Works at Risdon

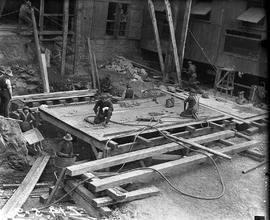
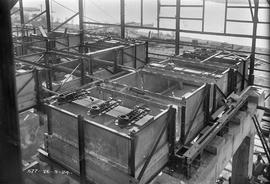
Construction of pure solution tank at E.Z. Co. Zinc Works
Black-and-white photograph shows construction of No. 6 pure solution tank in the cell division at E.Z. Co. Zinc Works at Risdon, January 1930
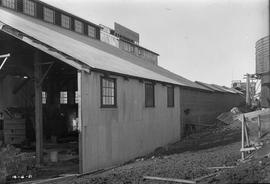
Corrugated iron shed dwarfed by larger building under construction at E.Z. Co. Zinc Works at Risdon
Black-and-white photograph shows small corrugated iron cottage or shed on a hillside below larger, open-fronted building under construction at E.Z. Co. Zinc Works at Risdon
Construction of furnace at E.Z. Co. Zinc Works
Black-and-white photograph shows workmen building the Derwent Prime furnace at E.Z. Co. Zinc Works at Risdon
Workers assembling base of furnace jacket at E.Z. Co. Zinc Works
Black-and-white photograph shows men assembling bottom jacket of Derwent Prime furnace at E.Z. Co. Zinc Works at Risdon
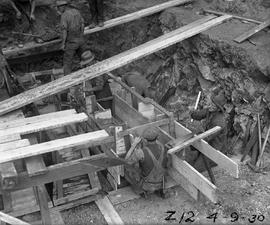
Boxing for foundations of Derwent Prime furnace at E.Z. Co. Zinc Works
Black-and-white photograph shows workmen building box work for foundations of Derwent Prime furnace at E.Z. Co Zinc Works at Risdon 1930
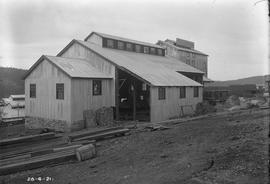
Bricks stacked inside corrugated iron shed at E.Z. Co. Zinc Works at Risdon
Black-and-white photograph shows construction and extension of factory building at E.Z. Co. Zinc Works at Risdon, with bricks stacked inside building partially clad in corrugated iron 1921
Bricks and timber stacked near corrugated iron building at E.Z. Co. Zinc Works at Risdon
Black-and-white photograph shows stacks of bricks and sawn timber near corrugated iron-clad building with solid stone foundation, situated above the railway line at E.Z. Co. Zinc Works at Risdon

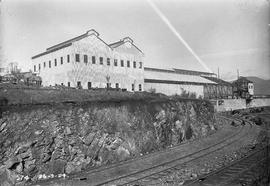
Black-and-white photograph shows elevated view of the construction of the roasting and leaching divisions of the 100-Ton Plant, below the cell room, at E.Z. Co. Zinc Works, looking west towards Mount Faulkner
New buildings under construction above railway cutting at E.Z. Co. Zinc Works 1924
Black-and-white photograph shows construction of new buildings above a railway line cutting, looking west, at E.Z. Co. Zinc Works at Risdon 1924
Interior tanks being fitted out in partially constructed building at E.Z. Co. Zinc Works
Black-and-white photograph shows partially completed tanks atop heavy concrete foundations in a building under construction, at E.Z. Co. Zinc Works at Risdon 1924
Bricks and timber stacked at E.Z. Co. Zinc Works at Risdon 1924
Black-and-white photograph shows piles of bricks and sawn timber amid excavation work and construction of new buildings at E.Z. Co. Zinc Works at Risdon
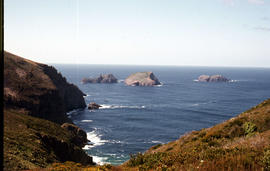
Adventure Bay near Cape Queen Elizabeth
Part of Arthur Knight Slides
View from headland of Adventure Bay near Cape Queen Elizabeth on Bruny Island.
Arthur Knight
View of Cape Connella from the air
Part of Arthur Knight Slides
Colour aerial photograph of cliffs of Cape Connella, viewed from the air.
Setting sun shines on headland east of Cloudy Bay
Part of Arthur Knight Slides
Colour photograph of headland east of Cloudy Bay, illuminated by low setting sun.
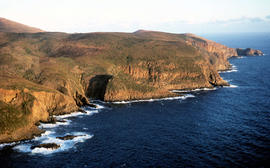
View of the Friars from shore near Pine Log Bight
Part of Arthur Knight Slides
Colour photograph of the Friars, a small group of islands, off southern shore of Bruny Island, taken from shore near Pine Log Bight.
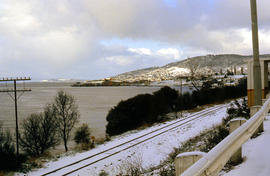
Snow on banks of River Derwent 1986
Part of Arthur Knight Slides
Colour photograph shows snow on the shoreline of River Derwent 1986
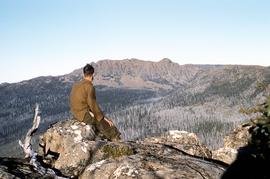
Part of Hal Wyatt Collection
Colour photograph shows man sitting on rock atop Mount Marian looking across valley to Collins Bonnet
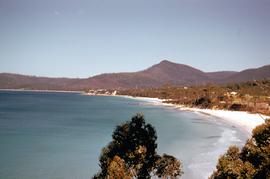
Adventure Bay from Coal Point 1960
Part of Hal Wyatt Collection
Colour photograph of Adventure Bay on Bruny Island, taken from Coal Point in 1960
Hal Wyatt
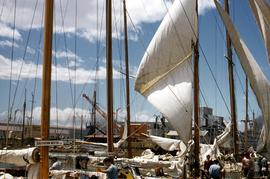
Part of Hal Wyatt Collection
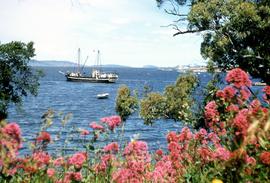
Colour photograph of yachts moored at Hobart waterfront, after a yacht race, masts, rigging, sails being stored by crew on yachts, including Southern Myth and Defiance.
Hal Wyatt
Auxiliary Ketch Argonaut off Powder Jetty 1957
Part of Hal Wyatt Collection
Colour photograph depicts Auxiliary Ketch Argonaut anchored near Powder Jetty, aka Gunpowder Jetty, near Howden, in 1957.
Hal Wyatt
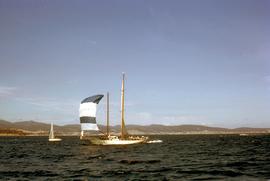
Astor at finish line of Sydney-Hobart Yacht Race
Part of Hal Wyatt Collection
Colour photograph shows yacht with spinnaker hoisted, sailing on Derwent River, the Astor, purportedly in 1962 Sydney-Hobart Yacht Race, photograph quite possibly taken in 1961, 1963 or 1964 race when the craft took line honours.
Hal Wyatt
Part of Hal Wyatt Collection
Colour photograph taken 1960 of Barnes Bay, Bruny Island, slightly out of focus, showing water and tree-covered headland
Hal Wyatt
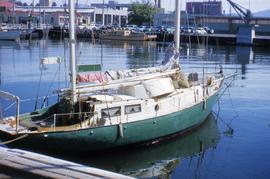
Sailing boat moored in Hobart, 1950s
Part of Hal Wyatt Collection
Colour photograph of small, two masted sailing boat, with green painted hull, and a sign Onrust, Holland, pinned to mast, Onrust also painted onto side of boat.
Hal Wyatt
McNaught beam engine at works depot in Hobart 1967
Part of Hal Wyatt Collection
Colour photograph of beam engine in Hobart, purportedly the oldest McNaught Beam Engine in existence, originally built 1854 in Paisley Scotland, by A.W. Smith and used by Risby’s Sawmill in Hobart until 1955; photograph taken at Moonah public works depot 1967
Hal Wyatt
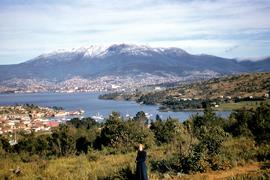
Snow cap on Mount Wellington taken from eastern shore
Part of Hal Wyatt Collection
Colour photograph of snow on Mount Wellington, taken from eastern shore of Derwent River, overlooking Bellerive and Rosny; woman in dark blue overcoat, standing on path in foreground
Hal Wyatt
Mount Wellington viewed from Bellerive fort
Part of Hal Wyatt Collection
Colour photograph of Mount Wellington, as viewed from Kangaroo Bluff Fort at Bellerive, eastern shore of River Derwent
Hal Wyatt
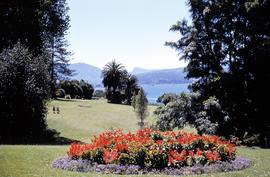
Flower bed at botanical gardens
Part of Hal Wyatt Collection
Colour photograph of Royal Tasmanian Botanical Gardens at Queens Domain, Hobart; depicts garden beds, lawns and Derwent River, looking towards Selfs Point Jetty and petroleum storage tanks at Selfs Point.
Hal Wyatt
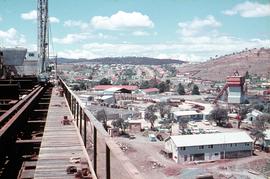
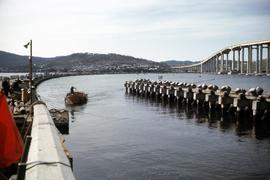
Construction depot and office of Tasman Bridge, 1964
Part of Hal Wyatt Collection
Colour photograph shows office and construction depot of Bridge Co on Derwent’s Eastern Shore, during construction of the Tasman Bridge across the Derwent River, 1964.
Hal Wyatt
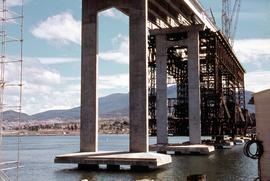
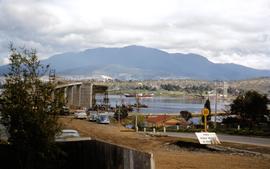
Tasman Bridge under construction from Eastern Shore
Part of Hal Wyatt Collection
Colour photograph shows pylons supporting Tasman Bridge, viewed from the Derwent’s Eastern Shore, during construction of the Tasman Bridge across the Derwent River, 1964.
Hal Wyatt
Part of Hal Wyatt Collection
Colour photograph shows site of repair work to Tasman Bridge, damaged by the crash of the ore carrier Lake Illawarra in January 1975.
Hal Wyatt
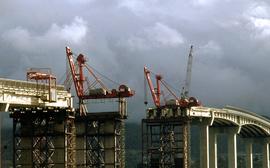
Cranes repairing Tasman Bridge
Part of Hal Wyatt Collection
Colour photograph shows cranes atop pylons at the site of repair work to Tasman Bridge, damaged by the crash of the ore carrier Lake Illawarra in January 1975; missing pylons being replaced.
Eastern approach to Tasman Bridge during construction
Part of Hal Wyatt Collection
Colour photograph of 30 MPH speed limit to motorists approaching the Hobart Bridge during construction of the downstream Tasman Bridge, from the eastern shore of the Derwent River.
Hal Wyatt
Hobart Bridge and Tasman Bridge
Part of Hal Wyatt Collection
Colour photograph taken from the western shore of the Derwent River, depicts vehicles travelling on the temporary, floating Hobart Bridge, while the nearly complete multi-lane Tasman Bridge to join the eastern and western shores of the river, is visible downstream.
Hal Wyatt
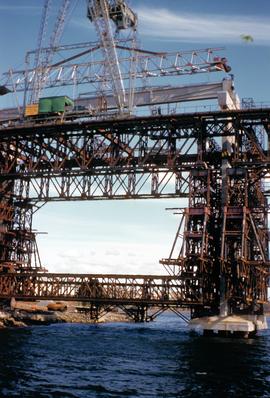
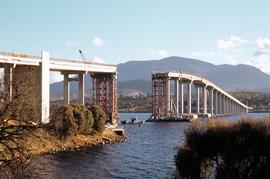
Part of Hal Wyatt Collection
Colour photograph shows construction of Tasman Bridge, with scaffolding, cranes and workers atop frame, photographed from the water, bridge built across the Derwent River, taken 1963.
Hal Wyatt
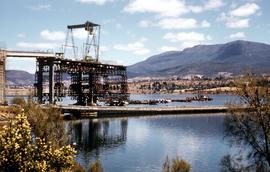
Building Tasman Bridge early 1960s
Part of Hal Wyatt Collection
Colour photograph shows construction of the Tasman Bridge, in early 1960s, as viewed from the eastern shore of the Derwent River; the floating Hobart Bridge is visible in foreground; Mount Wellington in distance, with dry grasslands in the foothills of the mountains, visible on western shore of river.
Hal Wyatt

Part of Hal Wyatt Collection
Colour photograph shows a child sailor at the rudder of a cadet dinghy on Derwent River sailing upstream, while another pleasure craft is travelling in opposite direction; both are sailing past the Royal Australian Navy ship, the Destroyer Escort, HMAS Torrens, (No. 53 emblazoned on the side) is berthed just off Port of Hobart.
Hal Wyatt
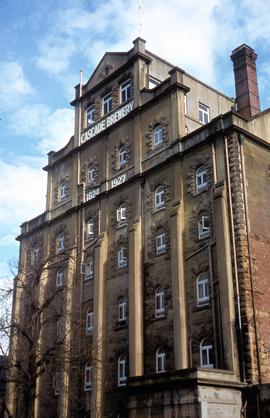
Part of Hal Wyatt Collection
Colour photograph shows facade of Cascade Brewery building.
Hal Wyatt
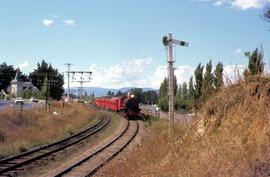
Steam train at Claremont, 1972
Part of Hal Wyatt Collection
Colour photograph of a steam train pulling old style carriage stock leaving Claremont and heading towards Chigwell station.
Hal Wyatt
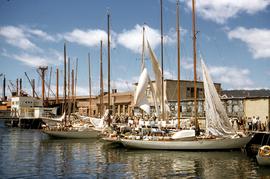
Sailing boats moored at Constitution Dock
Part of Hal Wyatt Collection
Colour photograph of crowds gathered on docks looking at sailing boats moored at Constitution Dock, Hobart
Hal Wyatt

Reflections on water at Constitution Dock 1954
Part of Hal Wyatt Collection
Colour photograph shows reflections in the water, of masts and sailing boats moored at Constitution Dock, Hobart, with State Library of Tasmania and Hobart GPO clocktower in background.
Hal Wyatt
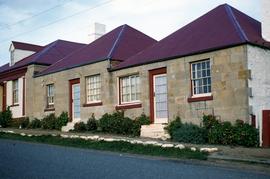
Part of Hal Wyatt Collection
Colour photograph shows sandstone cottages at Richmond, taken 1959.
Hal Wyatt
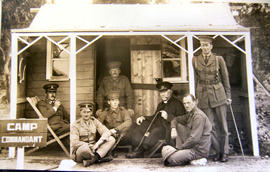
Men on verandah of Camp Commandant Cottage
Black and white photograph of Camp Commandant's hut with men in uniform seated outside, part of the Claremont military camp.
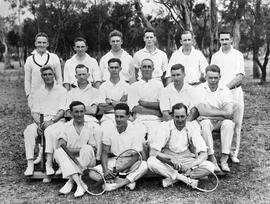
Group of men dressed in tennis whites, some holding rackets.
Cadbury Factory Under Construction
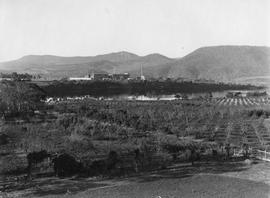
Looking across orchard to Cadbury buildings under construction.
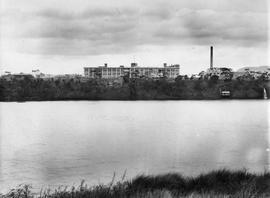
View across water to partially completed Cadbury factory.
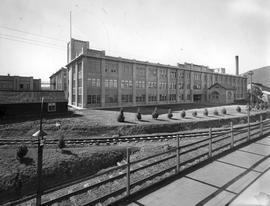
Cadbury Building and Train Tracks
Three story building forming part of the Cadbury factory. Railway lines visible in front.

Cadbury factory with train loaded with supplies in front of building.
Wooden Buildings, Cadbury Factory
Interlinking wooden buildings on Cadbury site, with Derwent River in background.
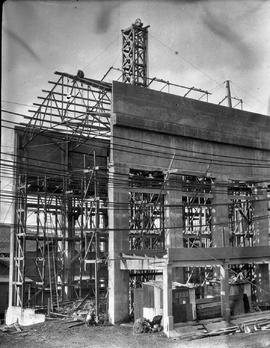
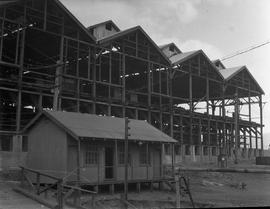
Multi-story buildings, Cadbury Factory
Courtyard and paths between multi-storied buildings, Cadbury factory.
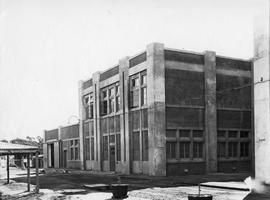
Multi-storied building with lettering reading Westway on corner, forming part of Cadbury factory.
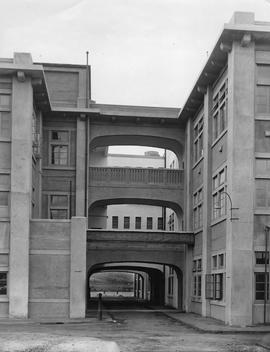
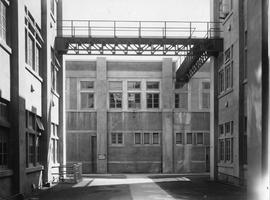
External Walkways, Cadbury Factory
Two multi-story buildings connected by walkways with road running through middle at ground level giving glimpse of water, forming part of the Cadbury factory.
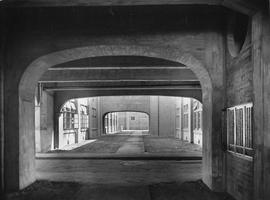
Internal Courtyard, Cadbury Factory
View of road through an internal courtyard linking factory buildings on Cadbury site.
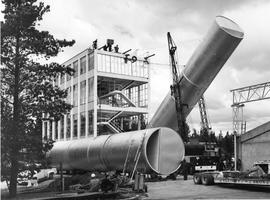
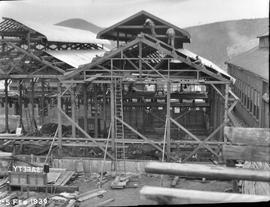
Raising Cylinders, Cadbury Factory
Construction of part of Cadbury factory showing large cylinders being erected. Elliot Brothers crane and truck in foreground.
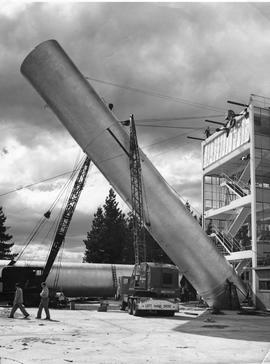
Cranes lifting cylinder, Cadbury Factory
Large cylinder being craned up into position at end of building, forming part of Cadbury factory. Crane marked as Johns & Waygood LTD.
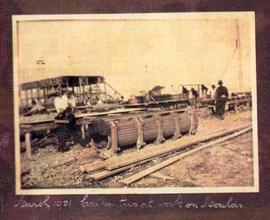
Carpenters working on constructing wooden moulds, part of Cadbury factory construction. Photograph annotated March 1921.
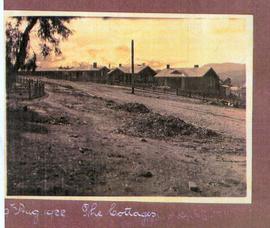
Row of cottages constructed on Cadbury estate. Photograph annotated 19th August 1922.
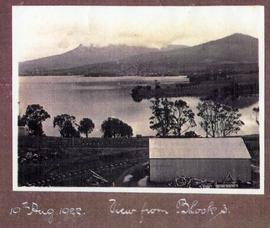
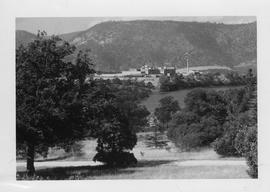
Mt Wellington from Cadbury Factory
View from Cadbury site across to orchard. Mt. Wellington in background. Photograph annotated View from block 3. 19th August 1922.
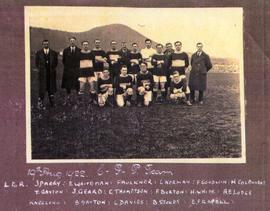
Group photograph of football team. Photograph annotated as 19th August 1922. C.F.P. Team. L to R: J Parry, E Whoteman, Faulkner, L Norman, F Goodwin, H Colbourne, T Gayton, J Geard, C Thomptson, F Burton, H White, A E Lodge. Kneeling: B Gayton, L Davies, B Stokes, E Frapell.
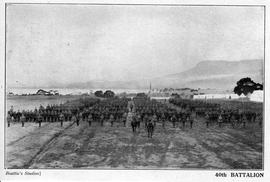
Soldiers and horsemen on parade ground with Mt. Wellington in background. Photograph annotated 40th Battalion. Photograph by Beattie's Studios.
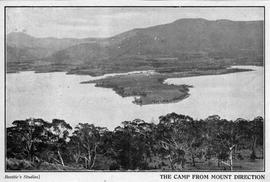
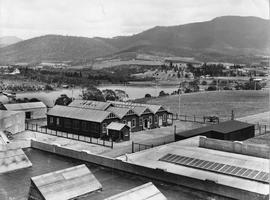
Claremont Military Camp from Mount Direction
Photograph of Claremont Military camp taken from high ground. Photograph annotated The Camp from Mount Direction. Photograph by Beattie's Studios.
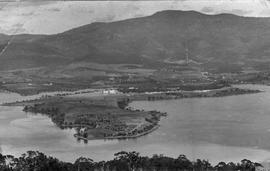
Cadbury Military Camp from Mt. Direction.
Photograph from Mt. Direction showing Cadbury Military Camp and surrounding area.
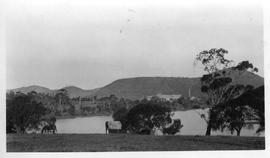
View across water to the Cadbury factory, horses grazing in foreground.

Four men playing golf. Back of photograph states The Origin of Claremont Golf Club 1926? (Lunch hour golf) Left to right: Wal Morrow (scorer), HV McKernan, Will Cooper, FB Richardson. Photo by JA Cooper (his clubs lying on green)
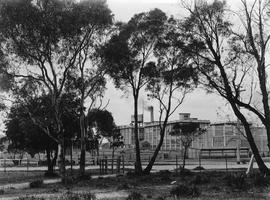
Cadbury Factory with Gum Trees
Cadbury factory as seen through stand of gum trees.
Cadbury Factory seen through stand of gum trees. Photograph taken from Windemere. Photograph by J J N Barnett.
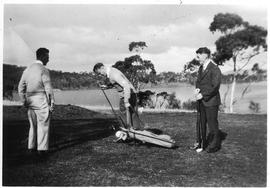
Three men playing golf, river in background.
Constructing footpath and nature strip, Cadbury Estate
Footpath and nature strip under construction, Cadbury Estate.
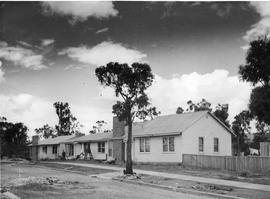
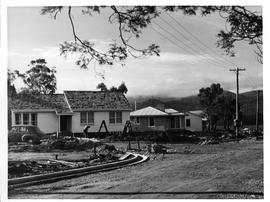
Houses on the Cadbury Estate, Claremont
Newly constructed wooden homes, Cadbury Village, Claremont.