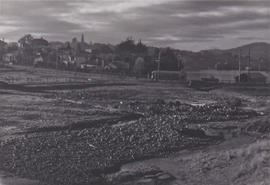
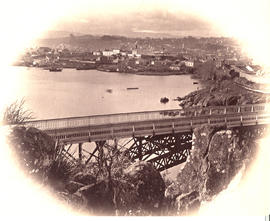
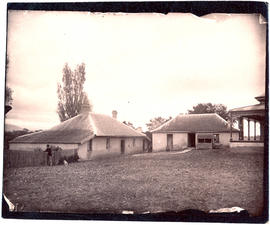
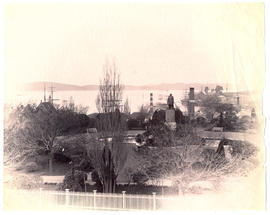
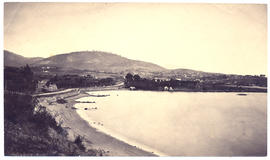
Sandy Bay Road and tram from the Rifle Range sheds
- AU TAS UTAS SPARC 2020/3-3-4
- Sub-item
Parte de Lindsay Crawford Collection

410 resultados com objetos digitais Mostrar resultados com objetos digitais
Sandy Bay Road and tram from the Rifle Range sheds
Parte de Lindsay Crawford Collection
Parte de Lindsay Crawford Collection
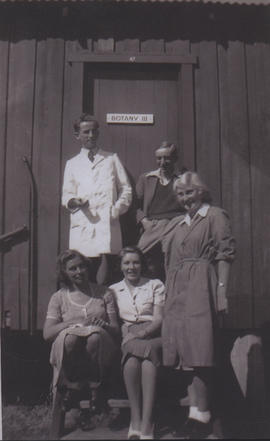
Photograph taken outside the Botany Shed. Lindsay Crawford back right, Pat Richardson right, Heather Gulline (?) left front)
Parte de Lindsay Crawford Collection
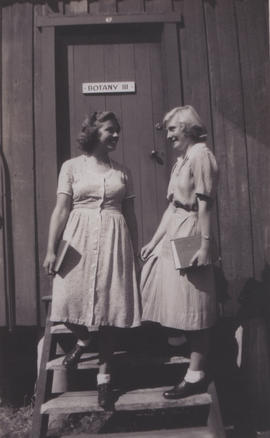
Photograph of two students believed to be Heather Gulline and Pat Richardson outside the Botany Shed

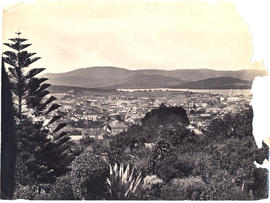
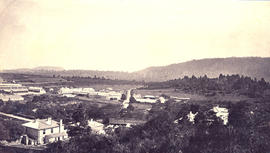
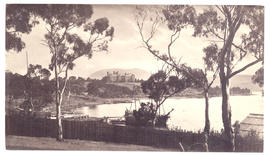
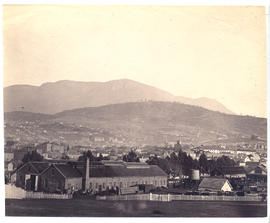
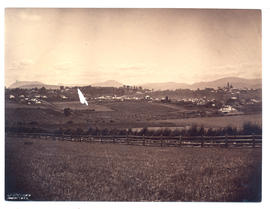
Sandy Bay campus facing Mt Wellington
Parte de Lindsay Crawford Collection
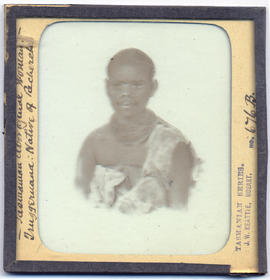
Tasmanian Aboriginal woman Truggeruana, native of Recherche, Van Diemen's Land
Parte de Walker Family Papers
Lantern slide of Tasmanian aboriginal woman Truggeruana, native of Recherche. Prepared by J.W. Beattie (1859-1930) whose studio locations were Elizabeth Street, Hobart from 1891-1920, Murray Street from 1921-40 and Cat and Fiddle until 1994
John Watt Beattie

Tasmanian Aboriginal Stone Implement Quarry, Plenty River, Van Diemen's Land
Parte de Walker Family Papers
Lantern slides of Tasmanian aboriginal stone implement quarry, Plenty river. Prepared by J.W. Beattie (1859-1930) whose studio locations were Elizabeth Street, Hobart from 1891-1920, Murray Street from 1921-40 and Cat and Fiddle until 1994.
John Watt Beattie
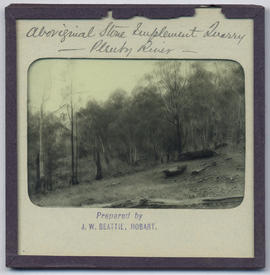
Plenty River, Van Diemen's Land, Tasmanian Aboriginal Stone Implement Quarry
Parte de Walker Family Papers
Lantern slides of Tasmanian aboriginal stone implement quarry, Plenty river. Prepared by J.W. Beattie (1859-1930) whose studio locations were Elizabeth Street, Hobart from 1891-1920, Murray Street from 1921-40 and Cat and Fiddle until 1994.
John Watt Beattie
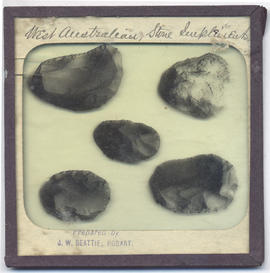
West Australian Aboriginal stone implements
Parte de Walker Family Papers
Lantern slide of West Australian aboriginal stone implements. Prepared by J.W. Beattie (1859-1930) whose studio locations were Elizabeth Street, Hobart from 1891-1920, Murray Street from 1921-40 and Cat and Fiddle until 1994.
John Watt Beattie
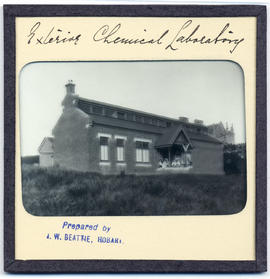
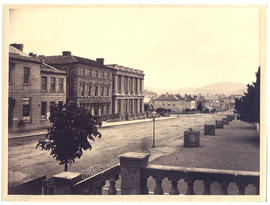
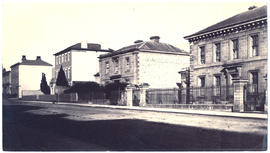
Parte de Walker Family Papers
Lantern slides of the University of Tasmania, Queen's Domain, Hobart. Views of exterior and laboratories and library. Prepared by J.W. Beattie (1859-1930) whose studio locations were Elizabeth Street, Hobart from 1891-1920, Murray Street from 1921-40 and Cat and Fiddle until 1994 (Collection Pr.S.Uni/1-8)
John Watt Beattie
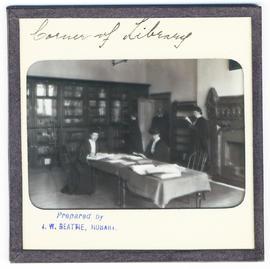
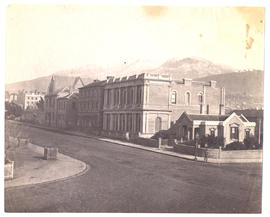
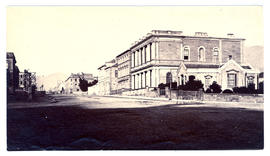
Corner of library, University of Tasmania, Queen's Domain, Hobart, late nineteenth century
Parte de Walker Family Papers
Lantern slides of the University of Tasmania, Queen's Domain, Hobart. Views of exterior and laboratories and library. Prepared by J.W. Beattie (1859-1930) whose studio locations were Elizabeth Street, Hobart from 1891-1920, Murray Street from 1921-40 and Cat and Fiddle until 1994 (Collection Pr.S.Uni/1-8)
John Watt Beattie

Parte de Dennison Collection
Aerial view of Eaglehawk Neck showing the Eaglehawk Neck hall which opened in 1928
Parte de Dennison Collection
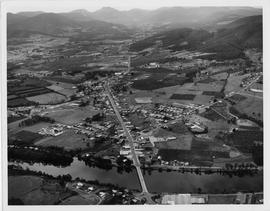
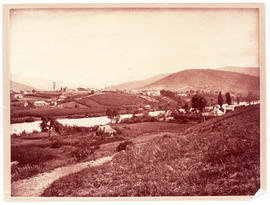
Aerial view of Huonville, Tasmania, looking toward Sleeping Beauty mountain range showing streets, bridge and Huon River
Parte de Dennison Collection
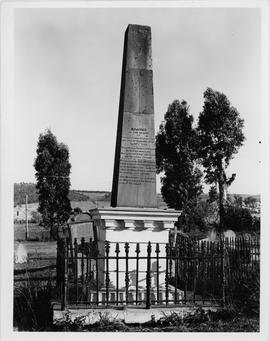
Photograph of the Rev. Robert Knopwood's grave at Rokeby, Clarence Plains, Tasmania. Knopwood died 18 September 1838. He was the first Chaplin of Van Diemen's Land
Parte de Dennison Collection
Photograph of a sketch of Old Hobart town
Parte de Dennison Collection
A view of Hobart Town by Irish born convict-artist Alan Carswell (1823), showing the colony establishing itself around the mouth of Sullivans Cove in the early 1820s.
Parte de Dennison Collection
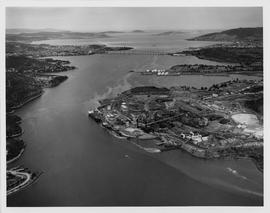
Aerial view of the Zinc Works at Derwent Park. Looking down the Derwent River toward the Tasman Bridge. Showing Self's Point and Cornelian Bay Cemetery
Parte de Dennison Collection
View of the Hobart harbour looking from Princes Park showing the cargo ships at Elizabeth Street Pier, MTT bus terminal, RH hospital, transport building, City Hall and Tasmanian Museum
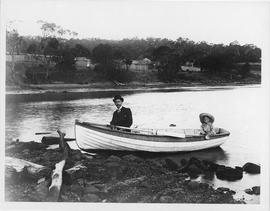
Man and small child in a rowboat
Parte de Dennison Collection
Photograph of man and small child in a rowboat. Thought to be taken at Beltana now Lindisfarne.
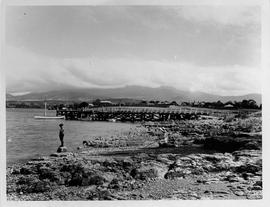
Parte de Dennison Collection
Photograph of Beltana or Lindisfarne jetty showing two young children playing in the foreground. Mt Wellington in the background.
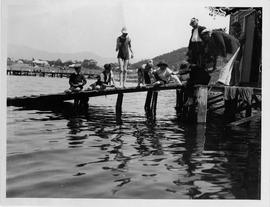
Children fishing from the jetty
Parte de Dennison Collection
Photograph of children fishing from the Lindisfarne Rowing Club jetty. Lindisfarne jetty in background.
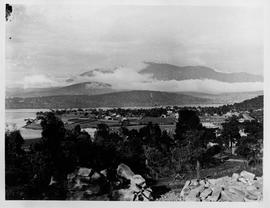
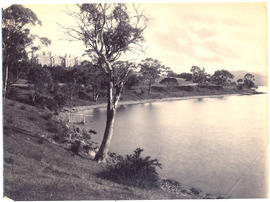
Lindisfarne with a view to the mountain
Parte de Dennison Collection
Photograph of Lindisfarne taken from hill behind showing quarried stone and a view to the mountain

View over the Tamar River to the public baths from Kings Bridge
Parte de Dennison Collection
View over the Tamar River, Launceston, from Kings Bridge. Showing the public swimming baths
Parte de Marshall and Terry Family Papers
Parte de Marshall and Terry Family Papers
Parte de Donald Davie Papers
Photograph of John A. King
Sketches from the Calder Papers
Parte de Donald Davie Papers
Photograph of three sketches from the Calder Papers : tent, camp and Mt. Olympus. Originals held in the Mitchell Library
Arctic Expedition in search of Sir John Franklin : newspaper article
Parte de Donald Davie Papers
Reproduction - Article from Illustrated London News, 10 August 1850. "Arctic Expedition in search of Sir John Franklin"
(also Maria Island)
(London Electrotype Agency Grays Inn Rd.London.WC1)
Beautiful Hobart and Surroundings
Parte de Donald Davie Papers
Souvenir booklet entitled 'Beautiful Hobart and surroundings. 81 views by J.C. Breaden'. It contains a series of black and white photographs of Hobart and places nearby
Parte de Donald Davie Papers
Photograph of young girl (contemporary) in two poses
Historic Port Arthur Tasmania : postcard sketches
Parte de Donald Davie Papers
Seven postcard sketches - Historic Port Arthur Tasmania. (NuColorvue Productions Pty.Ltd. Mulgrave Vic).
Watercolour of Governor's House at Sydney Port Jackson
Parte de Donald Davie Papers
Photograph of watercolour of Governor's House at Sydney Port Jackson, 1791
The history of the Van Diemen's Land Company : draft and typescript
Parte de Meston Papers
Draft and typescript of chapters 1-5, 7, conclusion and also introduction by K.M. Dallas of "The history of the Van Diemen's Land Company."
Archibald Lawrence Meston
Copies of dispatches of the Van Diemen's Land Company
Parte de Meston Papers
Copies of dispatches etc. of the Van Diemen's Land Company
Archibald Lawrence Meston
Parte de Meston Papers
Copies of diaries of Jorgen Jorgensen, including Journey to Ouse Plateau, Repat of Jorgensen to V.D.L. Co. on route between Hobart and Circular Head, and Journal kept while exploring from Circular Head to the Pieman River, 1826-7.
Archibald Lawrence Meston
Parte de Meston Papers
Manuscript of "Cradle Mountain" by R.E. Smith, with notes on wild life and climate by Gustav Weindorfer. dated 7 August
1937.
Archibald Lawrence Meston
Cradle Mountain miscellaneous papers
Parte de Meston Papers
Miscellaneous papers re Cradle Mountain comprising correspondence regarding Franz Malcher, translation from Malcher's account of his trip to Tasmania, March 1914, notes on wild animals by G. Weindorfer and copy of his birth certificate, and copy of "Trip to the Summit of Cradle Mountain" by W.O. Weston, published in Examiner, Feb-March 1891 and miscellaneous notes.
Archibald Lawrence Meston
Photographs: Miscellaneous & postcards
Parte de Clive Samson Collection
• A studio portrait of an unknown lady - an old photograph probably of a forebear.
• Two photographs of unidentified individuals, one annotated 'Tiesie Austria'.
• Postcard of Reigate Wray Common Windmill.
• Postcard of Eiger, Monch, Jungfrau.
• Pictorial folding letter card of scenes from Reigate.
• Two postcards of Reigate.
• Seven postcards of Winchmore Hill.
• Photograph of the cover designed for the Argo recording of ‘The Witnesses’.
• Envelope containing negatives of photographs.
Clive Sansom
View from Mr. Robert's garden, West Hobart
Parte de Walker Family Papers
Photograph from the collection of James Backhouse Walker of a view of Hobart looking towards the Eastern Shore. The panorama has been taken from Mr. Roberts' garden with various shrubs and a Norfolk Island pine in the foreground. Henry Hall Baily is the photographer. He had studios in Elizabeth and Liverpool Streets Hobart from 1865 until 1918.
James Backhouse Walker
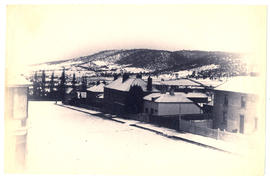
Parte de Walker Family Papers
Photograph from the collection of James Backhouse Walker of a Hobart streetscape in snow - looking towards Mt Nelson and Sandy Bay.
James Backhouse Walker
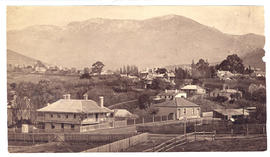
Hobart, looking towards St. George's Hill
Parte de Walker Family Papers
Photograph from the collection of James Backhouse Walker of a view of Hobart, looking towards St. George's Hill, Battery Point. Showing St Georges Church and James Luckman's windmill probably taken in the 1870s.
James Backhouse Walker
Mt. Wellington from St. George's Hill
Parte de Walker Family Papers
Photograph from the collection of James Backhouse Walker of a view of Mt. Wellington from St. George's Hill with Hawthorn Cottage in the foreground and Bishopscourt - Garden Crescent and Davey Street Chapel in the background (according to notes on the reverse). The photographer was the Anson Brothers, whose firm was located in Liverpool, Collins and Elizabeth Streets between 1878 and 1891.
James Backhouse Walker

Hobart from Huon Road looking east
Parte de Walker Family Papers
Photograph from the collection of James Backhouse Walker of a view of Hobart from Huon Road looking east in about 1879, according to notes on the reverse.
James Backhouse Walker
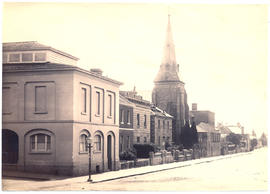
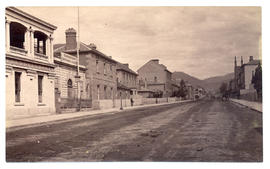
Photograph of the Oddfellows Hall and Congregational Church
Parte de Walker Family Papers
Photograph of Davey Street, Hobart, looking east, showing the Oddfellows hall and the Congregational church. Photograph taken from the Harrington Street intersection.

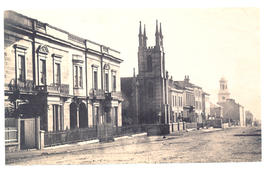
St. John's Church Goulburn Street
Parte de Walker Family Papers
Photograph of St. John's Church Goulburn Street, Hobart taken c1880 the photographers were Anson brothers whose firm was located in Liverpool, Collins and Elizabeth Streets between 1878 and 1891
Anson Brothers
Parte de Walker Family Papers
Photograph of Wilmot Terrace, Harrington Street (Sandy Bay Road) showing grandmother Mathers house, the furthest in the terrace.
Alfred Winter
Parte de Walker Family Papers
Photograph of Macquarie Street, Hobart looking east towards Elizabeth Street from the Civil Court in about 1880. The photographer was Alfred Winter who had studios in Bathurst, Elizabeth and Liverpool Streets from 1869 until 1880.
Alfred Winter
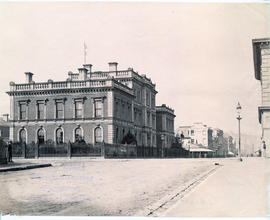
Bank of Australasia and Macquarie House
Parte de Walker Family Papers
Photograph of Macquarie Street, Hobart looking south in about 1870. The Bank of Australasia and Macquarie House are two of the buildings featured. The photographer is Henry Hall Baily who had studios in Elizabeth and Liverpool Streets between 1865 and 1918.
Henry Hall Baily
Parte de Walker Family Papers
Photograph of Macquarie Street, Hobart looking south from the corner of Elizabeth Street c. 1870. Some of Franklin Square on left Commercial Bank on right. The photographers were Anson Brothers whose firm was located in Liverpool, Collins and Elizabeth Streets between 1878 and 1891.
Anson Brothers
Parte de Walker Family Papers
Photograph of the Commercial Bank, Macquarie Street, Hobart looking south from the corner of Elizabeth Street in c1877 after old St. Davids Cathedral was pulled down. The photograph is attributed to Henry Hall Baily who had studios in Elizabeth and Liverpool Streets Hobart from 1865 until 1918.
Henry Hall Baily
Parte de Walker Family Papers
Photograph of the first Tasmanian Temperance Alliance building, Macquarie Street Hobart
Henry Hall Baily
St. Joseph's Catholic Church and old St. David's Cathedral
Parte de Walker Family Papers
Photograph of St. Joseph's Catholic Church, Macquarie Street, with old St. David's Cathedral in the background, Macquarie Street, Hobart c. 1870.
Buildings on the corner of Macquarie and Murray Streets
Parte de Walker Family Papers
Photograph of buildings on corner of Macquarie and Murray Streets, Hobart c. 1877. Photographed by Henry Hall Baily who had studios in Elizabeth and Liverpool Streets, Hobart from 1865 until 1918.
Henry Hall Baily
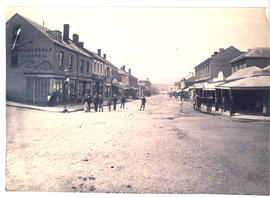
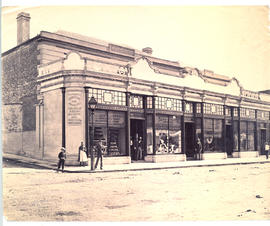
Wholesale & Retail Drapery Warehouse
Parte de Walker Family Papers
Photograph of Liverpool Street Hobart with Wholesale & Retail Drapery Warehouse in foreground.
Perkins and Nephew Wholesale & Retail Drapers and Grocers
Parte de Walker Family Papers
Photograph of the Emporium of Perkins and Nephew Wholesale & Retail Drapers and Grocers established in 1826, situated on the corner of Watchorn and Liverpool Street Hobart, taken in 1881. The photographers were Anson Brothers Portrait and Landscape Photographers Hobart Town whose firm was located in Liverpool, Collins and Elizabeth Streets between 1878 and 1891.
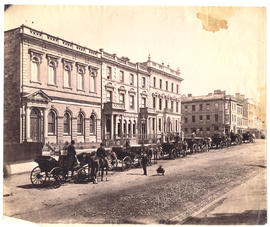
Murray Street with horse drawn carriages
Parte de Walker Family Papers
Photograph of Murray Street, Hobart in 1881 with a row of horse drawn carriages outside the Hobart Savings Bank, Masonic Temple and the Derwent and Tamar Buildings with Webb's hotel (later Hadley's Orient Hotel) in the distance.
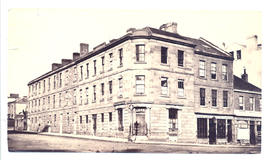
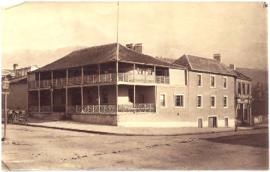
Waterloo House Private Boarding Establishment
Parte de Walker Family Papers
Photograph of Waterloo House Private Boarding Establishment on the corner of Murray and Davey Streets, Hobart c.1893 with an electric tram in the background.
Parte de Walker Family Papers
Photograph of Webb's Hotel, later Hadley's, Murray Street, Hobart, Tasmania, in about 1880. The photographer was Alfred Winter who had studios in Bathurst, Elizabeth and Liverpool Streets from 1869 until 1891.
Alfred Winter
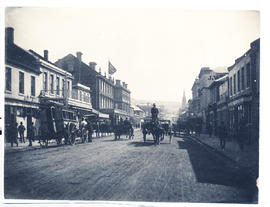
Elizabeth Street outside C. Davis Importer of English and American Hardware
Parte de Walker Family Papers
Photograph of Elizabeth Street looking north, outside C. Davis Importer of English and American Hardware. Showing horse drawn carts and coach.
Alfred Winter
Parte de Walker Family Papers
Photograph of the Ship Inn on the corner of Elizabeth and Collins Streets, Hobart in about 1881. The photographer is Alfred Winter who had studios in Bathurst, Elizabeth and Liverpool Streets from 1869 until 1891.
Cataract Bridge and Launceston
Parte de Walker Family Papers
Photograph of Launceston, Tasmania from beyond the Cataract Bridge. The photographers were Anson Brothers who had studios in Liverpool, Collins and Elizabeth Streets, Hobart, between 1878 and 1891.
Anson Brothers
Parte de Walker Family Papers
Photograph of the Public Buildings in Launceston, Tasmania. The Criterion Hotel is in the background. The photographers were Anson Brothers who had studios in Liverpool, Collins and Elizabeth Streets, Hobart, between 1878 and 1891.
Anson Brothers
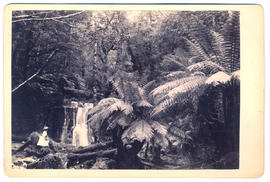
Young lady at Silver Falls, Fern Tree Bower
Parte de Walker Family Papers
Photographs of Silver Falls, Fern Tree Bower, Mount Wellington showing young lady with a basket
James Backhouse Walker
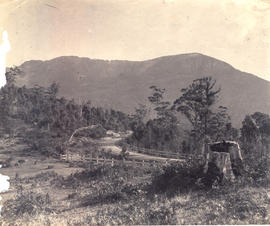
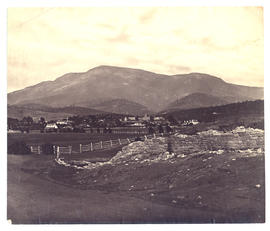
Huon Road with post and rail fence looking to Mt Wellington
Parte de Walker Family Papers
Photograph of Huon Road with post and rail fence looking to Mt Wellington
James Backhouse Walker
Parte de Walker Family Papers
Photograph of Mount Wellington from hillside. The photographers were Anson Brothers who had studios in Liverpool, Collins, and Elizabeth Streets between 1878 and 1891.
Anson Brothers
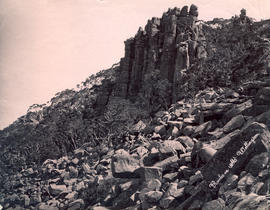
Parte de Walker Family Papers
Photograph rocks on Mount Wellington. The photographer was Albert Sargeant who had studios in Macquarie Street, Hobart and George Street, Launceston between 1886 and 1913.
Albert Sargeant
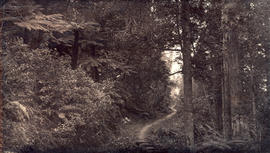
Parte de Walker Family Papers
Photograph of the track to Fern Tree Bower, Mount Wellington before taken prior to 1870
James Backhouse Walker
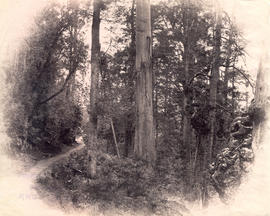
Track to Fern Tree Bower, Mt Wellington
Parte de Walker Family Papers
Photograph of the track to Fern Tree Bower, Mount Wellington before taken prior to 1879 by Anson Brothers who had studios in Liverpool, Collins, and Elizabeth Streets between 1878 and 1891.
James Backhouse Walker
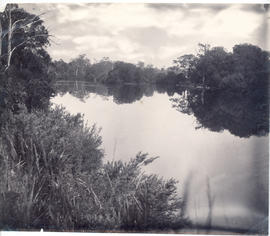
Derwent River above New Norfolk
Parte de Walker Family Papers
Photograph of the Derwent River above New Norfolk, Tasmania, 1882. The photographer was Henry Hall Baily who had studios in Elizabeth and Liverpool Streets, Hobart from 1865 until 1918.
Henry Hall Baily
Parte de Walker Family Papers
Photograph of New Norfolk, Tasmania, c. 1880 from the opposite side of the River Derwent. The photographer was Alfred Winter who had studios in Bathurst, Elizabeth and Liverpool Streets from 1869 until 1891.
Alfred Winter

Parte de Walker Family Papers
Photograph of the lighthouse on Maatsuyker Island, Tasmania, taken on the day of the opening of the lighthouse in 1891
Big Witch from Maatsuyker Island
Parte de Walker Family Papers
Photograph of Big Witch from Maatsuyker Island, taken on the day of the opening of the lighthouse in 1891
Commandant's house and jetties at Port Arthur
Parte de Walker Family Papers
Photograph of the commandant's house and jetties, Port Arthur c. 1880. The photographers are Anson Brothers., Portrait and Landscape Photographers, Hobart Town whose firm was located in Liverpool, Collins and Elizabeth Streets between 1878 and 1891.
Anson Brothers
Parte de Walker Family Papers
Photograph of the Model Prison, Port Arthur, Tasmania.
Parte de Walker Family Papers
Thought to be a photograph of dwellings at Port Arthur
Parte de Walker Family Papers
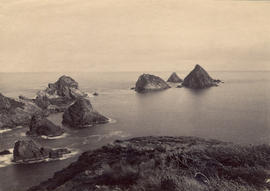
Panorama from Waterfall Bay to Cape Huay on the Tasman Peninsula. The photographer is John Watt Beattie.
John Watt Beattie
Government House from the shipyards
Parte de Walker Family Papers
Photograph of Government House, Hobart, Tasmania in about 1870. Showing the shipyard in the foreground and Mount Direction behind.. The photographer was Henry Hall Baily who had studios in Elizabeth and Liverpool Streets, Hobart from 1865 until 1918.
Henry Hall Baily
Parte de Walker Family Papers
Photograph of Government House Hobart taken from the bay below the Queen's Domain, c.1890s. The photographer was Henry Hall Baily who had studios in Elizabeth and Liverpool Streets, Hobart from 1865 until 1918.
Henry Hall Baily
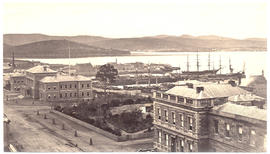
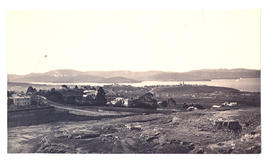
Franklin Square and Hobart waterfront
Parte de Walker Family Papers
Photograph from the collection of James Backhouse Walker of Franklin Square and the Hobart waterfront taken in about 1870 possibly from St. David's Cathedral according to a note on the reverse. The photographer is Henry Hall Baily who had studios in Elizabeth and Liverpool Streets Hobart from 1865 until 1918.
Henry Hall Baily
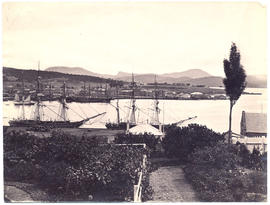
Sullivans Cove and Hunter Island
Parte de Walker Family Papers
Photograph of Sullivans Cove and Hunter Island taken from the eastern end of Salamanca with garden in the foreground and two ships alongside the wharf. c.1880
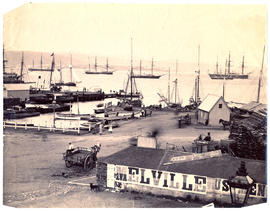
Parte de Walker Family Papers
View of Hobart waterfront c.1880 showing docks, carts, ships at anchor and woodyard
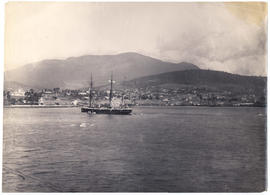
Sullivans Cove, taken from HMS Nelson
Parte de Walker Family Papers
Photograph of a ship with Sullivans Cove and Mount Wellington in the background taken from HMS Nelson in 1882. The photographer is Henry Hall Baily who had studios in Elizabeth and Liverpool streets Hobart from 1865 until 1918.
Henry Hall Baily
Parte de Walker Family Papers
Photograph of Franklin Square Hobart was taken by the Anson Brothers photographers, whose firm was located in Liverpool, Collins and Elizabeth Streets between 1878 and 1891.
Anson Brothers

Parte de Walker Family Papers
Photograph of Sir John Franklin's statue in the fountain, Franklin Square, Hobart.

Hobart Town from the Queen's Domain
Parte de Walker Family Papers
Photograph of Hobart Town, Tasmania, from the Queen's Domain, looking down Macquarie Street in the 1850s. This photograph appears on page 27 of Allan Sierp's 'Colonial Life in Tasmania: Fifty Years of Photography 1855-1905' (Rigby, 1976)
Parte de Walker Family Papers
Photograph of Hobart from the Queen's Domain with the railway station in the foreground, c. 1881. The photographers were Anson Brothers who had studios in Liverpool, Collins and Elizabeth Streets between 1878 and 1891.
Anson Brothers
New Town from New Town Invalid Asylum
Parte de Walker Family Papers
Photograph from New Town Invalid Asylum, Tasmania in about 1882. The photographer was Henry Hall Baily who had studios in Elizabeth and Liverpool Streets, Hobart from 1865 until 1918.
Henry Hall Baily
Parte de Walker Family Papers
Photograph of Austins Ferry, Hobart, Tasmania, with Austin's old Inn to the right. The photographer was Alfred Winter who had studios in Bathurst, Elizabeth and Liverpool Streets from 1869 until 1891.
James Backhouse Walker
Parte de Walker Family Papers
Photograph of Sandy Bay Road, with St. Helena , later Wrest Point, on the left.
James Backhouse Walker
Parte de Walker Family Papers
Photograph of Queenborough, Sandy Bay, Tasmania, c.1881. The photographer was Alfred Winter who had studios in Bathurst, Elizabeth and Liverpool Streets from 1869 until 1891.
James Backhouse Walker
Parte de Walker Family Papers
Photograph of the Cascades' Female Factory looking toward Mt Wellington with the Cascade Brewery in the distance. In 1828 a Female Factory opened on the outskirts of Hobart at Cascades. It became the colony's largest Factory, expanding by 1853 into five major courtyards accommodating 1000 women and 175 children. The photographer was J.W. Beattie (1859-1930) whose studios were in Elizabeth and Murray Streets between 1891 and 1940
John Watt Beattie
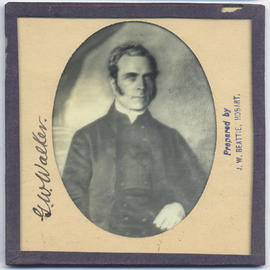
Parte de Walker Family Papers
Lantern slide of George Washington Walker (1800-1859). Prepared by J.W. Beattie (1859-1930) whose studio locations were Elizabeth Street, Hobart from 1891-1920, Murray Street from 1921-40 and Cat and Fiddle until 1994.
John Watt Beattie
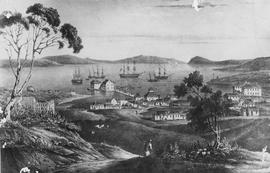
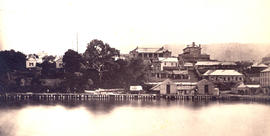
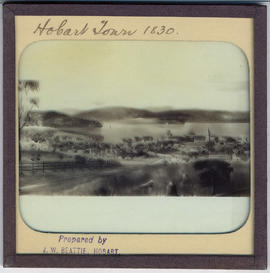
Hobart Town Harbour, Van Diemen's Land
Parte de Walker Family Papers
Lantern slide of Hobart Town Harbour, Van Diemen's Land, in 1830. Prepared by J.W. Beattie (1859-1930) whose studio locations were in Elizabeth Street, Hobart from 1891-1920, Murray Street from 1921-40 and Cat and Fiddle Arcade, Hobart, until 1994.
John Watt Beattie
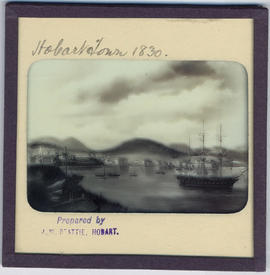
Hobart Town, Van Diemen's Land in 1830
Parte de Walker Family Papers
Lantern slide of early print of Hobart Town, Van Diemen's Land in 1830. From the collection of James Backhouse Walker. Prepared by J.W. Beattie (1859-1930) whose studio locations were in Elizabeth Street, Hobart from 1891-1920, Murray Street from 1921-40 and Cat and Fiddle Arcade, Hobart, until 1994.
John Watt Beattie

Hobart Town, Van Diemen's Land, from Old Wharf in 1839
Parte de Walker Family Papers
Lantern slide of Hobart Town, Van Diemen's Land, from Old Wharf in 1839. From the collection of James Backhouse Walker. Prepared by J.W. Beattie (1859-1930) whose studio locations were in Elizabeth Street, Hobart from 1891-1920, Murray Street from 1921-40 and Cat and Fiddle Arcade, Hobart, until 1994.
John Watt Beattie
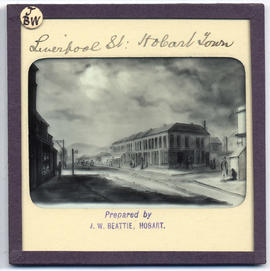
Parte de Walker Family Papers
Lantern slide of Liverpool Street, Hobart. Prepared by J.W. Beattie (1859-1930) whose studio locations were Elizabeth Street, Hobart from 1891-1920, Murray Street from 1921-40 and Cat and Fiddle until 1994.
John Watt Beattie
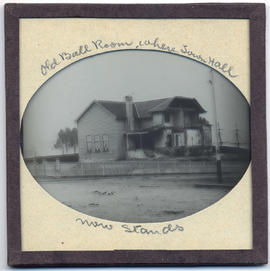
Old Ball Room where Town Hall now stands, Hobart
Parte de Walker Family Papers
Lantern slide from the collection of James Backhouse Walker of the demolition of the old ball room where the Town Hall now stands, Hobart, Tasmania. Thought to have been prepared by J.W. Beattie (1859-1930) whose studio locations were in Elizabeth Street, Hobart from 1891-1920, Murray Street from 1921-40 and Cat and Fiddle Arcade, Hobart, until 1994.
John Watt Beattie
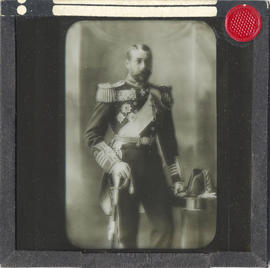
Parte de Walker Family Papers
Lantern Slide of Prince Albert, husband of Queen Victoria, England.
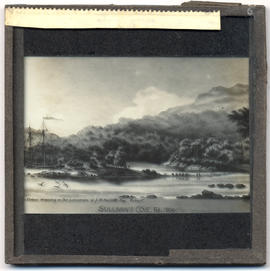
Sullivans Cove, Hobart Town, Van Diemen's Land in 1804
Parte de Walker Family Papers
Lantern slide of Sullivans Cove, Hobart Town, Van Diemen's Land, in February, 1804. Inscribed with the words 'Water colour drawing in the possession of J. B. Walker Esq., Hobart, 1891'.
John Watt Beattie

Tasmanian Aboriginal man Timmy, native of the East Coast, Van Diemen's Land
Parte de Walker Family Papers
Lantern slide of Tasmanian aboriginal man Timmy, native of the East Coast. Prepared by J.W. Beattie (1859-1930) whose studio locations were Elizabeth Street, Hobart from 1891-1920, Murray Street from 1921-40 and Cat and Fiddle until 1994.
John Watt Beattie
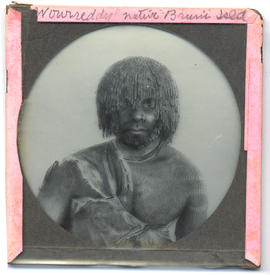
Tasmanian Aboriginal man Woureddy, native of Bruny Island, Van Diemen's Land
Parte de Walker Family Papers
Lantern slide of Tasmanian aboriginal man Woureddy, native of Bruni[Bruny]Island. Prepared by J.W. Beattie (1859-1930) whose studio locations were Elizabeth Street, Hobart from 1891-1920, Murray Street from 1921-40 and Cat and Fiddle until 1994.
John Watt Beattie