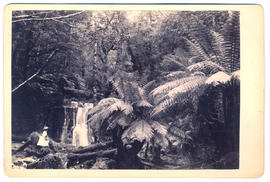
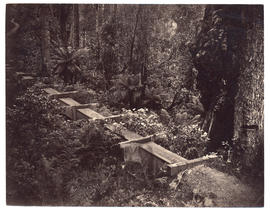
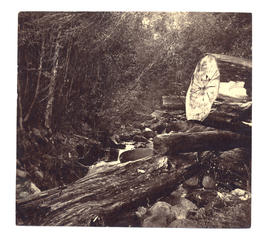
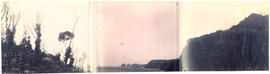
Young lady at Silver Falls, Fern Tree Bower
- AU TAS UTAS SPARC W9-Ph-136-3
- Sub-item
- n.d.
Part of Walker Family Papers
Photographs of Silver Falls, Fern Tree Bower, Mount Wellington showing young lady with a basket
James Backhouse Walker
423 results with digital objects Show results with digital objects
Young lady at Silver Falls, Fern Tree Bower
Part of Walker Family Papers
Photographs of Silver Falls, Fern Tree Bower, Mount Wellington showing young lady with a basket
James Backhouse Walker
Part of Donald Davie Papers
Photograph of young girl (contemporary) in two poses
Young couple with baby : photograph
Part of Donald Davie Papers
Photograph of young couple with baby (contemporary)
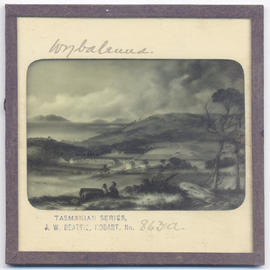
Part of Walker Family Papers
Lantern slide of Wybalena, Flinders Island. Prepared by J.W. Beattie (1859-1930) whose studio locations were Elizabeth Street, Hobart from 1891-1920, Murray Street from 1921-40 and Cat and Fiddle until 1994.
John Watt Beattie
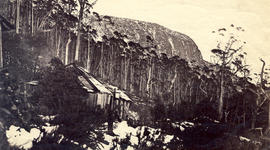
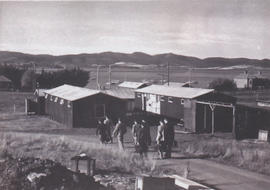
Woods Huts, Mt Wellington in the snow
Part of Walker Family Papers
Photograph of Woods Huts, Mt Wellington in the snow. Organ pipes in distance
James Backhouse Walker
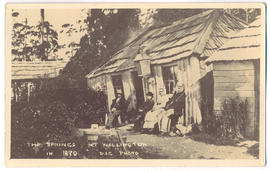
Part of Walker Family Papers
Photograph of Wood's huts at the Springs, Mount Wellington, in 1870 with old couple and younger gentleman and boy sitting outside. On the reverse of the photo post card 'Do you remember them. Huts and old Mr. and Mrs. Wood'.
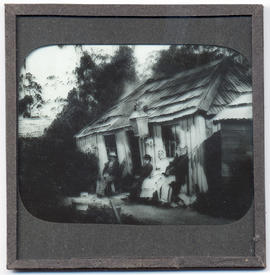
Wood's hut, the Springs, Mount Wellington, Hobart, Tasmania
Part of Walker Family Papers
Lantern slide of Wood's hut, the Springs, Mount Wellington, Hobart. Prepared by J.W. Beattie (1859-1930) whose studio locations were Elizabeth Street, Hobart from 1891-1920, Murray Street from 1921-40 and Cat and Fiddle until 1994.
John Watt Beattie
Part of Clive Samson Collection
Correspondence and information about WOODBROOKE, a 'missionary' college or 'settlement ... designed primarily to give members of the Society of Friends an opportunity of preparing for the variety of service required in the cause of Christ today': letter from the Warden, Henry T. Cadbury, with an application form (l 8/3/40); Sansom's reply (19/3/40); copy of the Prospectus, syllabus and timetable from the Secretary, D. Best, (20/3/40 and 6/4/40).
Clive Sansom
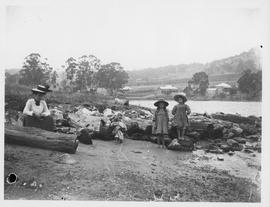
Woman and children on the foreshore
Part of Dennison Collection
Photograph of a woman and three small barefooted girls on the foreshore with logs. Houses and orchards in the background. Thought to be Beltana now Lindisfarne.
Part of Walker Family Papers
Photograph of Wilmot Terrace, Harrington Street (Sandy Bay Road) showing grandmother Mathers house, the furthest in the terrace.
Alfred Winter
William Thomas Napier Champ : photograph
Part of Donald Davie Papers
Photograph of William Thomas Napier Champ, first premier of Tasmania
William Peacock : shingles and nails
Part of Cotton Family Papers
Part of Cotton Family Papers
Extract of a letter , from Francis Cotton on the subject of the death of his cows in Australia. Poisoned by a noxious plant that grows in damp marshy places. Suspected a small fungus that makes the mucus membranes of the stomach peel off.
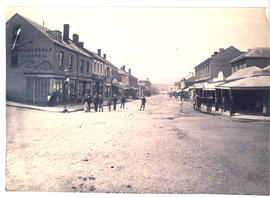
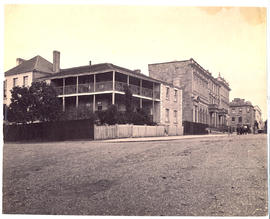
Wholesale & Retail Drapery Warehouse
Part of Walker Family Papers
Photograph of Liverpool Street Hobart with Wholesale & Retail Drapery Warehouse in foreground.
Part of Walker Family Papers
Photograph of Elizabeth Street, Hobart, looking towards the harbour with Westella and the Memorial Congregational Church in the foreground. Taken prior to The photographer was Alfred Winter who had studios in Bathurst, Elizabeth and Liverpool Streets from 1869 until 1891.
Alfred Winter
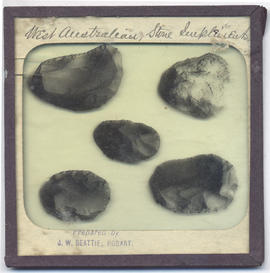
West Australian Aboriginal stone implements
Part of Walker Family Papers
Lantern slide of West Australian aboriginal stone implements. Prepared by J.W. Beattie (1859-1930) whose studio locations were Elizabeth Street, Hobart from 1891-1920, Murray Street from 1921-40 and Cat and Fiddle until 1994.
John Watt Beattie
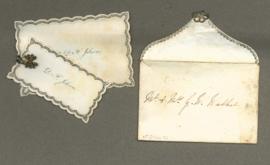
Part of Walker Family Papers
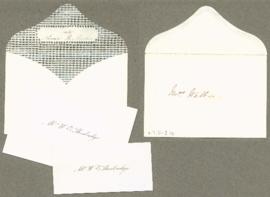
Two wedding cards with decorative scalloped edges attached together with metallic beaded clip, one smaller, inscribed Mrs D.F. Jobson and D.F. Jobson in a silver embossed envelope with decorative seal addressed Mr & Mrs G.W. Walker
Part of Walker Family Papers
Two wedding cards, one smaller, inscribed Mr & Mrs W.E. Shoobridge in envelope addressed Mrs Walker. On verso of envelope flap written nee Annie B Mather.
Part of Walker Family Papers
Photograph of Webb's Hotel, later Hadley's, Murray Street, Hobart, Tasmania, in about 1880. The photographer was Alfred Winter who had studios in Bathurst, Elizabeth and Liverpool Streets from 1869 until 1891.
Alfred Winter
Part of Walker Family Papers
Photograph of Webb's Hotel, later Hadley's, Murray Street, Hobart, in about 1877. The photographer was Henry Hall Baily who had studios in Elizabeth and Liverpool Streets, Hobart, from 1865 until 1918.
Henry Hall Baily
Part of Walker Family Papers
Photograph of Stony Steps or Waterworks Valley, Hobart, Tasmania with Livingstone's house Marydale in the foreground and the Waterworks dam in the background, c.1870.
James Backhouse Walker
Part of Walker Family Papers
Photographs of Waterworks wooden troughing through bush
James Backhouse Walker
Part of Walker Family Papers
Photographs of Waterworks off Huon Road. Flowing stream and felled tree.
James Backhouse Walker
Waterloo House Private Boarding Establishment
Part of Walker Family Papers
Photograph of Waterloo House Private Boarding Establishment on the corner of Murray and Davey Streets, Hobart c.1893 with an electric tram in the background.
Part of Walker Family Papers
Photograph of Waterloo House on the corner of Murray and Davey Streets, Hobart, Tasmania in 1880. The photographers were Anson Brothers whose firm was located in Liverpool, Collins and Elizabeth Streets between 1878 and 1891.
Anson Brothers
Waterloo Hotel, corner Murray and Davey Streets, Hobart, Van Diemen's Land, 1832
Part of Walker Family Papers
Lantern slide of Waterloo Hotel on the corner of Murray and Davey Streets, Hobart - from a painting dated 1832. Renamed Waterloo Tavern in 1842. Prepared by J.W. Beattie (1859-1930) whose studio locations were Elizabeth Street, Hobart from 1891-1920, Murray Street from 1921-40 and Cat and Fiddle until 1994.
John Watt Beattie
Waterfront buildings and Salamanca, Hobart, Tasmania
Part of Walker Family Papers
Lantern slide from the collection of James Backhouse Walker of waterfront buildings and Salamanca, Hobart,Tasmania. Thought to have been prepared by J.W. Beattie (1859-1930) whose studio locations were in Elizabeth Street, Hobart from 1891-1920, Murray Street from 1921-40 and Cat and Fiddle Arcade, Hobart, until 1994.
John Watt Beattie
Part of Walker Family Papers
Panorama from Waterfall Bay to Cape Huay on the Tasman Peninsula. The photographer is John Watt Beattie.
John Watt Beattie
Watercolour of Governor's House at Sydney Port Jackson
Part of Donald Davie Papers
Photograph of watercolour of Governor's House at Sydney Port Jackson, 1791
Part of Walker Family Papers
Photograph of George Washington Walker's drapery shop at 65 Liverpool St., Hobart. The shop also housed the Savings Bank
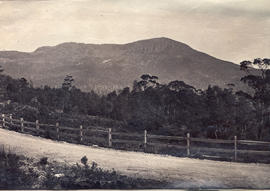
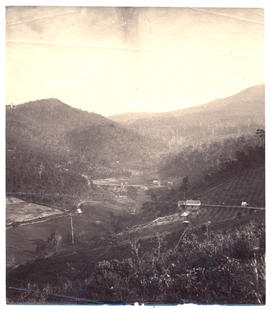
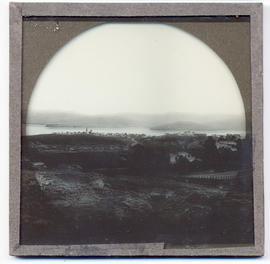
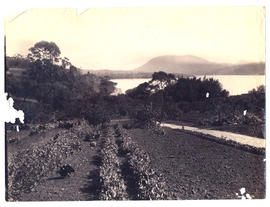
View to Mt Wellington from Huon Road
Part of Walker Family Papers
Photograph of view to Mt Wellington from Huon Road.
James Backhouse Walker

View over the Tamar River to the public baths from Kings Bridge
Part of Dennison Collection
View over the Tamar River, Launceston, from Kings Bridge. Showing the public swimming baths
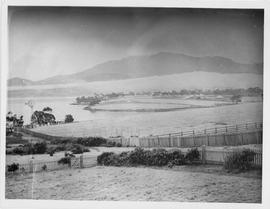
View over Lindisfarne paddocks in the snow
Part of Dennison Collection
View over Lindisfarne paddocks in the snow showing an Aermotor wind-powered water pump
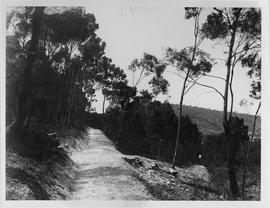
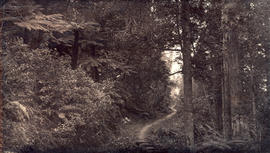
Part of Dennison Collection
Photograph of a hillside track in the bush may be Shag Bay or Natone Hill Track
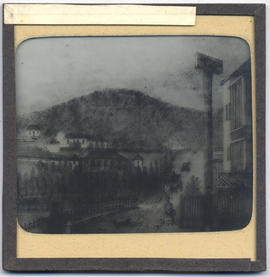
View of the Derwent River, Hobart, Tasmania
Part of Walker Family Papers
Lantern slide of view of the Derwent River, Hobart. Prepared by J.W. Beattie (1859-1930) whose studio locations were Elizabeth Street, Hobart from 1891-1920, Murray Street from 1921-40 and Cat and Fiddle until 1994. 1994.
John Watt Beattie
Part of Dennison Collection
Photograph of houses at Lindisfarne or Geilston Bay taken from hill.
Part of Dennison Collection
View of the Hobart harbour looking from Princes Park showing the cargo ships at Elizabeth Street Pier, MTT bus terminal, RH hospital, transport building, City Hall and Tasmanian Museum
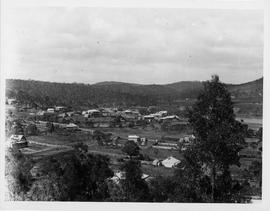
View of Hobart from West Hobart
Part of Walker Family Papers
Photograph from the collection of James Backhouse Walker of a view of Hobart from West Hobart. Looking down Murray & Harrington Streets. The photographer is Henry Hall Baily who had studios in Elizabeth and Liverpool Streets Hobart from 1865 until 1918.
James Backhouse Walker
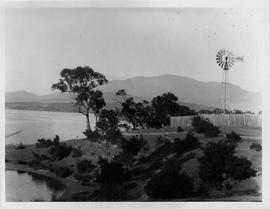
Part of Dennison Collection
View of an Aermotor wind-powered water pump at Lindisfarne on the eastern shore of the Derwent River looking toward Mt. Wellington. James Martin & co. Sydney imported the Chicago-built windmills into Australia between 1895-1913
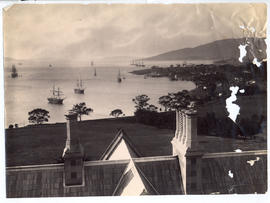
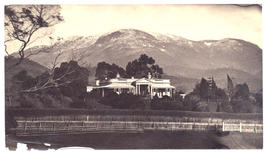
View from the roof of Government House
Part of Walker Family Papers
Photograph of ships on the Derwent River taken from the roof of Government House, Hobart, Tasmania in 1882. The photographer was Henry Hall Baily who had studios in Elizabeth and Liverpool Streets, Hobart from 1865 until 1918.
Henry Hall Baily
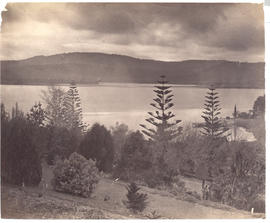
View from the Botanical Gardens
Part of Walker Family Papers
Photograph of view from the Botanical Gardens, Hobart, Tasmania in about 1880. Three Norfolk Island pines dominate the foreground and the view looks out to the River Derwent and Eastern Shore. The photographers were Anson Brothers, whose firm was located in Liverpool, Collins and Elizabeth Streets between 1878 and 1891.
Anson Brothers
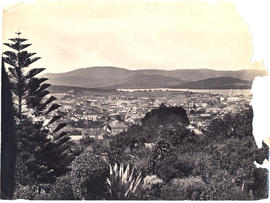
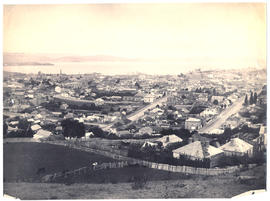
View from Mr. Robert's garden, West Hobart
Part of Walker Family Papers
Photograph from the collection of James Backhouse Walker of a view of Hobart looking towards the Eastern Shore. The panorama has been taken from Mr. Roberts' garden with various shrubs and a Norfolk Island pine in the foreground. Henry Hall Baily is the photographer. He had studios in Elizabeth and Liverpool Streets Hobart from 1865 until 1918.
James Backhouse Walker
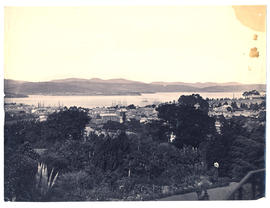
Part of Walker Family Papers
Photograph of view from Government House looking over a vegetable garden and orchard which could either be in the Government House or Botanical Gardens grounds with the River Derwent and Mt. Direction in the background.
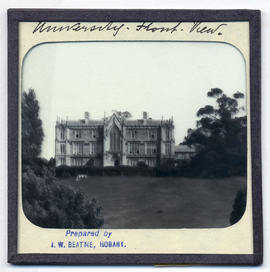
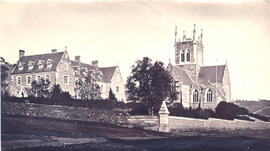
University of Tasmania, Queen's Domain, Hobart, late nineteenth century
Part of Walker Family Papers
Lantern slides of the University of Tasmania, Queen's Domain, Hobart. Views of exterior and laboratories and library. Prepared by J.W. Beattie (1859-1930) whose studio locations were Elizabeth Street, Hobart from 1891-1920, Murray Street from 1921-40 and Cat and Fiddle until 1994 (Collection Pr.S.Uni/1-8)
John Watt Beattie
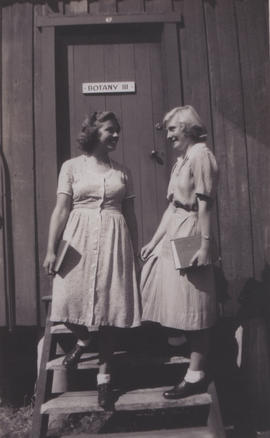
Part of Lindsay Crawford Collection
Photograph of two students believed to be Heather Gulline and Pat Richardson outside the Botany Shed
Part of Clive Samson Collection
Two prose pieces by Sansom: 'A Discussion of Ministry' and 'Sermon in Stones and Trivia on Everything, or Mr Pearsall Smith visits his Chiropodist -a parody'.
Clive Sansom
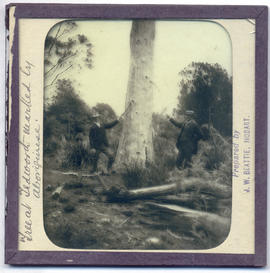
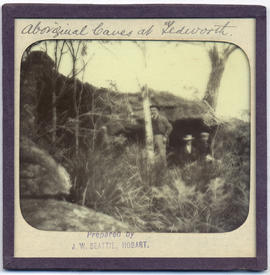
Tree marked by aborigines, Tedworth
Part of Walker Family Papers
Lantern slide of a tree marked by aborigines at Tedworth. Prepared by J.W. Beattie (1859-1930) whose studio locations were Elizabeth Street, Hobart from 1891-1920, Murray Street from 1921-40 and Cat and Fiddle until 1994.
John Watt Beattie
Part of Clive Samson Collection
Documents relating to the Sansoms' travel to Tasmania on the Orion in 1950 including their formal application for a passage on the ship and medical testimonials supporting this.
Clive Sansom
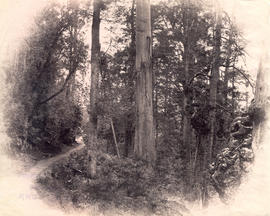
Track to Fern Tree Bower, Mt Wellington
Part of Walker Family Papers
Photograph of the track to Fern Tree Bower, Mount Wellington before taken prior to 1879 by Anson Brothers who had studios in Liverpool, Collins, and Elizabeth Streets between 1878 and 1891.
James Backhouse Walker
Part of Walker Family Papers
Photograph of the track to Fern Tree Bower, Mount Wellington before taken prior to 1870
James Backhouse Walker
Part of Cotton Family Papers
To a sister on the protracted illness of her infant
Part of Cotton Family Papers
Part of Walker Family Papers
Photograph of Thomas Crosby, (head and shoulders) 1880. Carte de visite , by Edward Sands, Melbourne. (see letter to S. B. Walker)
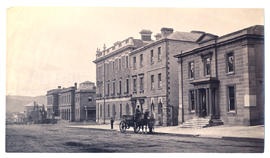
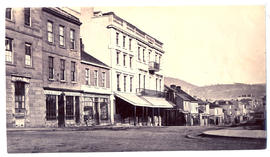
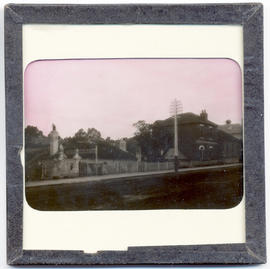
The Tasmanian Club, Macquarie Street, Hobart
Part of Walker Family Papers
Photograph of the Tasmanian Club formally the Derwent Bank, and Walch's building with a landau outside. The Tasmanian Club is a Georgian style building designed by architect James Alexander Thomson and built in 1846 for banker and merchant Captain Charles Swanston as the Derwent Bank. After the depression of the 1840's the Bank went into liquidation and the building was bought by the Tasmania Club in April 1873 and is still their residence today. The Tasmanian Club was established in 1861 in Hobart by seventy gentlemen. It was founded on the 'London pattern', that is, election or exclusion of candidates by ballot. The photographers are Anson Brothers whose firm was located in Liverpool, Collins and Elizabeth Streets between 1878 and 1891.
Anson Brothers
The history of the Van Diemen's Land Company : draft and typescript
Part of Meston Papers
Draft and typescript of chapters 1-5, 7, conclusion and also introduction by K.M. Dallas of "The history of the Van Diemen's Land Company."
Archibald Lawrence Meston
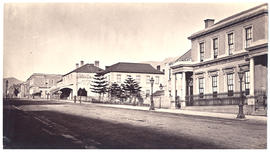
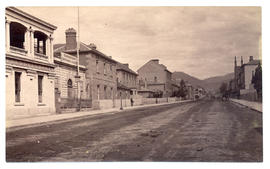
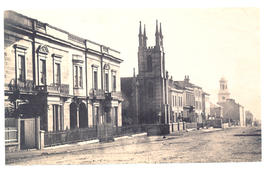
The Bank of Van Diemen's Land and Hobart Town Hotel
Part of Walker Family Papers
Photograph of Macquarie Street Hobart, looking west in about 1870. The Bank of Van Diemen's Land and Hobart Town Hotel are in the foreground. The photographer is Henry Hall Baily who had studios in Elizabeth and Liverpool Streets between 1865 and 1918.
Henry Hall Baily
Part of Marshall and Terry Family Papers
Part of Marshall and Terry Family Papers
Part of Marshall and Terry Family Papers
Part of Walker Family Papers
Lantern slide of aboriginal caves at Tedworth. Prepared by J.W. Beattie (1859-1930) whose studio locations were Elizabeth Street, Hobart from 1891-1920, Murray Street from 1921-40 and Cat and Fiddle until 1994.
John Watt Beattie
Part of Walker Family Papers
Photograph of the first Tasmanian Temperance Alliance building, Macquarie Street Hobart
Henry Hall Baily
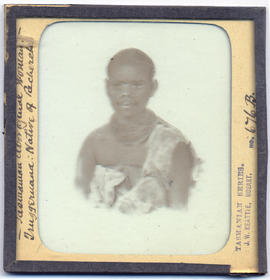
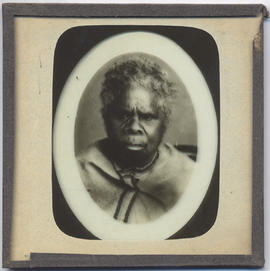
Tasmanian Aboriginal woman Truggeruana, native of Recherche, Van Diemen's Land
Part of Walker Family Papers
Lantern slide of Tasmanian aboriginal woman Truggeruana, native of Recherche. Prepared by J.W. Beattie (1859-1930) whose studio locations were Elizabeth Street, Hobart from 1891-1920, Murray Street from 1921-40 and Cat and Fiddle until 1994
John Watt Beattie
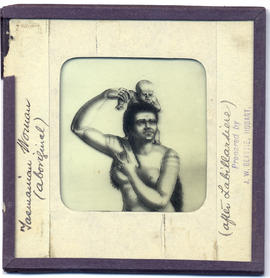
Tasmanian Aboriginal woman and child
Part of Walker Family Papers
Lantern slide of Tasmanian aboriginal woman and child 'after Labillardiere'. Prepared by J.W. Beattie (1859-1930) whose studio locations were Elizabeth Street, Hobart from 1891-1920, Murray Street from 1921-40 and Cat and Fiddle until 1994
John Watt Beattie
Part of Walker Family Papers
Lantern slide of a Tasmanian aboriginal woman. Prepared by J.W. Beattie (1859-1930) whose studio locations were Elizabeth Street, Hobart from 1891-1920, Murray Street from 1921-40 and Cat and Fiddle until 1994.
John Watt Beattie
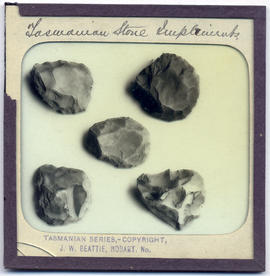
Tasmanian Aboriginal stone implements
Part of Walker Family Papers
Lantern slide of Tasmanian aboriginal stone implements. Prepared by J.W. Beattie (1859-1930) whose studio locations were Elizabeth Street, Hobart from 1891-1920, Murray Street from 1921-40 and Cat and Fiddle until 1994.
John Watt Beattie

Tasmanian Aboriginal Stone Implement Quarry, Plenty River, Van Diemen's Land
Part of Walker Family Papers
Lantern slides of Tasmanian aboriginal stone implement quarry, Plenty river. Prepared by J.W. Beattie (1859-1930) whose studio locations were Elizabeth Street, Hobart from 1891-1920, Murray Street from 1921-40 and Cat and Fiddle until 1994.
John Watt Beattie
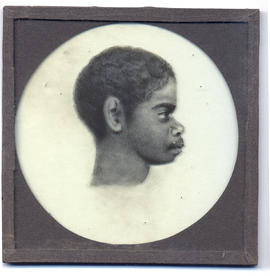
Part of Walker Family Papers
Lantern slide of Tasmanian aboriginal profile. Prepared by J.W. Beattie (1859-1930) whose studio locations were Elizabeth Street, Hobart from 1891-1920, Murray Street from 1921-40 and Cat and Fiddle until 1994.
John Watt Beattie
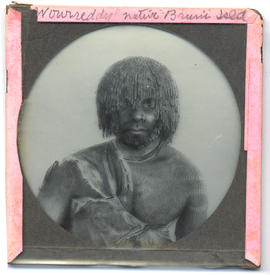
Tasmanian Aboriginal man Woureddy, native of Bruny Island, Van Diemen's Land
Part of Walker Family Papers
Lantern slide of Tasmanian aboriginal man Woureddy, native of Bruni[Bruny]Island. Prepared by J.W. Beattie (1859-1930) whose studio locations were Elizabeth Street, Hobart from 1891-1920, Murray Street from 1921-40 and Cat and Fiddle until 1994.
John Watt Beattie

Tasmanian Aboriginal man Timmy, native of the East Coast, Van Diemen's Land
Part of Walker Family Papers
Lantern slide of Tasmanian aboriginal man Timmy, native of the East Coast. Prepared by J.W. Beattie (1859-1930) whose studio locations were Elizabeth Street, Hobart from 1891-1920, Murray Street from 1921-40 and Cat and Fiddle until 1994.
John Watt Beattie
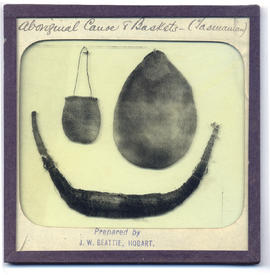
Tasmanian Aboriginal canoe and baskets
Part of Walker Family Papers
Lantern slide of Tasmanian aboriginal canoe and baskets. Prepared by J.W. Beattie (1859-1930) whose studio locations were Elizabeth Street, Hobart from 1891-1920, Murray Street from 1921-40 and Cat and Fiddle until 1994.
John Watt Beattie
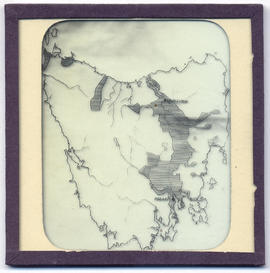
Part of Walker Family Papers
Lantern slide of maps of Tasmania. Prepared by J.W. Beattie (1859-1930) whose studio locations were Elizabeth Street, Hobart from 1891-1920, Murray Street from 1921-40 and Cat and Fiddle until 1994.
John Watt Beattie
Part of Walker Family Papers
Two photographs of Sunnyside, New Town, Tasmania, home of Thomas Daniel Chapman 1815-1884, Politician. Mt Wellington in distance. The photographer was Henry Hall Baily who had studios in Elizabeth and Liverpool Streets, Hobart from 1865 until 1918.
James Backhouse Walker
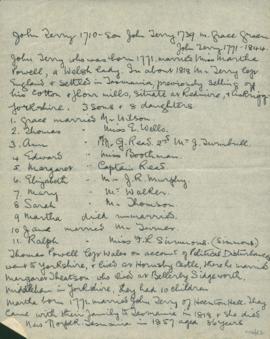
Summary of the Will of James Backhouse Walker, Hobart, Tasmania,
Part of Walker Family Papers 2007
Summary of the Will of James Backhouse Walker with instructions for the disposal of his papers, manuscripts, books, pictures, etc. From Walker Family Scrapbook compiled by Peter Benson Walker. Private collection.
James Backhouse Walker
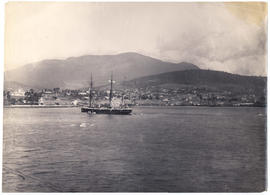
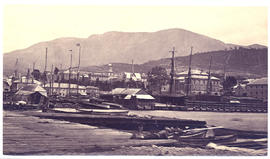
Sullivans Cove, taken from HMS Nelson
Part of Walker Family Papers
Photograph of a ship with Sullivans Cove and Mount Wellington in the background taken from HMS Nelson in 1882. The photographer is Henry Hall Baily who had studios in Elizabeth and Liverpool streets Hobart from 1865 until 1918.
Henry Hall Baily
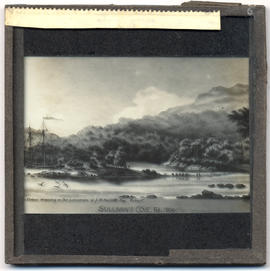
Sullivans Cove, Hobart Town, Van Diemen's Land in 1804
Part of Walker Family Papers
Lantern slide of Sullivans Cove, Hobart Town, Van Diemen's Land, in February, 1804. Inscribed with the words 'Water colour drawing in the possession of J. B. Walker Esq., Hobart, 1891'.
John Watt Beattie
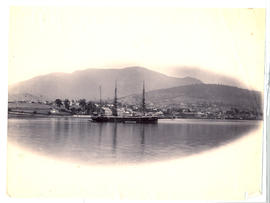
Part of Walker Family Papers
Photograph of Sullivans Cove and Mount Wellington from the water with a three masted ship in foreground.
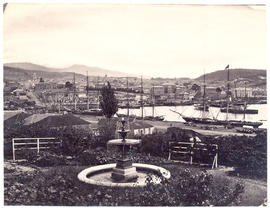
Sullivans Cove from Battery Point
Part of Walker Family Papers
Photograph taken from Battery Point of Sullivans Cove. Taken from a garden with fountain in the foreground. Dated about 1876 and taken by photographer Henry Hall Baily who had studios in Elizabeth and Liverpool Streets, Hobart from 1865 until 1918.
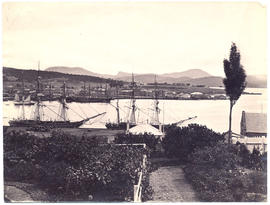
Sullivans Cove and Hunter Island
Part of Walker Family Papers
Photograph of Sullivans Cove and Hunter Island taken from the eastern end of Salamanca with garden in the foreground and two ships alongside the wharf. c.1880
Part of Walker Family Papers
Photograph from the collection of James Backhouse Walker of Sullivan's Cove in about 1870 according to a note on the reverse. Taken from around Victoria Dock, Old St David's cathedral in background. The photographer is Henry Hall Baily who had studios in Elizabeth and Liverpool Streets Hobart from 1865 until 1918.
Henry Hall Baily
Part of Lindsay Crawford Collection
Part of Lindsay Crawford Collection
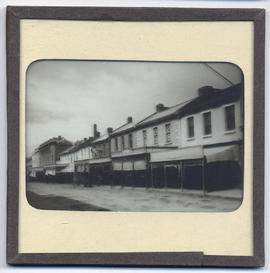
Part of Walker Family Papers
Lantern slide from the collection of James Backhouse Walker of a streetscape in Hobart, Tasmania. Thought to have been prepared by J.W. Beattie (1859-1930) whose studio locations were in Elizabeth Street, Hobart from 1891-1920, Murray Street from 1921-40 and Cat and Fiddle Arcade, Hobart, until 1994.
John Watt Beattie
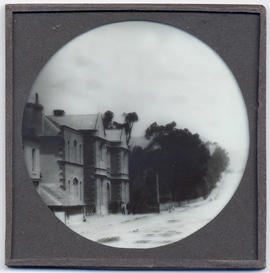
Stonemason's house, Hobart ,Tasmania
Part of Walker Family Papers
Lantern slide from the collection of James Backhouse Walker of Stonemason's house, Hobart, Tasmania. Thought to have been prepared by J.W. Beattie (1859-1930) whose studio locations were in Elizabeth Street, Hobart from 1891-1920, Murray Street from 1921-40 and Cat and Fiddle Arcade, Hobart, until 1994.
John Watt Beattie

Part of Walker Family Papers
Photograph of Sir John Franklin's statue in the fountain, Franklin Square, Hobart.
Staff and students on Sandy Bay campus
Part of Lindsay Crawford Collection
Part of Walker Family Papers
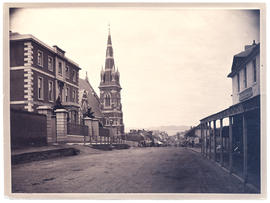
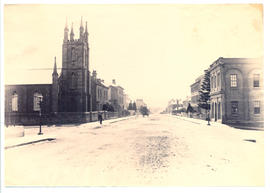
Photograph of St. Mary's Cathedral in Harrington Street in about 1870. Henry Hall Baily is the photographer. He had studios in Elizabeth and Liverpool Streets Hobart from 1865 until 1918.
Henry Hall Baily
St. Joseph's Catholic Church and old St. David's Cathedral
Part of Walker Family Papers
Photograph of St. Joseph's Catholic Church, Macquarie Street, with old St. David's Cathedral in the background, Macquarie Street, Hobart c. 1870.
Part of Walker Family Papers
Photograph of Macquarie Street, Hobart looking east from St. Joseph's Catholic Church, c. 1870.
Henry Hall Baily
Part of Walker Family Papers
Photograph of Macquarie Street Hobart including St. Joseph's Catholic Church c. 1870. The view is looking west. The photographer was Henry Hall Baily who had studios in Elizabeth and Liverpool Streets Hobart from 1865 until 1918.
Henry Hall Baily
Part of Walker Family Papers
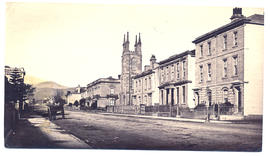
Photograph of St. John's Street, Launceston with St. John's Anglican Church and Chalmers Free Presbyterian Church on opposite sides of the street. The photographer was William Cawston who had studios in Paterson and St. John Streets, Launceston from 1863-1891.
William Cawston

St. John's Church Goulburn Street
Part of Walker Family Papers
Photograph of St. John's Church Goulburn Street, Hobart taken c1880 the photographers were Anson brothers whose firm was located in Liverpool, Collins and Elizabeth Streets between 1878 and 1891
Anson Brothers
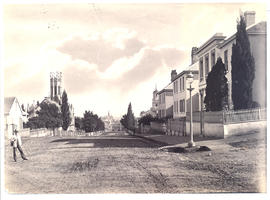
St. David's Park, Davey Street, Hobart, Tasmania
Part of Walker Family Papers
Lantern slide from the collection of James Backhouse Walker of St. David's Park, Davey Street, Hobart, Tasmania. Thought to have been prepared by J.W. Beattie (1859-1930) whose studio locations were in Elizabeth Street, Hobart from 1891-1920, Murray Street from 1921-40 and Cat and Fiddle Arcade, Hobart, until 1994. Quaker Collection.
John Watt Beattie
Part of Clive Samson Collection
Letters and documents about Spiceland Training Centre. Circulars outlining the purpose of the Centre. Sansom' s application to undertake a training course at the Centre. Two letters from the Centre's Warden and typed extracts from 'The Fifty-Fifth Column' the Centre's newsletter compiled by the residents (including Sansom). Further letters from Sansom to the Labour Exchange, Chipping Norton, to 'Peter' describing Spicelands Centre building and the daily routines, and to Mr Foulis about LAMDA matters. Two letters from Jonathon Field to Sansom about plans to jointly operate a market garden at 'Tinker's Orchard'.
Clive Sansom
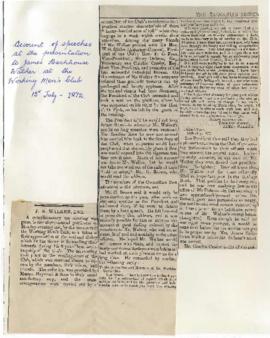
Speeches given to honour James Backhouse Walker at the Working Men's Club
Part of Walker Family Papers 2007
Account in 'The Tasmanian Tribune' of speeches given at the Working Men's Club, Hobart, Tasmania 1872 to honour James Backhouse Walker. From Walker Family Scrapbook compiled by Peter Benson Walker. Private collection.
James Backhouse Walker
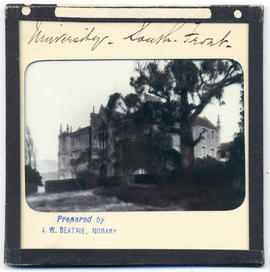
South front, University of Tasmania, Queen's Domain, Hobart, late nineteenth century
Part of Walker Family Papers
Lantern slides of the University of Tasmania, Queen's Domain, Hobart. Views of exterior and laboratories and library. Prepared by J.W. Beattie (1859-1930) whose studio locations were Elizabeth Street, Hobart from 1891-1920, Murray Street from 1921-40 and Cat and Fiddle until 1994 (Collection Pr.S.Uni/1-8)
John Watt Beattie
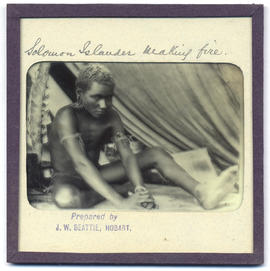
Part of Walker Family Papers
Lantern slide of Solomon Islander making fire. Prepared by J.W. Beattie (1859-1930) whose studio locations were Elizabeth Street, Hobart from 1891-1920, Murray Street from 1921-40 and Cat and Fiddle until 1994.
John Watt Beattie
Sketches from the Calder Papers
Part of Donald Davie Papers
Photograph of three sketches from the Calder Papers : tent, camp and Mt. Olympus. Originals held in the Mitchell Library
Sketch of John Batman : photograph
Part of Donald Davie Papers
Photograph of a sketch of John Batman by Charles Nuttall from old print in possession of his grandson Mr. A.B. Weire.
Inscribed "with the compliments of L. Batman Weire 11.11.34"
Part of Marshall and Terry Family Papers